Showing posts with label string wreath metal die. Show all posts

Sunday, 13 February 2022

Beautiful Mistake part two by Tracey Campbell

Hello everyone, happy Sunday to you all. Here is my latest layout I have created.

The other week I ended up creating this Dream Catcher from a mistake that I made. 
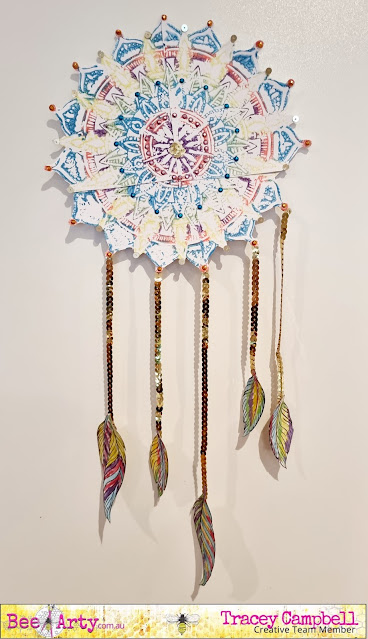
I blogged about it here... if you want to see how I create it. This week I am using the Dream Catcher on a layout and continuing my Beautiful Mistake journey. 
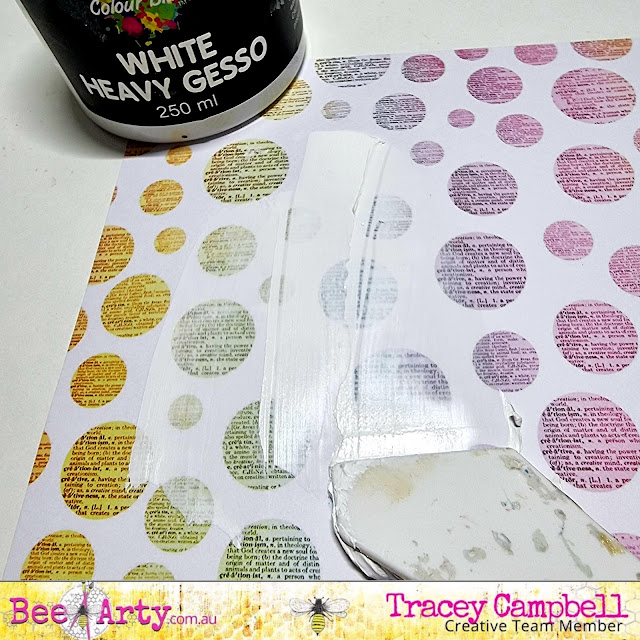
I used the patterned paper with the word circles on from the Arty Farty Collection as my background I applied a layer of Heavy White Gesso to the area where I was going to position the Dream Catcher. 


Applying the Gesso dulls down the printed area of the paper to create a colour block, " a perfect space" to create. The duller background allows the photo or the embellishment to stand out more.


When the gesso was dry, I used some Bling Colour Paste and the Boho Mandal Stencil to add the beading of the Dream Catcher back. When fussing cutting the Mandal out to create a Dream Catcher I had to cut off the vines and beads, as they were way too fiddly for me to cut out. I positioned the beads roughly to the positon where they would have sit fir still attached and where I knew I wanted to glue my Dream Catcher down to, on the background.


I also added the small half mandala from the Boho Mandala Stencil to the right hand side of my background paper.


Here is the positioning of the stencilling with the Bling Colour Paste. I must admit of all the colours of the Colour Paste, the Bling is my favourite, the gold is perfect (not too yellow or dull) and the way it dries makes my heart pitter patter. Once dried I adhered the Dream Catcher over the top, see the final photo for the positioning.


Next I found a photo (4x6 inches) that I thought would suit and cut out 6 different rectangles, the same size of the photo. I also cut out two pieces of vellum the same size. For my papers I used a variety of patterns and colours from the following collections:


Next I distressed the edges of the rectangles with a distressing tool, then screwed them up into loose balls of paper, untangled them and flattened them out. Tip: if you don't have a distressing tool use the edge of a pair of sharp scissors and run the blade across the paper edge but be careful of your fingers. 


Once flat I stacked them under my photo so that at least two of the edges of each rectangle were peaking out. This creates a photo mat with "attitude"  :) it is quiet hight and adds lots of dimension to the layout. Adhere the photo stack to the bottom right hand side of the Dream Catcher. 


To create some addition layouts I tucked in some gold paper doilies and string wreaths that I cut out of some white cardstock with the Sting Wreath metal die. 
I shortened up the gold sequins string, that attached the feather to the Dream Catcher so that they didn't dangle off the page.


Next I cur out a stack of single words from Sweet Talker cut apart in the Bohemian Bliss Collection and distressed the edges. I then adhered them around the layout in random places (see final layout below for positions).


Some close ups.


So I hope I have inspired you to keep going if you make a mistake and not to throw it away, try and create something from it. 

Hugs until next time,
Tracey


Sunday, 21 November 2021

Be Fearless with Belinda Spencer

 Hello Arty Bees!!


It's Belinda here with you today to share my latest layout featuring the stunning Fearless, Brave and Free Collection by Fiona Paltridge.


I started my layout by cropping a sheet of the Positive patterned paper and mounting it on a sheet of the fabulous 350gsm White Cardstock. I love to have a border around my page and also I love the sturdiness this double layer gives. 


Next I grabbed the beautiful Indigo Colour Spray and spritzed some of that on the background. I titled my page and let some drip down in the area where I knew my photo was going to be. The background design on the paper was so nice that it didn't need too much added to it. I didn't want to obliterate what was already there just add a little bit more to it.


Once the layout was dry, I then added some stencilling using the Ecliptic A6 Stencil with Snow White Colour Paste. I applied the paste through the stencil using a palette knife. 
I added some stamping too using the Say It Clear Stamp Set with Archival Ink.


I fussy cut some images from the Fearless, Brave and Free Collection patterned papers. I also used the String Wreath and the Create Metal Dies to add more layers behind my photo. I used the Create die with patterned paper as well as with the white cardstock. One of the die cuts I sprayed with the Indigo Colour Spray. I then layered them together behind my photo.


Finally I added my embellishments, title and quote.

Here's what I used:


Metal Dies:


Thanks so much for stopping by the blog today.

Cheers
Belinda


Monday, 19 July 2021

Catch Up With Mum by Charmane Koch

 Happy Monday People! Although I'm guessing it would feel like Ground Hog Day for a lot of you!

Today I wanted to share with you a layout I created recently for the Scrap the Girls Challenge, using a sketch...

I just love the Grateful Heart Collection & with a few extras I've come up with this layout...


I started off by using the "Family" paper from Grateful Heart


It was a perfect colour match to the photo I was using...

To colour the Mum chipboard, I have gesso'd and then I have coloured with Just Blue Mica Powder with a little water.


I also used the String Wreath Metal Die, by cutting it out with White 350gsm Cardstock & embossing it using Olive Sparkle Embossing Powder - you can find this in the Sweet Stuff Embossing Bundle!


I have also cut out a doily from the Gathers Cut & Colour Paper from the Grateful Heart Collection...


You may also notice that I have used a piece from the Fearless Brave & Free Collection - because the colour matched!

I also decided to make my main paper with the Chic Trendsetter Paper, as the colour of the Houndstooth matched my layout too!

And this is how my layout turned out after adding a few extra bits from my stash and a bit of distressing and machine sewing around the edges...


Nothing like a bit of Mix & Match to come up with this layout!

Thanks for popping by!


XO Charm

Friday, 11 June 2021

Family is Life by Charmane Koch

 Happy Friday Everyone! Today I want to share with you another layout I created at the Bee Arty Retreat using a mix of different Bee Arty products from different collections...

I started off using a Spread Your Wings paper as my base, and using modelling paste I have used the NEW Destination Anywhere Pavement A4 Stencil to create texture to my background. Once dried with a heat gun, I have used Leather Mica Powder mixed in water to colour the "brickwork" of the stencil.


I also coloured the scalloped heart Chipboard using the same Leather Mica Powder.

I also coloured the String Wreath Metal Die {cut from 350gsm White Cardstock} and the "family" chipboard word using Olive Sparkle Embossing Powder {found in the Sweet Stuff Embossing Bundle} 

 The Sweet Floral Metal Die I coloured with Olive Grove Mica Powder for the leaves & Punch Mica Powder for the flowers.


I matted my photos using the back of the Grateful Heart Word Sheet, and then distressed the edges.

I added some kitchen string from top left to bottoms right, paper roses and a Charms Creations Hessian Heart to finish the page off. 


I think the colours really work well together in this layout, and tying different floral elements together made this page work!

I hope that you are inspired and like the outcome as much as I do!


Thanks for popping by...


XO Charm

Monday, 24 May 2021

You have my Heart by Charmane Koch

 Happy Monday Everyone!

Hoping your week will be a wonderful one!

Today I wanted to share with you one of the layouts I created based on a Challenge that we had at the AMAZING Bee Arty Retreat!

Here's a closeup...


We had to use the Love & Grace Elmore paper - which is gorgeous just by itself...


Sorry I don't have any step-by-steps as I didn't take any on retreat! {silly me!}

I however started off by stencilling the gorgeous Rose Reveal stencil from the Love & Grace Range using some modelling paste to the top left & bottom right of the gorgeous designs on the page... I have then quickly dried with a heat gun.


Using Apple of my Eye & Blush Mica Powder I have added water to colour the Rose Reveal stencil, & the White Doily that I have tucked behind the photo.

Before sticking everything down, I also lightly stamped the Memories Stamp which was another requirement for the challenge!

I cut out a few dies using the 350gsm White Cardstock - Runway, String Leaves & String Wreath and then embossed them using Key Lime & Baby Pink from the Mermaid Embossing bundle! Such beautiful colours!


Here are the Dies, Stamp & Stencil I used for this layout:


To finish off my layout I have trimmed the edges and distressed and backed with the fabulous nice and thick 350gsm White Cardstock.

I really love how this page turned out using so many of the AWESOME products at Bee Arty!


Thanks for stopping by and I hope I have inspired you to play today!


XO Charm

Wednesday, 9 December 2020

Shine from within by Linda Pearson

 Hi everyone,  This is my first time posting as a creative team member.  

I have created an art journal page with lots of layers and fussy cutting using a variety of Bee Arty products.  Enjoy! 😉

The following image highlights the Bee Arty products used.


General materials List:

journal book or scrap book page, gesso, paint colours; blue (background), magenta/white, leaf green, payne's grey/white, wet wipes, paper towel, brushes and palette knife, paint wedge or credit card, blending tool or foam sponge, foil card (white and light green) and adhesive.

Bee Arty products:


White cardstock  12" x 12" 350gsm x 1 sheet

My Lady – A4  Stencil Forever my always range

Within 12" x 12" scrapbooking paper  or choose an alternative sentiment for page

String Wreath – Metal Die   Love and grace collection

Bird Talk Metal Die   Spread your wings collection

*Distressed Wings stencil is no longer available.  Alternative options for background stencil:

Rhythm Follow your dreams range

Triangles Forever my always range

Colourblast Paste  -   Envy, Rose Petal and Singing the blues

Dorland’s wax medium


Surface preparation:

Apply a layer of White Heavy Gesso over page, dry off.

Apply light blue background colour over the page, dry off.


Using the *distressed wings (or alternative) stencil rub White Heavy Gesso through the stencil using a blending tool or foam sponge.


Using the same *distressed stencil (or alternative) stencil apply Colourblast Paste - singing the blues through the stencil randomly over the page, allow to dry.


Mix a touch of white paint into payne's grey to lighten a little, then using the artist's wedge (or credit card) dipped in paint add random broken lines over the surface and border also, dry off.


Using a blending tool and black archival ink rub the ink with blending tool through the stencil onto the White cardstock.  Please note: only use the floral sprays (tape off the lady's face with masking tape) in the print.  Try to fit 2 onto the one sheet of White cardstock.


Painting the flowers; use 2 shades of leaf green paint to loosely fill in leaves.  
Please note: I painted up 2 coloured sprays of flowers and left one spray of flowers with no colour.  
Paint the flower petals in 2 shades of light magenta as base colour.  Allow to dry.


With a brush load up some Colourblast Paste in Envy add thick texture to the leaves with the paste.  Repeat for the flower petals using Colourblast Paste in Rose Petal, apply loosely and thickly over parts of the petals allowing some of the background colour to show through.  Allow to dry.


Fussy cut the sprays of flowers as closely as you can (I chose to leave a tiny white outline around the shapes so I didn't have to highlight the shapes later on).  


Cut shapes using the die cuts 
String Wreath – Metal Die from the foil card (2 from each colour).
Using off cut from centre of wreath die cut out the Bird Talk Metal Die (you may not use all the diecut shapes, depends on the size of your page.

For this page I cut some of the words from the Within scrapbook page ... but you may choose to use your own sentiment.


Layout all the cut out sprays of flowers, string wreaths, birds and words onto page.  Arrange the layers to your taste.  I cut a couple of the leaves off and did not use one of the coloured sprays and a white string wreath.  Again it depends on the size of your page to determine how much you use.
When you're happy with layout, adhere all the elements onto the background page.

Finally,  apply a little Dorland’s wax medium over the areas with Colourblast Paste this help to protect your artwork from sticking to other pages.