Tuesday 31 May 2016

BONUS Card Share by Krisy Podolak

BONUS! This month has me having a third share - Just the way it all works out with weeks, leap years and stuff so, I decided I wanted to share something that I create to actually use.  This is not an off the page project that I will shove in the back of the cupboard. It is a card that my husband requested I make for one of his collegues who had recently become engaged.  By recently I mean over Christmas some time but hubby failed to mention it until the engagement invitation came home three and a half months later.  (Yes, it was like a kid pulling out the note about a bring a plate to share lunch - the next day.) To make it worse, between the event and the invitation, I had spoken with both the collegue and partner a number of times.  (Insert wide eyed emoticon here)

So, this card is quite simple in comparison to some of the other stuff I do and the other Design Team members but I wanted it to make a point.  I wanted to remind everyone that if you have ANY Colour Blast products in your stash to pull them out and actually use them.  It doesn't have to be technical.  The product is beautiful and will shine on any project.

For this card I had a few different ideas.  If you have access to the YouTube video you can watch me explore these before I settle on the final idea.  For the finished card, I use Colour Blast Paste in BLING to create a background for a simple stick figure drawing. It turned out so well and by chance it matched the engaged couples "theme" of kissing stick people. (This was on their cake and the stubby coolers they handed out to everyone)


I even kept the inside very simple - just stamping the sentiment - "he put a ring on it".


My tip for something so simple is to make sure you finish everything.  Little things like inking the edges of the papers, mounting your layers or not having glue spilling out from under your embellishments make a big difference to the over all finished product.

I'm not going to give you a step by step because by looking at it you'll be able to work out how to put this together.  Remember not to be afraid to go back to basics - A handmade card has more love that a store bought one!  Incase your wondering this heart stencil is from Flutterby Designs.

There is a process video so you can see what I mean by exploring other ideas.  You might like some of the other ideas and give them a go on your own projects.  You can check it out here.


Monday 30 May 2016

Remember This by Nirvana

Hi,

Today I made you a small tutorial in photo,

On my page of Art Journal, I spread a thick layer of gesso.


Next I sprayed the page with Colour Shimmer Spray in Steel.


Then I spread Steel Colour Paste on a stencil, just a little everywhere.


Then I sprayed Lovely Lilac  Colour Shimmer Spray almost everywhere.


Finally, I stuck my embellishments.


Thanks for stopping by,

Nirvana


Sunday 29 May 2016

Butterfly Canvas by Elisa Ablett

Hi everyone!!

Happy Sunday again, grab a cuppa and sit down with me as I share my canvas tutorial.

Just sharing the Butterfly Canvas I created using the awesome Colour Blast Pastes and Shimmer Sprays which can be found here - http://www.colourblastaust.com.au/

The colours that I used include the following - Pastes : Just Blue, Lipstick, Bling and Sprays: Lipstick, Just Blue, Bling, Envy, Deep Water and Royalty.


Let's get started!! Firstly I used a 12 x 12 canvas primed with gesso and lightly sketched a large butterfly, I then rifled through my stencil stash as you can see below and grabbed out a handful of my favourite stencils and of course ...selected the Colour Blast Pastes and sprays that I wanted to use.


Next Step! using Bling Paste and a spatula or palette knife spread your Paste through your stencil on even sides of the butterfly.


Then once dry thoroughly, select another larger stencil and add different colour Pastes using a palette knife, I used Lipstick and Just Blue !


Once your Paste is dry on both sides of the butterfly, take the tops off your co-ordinating sprays and using a paintbrush fill in your butterfly shape using the liquid from the spray bottles as per the photo's above and below.


After I coloured in the butterfly with the co-ordinating sprays to the Pastes I gathered together a few more shimmer sprays to add some more COLOUR!! because by now you should know that I love colour :-) I used Envy, Deep Water, Royalty and Snow White sprays to add more colour to my Butterfly using a paintbrush. I was looking for a watercolour tye-dyed or batik effect.


The finishing touches! as from the photo above you can see I added splashes of bling Shimmer Spray in splats and splotches (totally a technique don't knock it til you try it!) also I added a few dots of an metallic acrylic ink by Daler Rowney which has a thick consistancy, you could probably use a white acrylic paint instead in this part. I dotted the ink on the edges of the butterfly wings and used the bottom of my paint brush to drag the colour out into stripes. Also as you can see from the photo below, part of my finishing touches include using an embossing dauber from Ranger which i dobbed a few dots in the middle of my butterfly and embossed them with Envy, Lipstick, Just Blue, Bling and Royalty Embossing Powders. Also to add some texture and added interest I decided to use rough hessian twine and twirl it into circles as the butterfly body and also on the wings. 


From the photo below you can see some close ups of the twine circles. I used a high tack glue by Helmar to stick them onto the Canvas.


After the canvas had dried completely, I couldn't help myself so I added some MORE! I used a white paint marker pen by Sharpie and traced around the circles and the twine circles, and then used a black thin marker pen to trace unevenly around the Butterfly. And then added some splashes of Envy spray and Bling Spray around the Butterfly to create a  slight shading effect.


Just showing a great close up of the shimmer and shine of the Pastes and Sprays, sometimes its hard to get the right lighting when taking the photos so that we can show you the amazing shimmer and shine from the products so I like to get a few 'along the way' close up's to show what the Canvas is really like in the right light.

Well that's it for me today, I hope you have enjoyed the tutorial and my Canvas but better yet I have shown you another great way to create using Colour Blast Products.

Thanks Elisa xx


Saturday 28 May 2016

'You're Weird I Like It' By Anita Rodway

Hi There Colour Blasters!!

I'm back to share a little layout I created the other week at a retreat.
This one is SUPER easy to create - let me tell you how....

'You're Weird I Like It'

Using some 'Marshmellow' Bazzill Cardstock, I put down a layer of gesso & with one of my
old (kinda hard) brushes, I dragged it through to add some texture to the gesso.

I then used some clear 'Glass Bead Gel' through a Flutterby stencil.
This media dries really cool.


 Then it was time for some Colour Blast Paste!!
I've used 'Envy' in this. I put a blob of it on my craft mat & watered it down.
Using a paintbrush, I applied in areas to my background. Using a water spray bottle,
I can spray different parts & moving my cardstock around - I can achieve nice movement
throughout my background.

I gave that a quick dry & used the left overs on my mat with a smallish paint brush,
do add 'flicks' to my layout.


I finished my layout off with some simple embellishments.
Firstly a large open cutfile, an foiled ampersand, my photos, some word stickers,
thread & a flair button :)

My little girl is the cheekiest kid ever!!
These faces she's pulled are priceless LOL


You can find all the Colour Blast products here

See you soon
Anita!


Friday 27 May 2016

Noted: Awesome by Melissa Struhs


Surely we have run out of ideas to use our Colour Blast for by now? Absoloutely not!
I have so many combinations of colours that I am desperately wanting to use together. I tend to have lots of random photo's left over from other layouts at the moment....somehow they seem to be of the manchild in front of graffiti walls too. But the colours are screaming to be teamed with our favourite mixed media products. So why fight it?
This unusual combo features all of the 3 green pastes in the collection.


Starting on a piece of black cardstock, I have added some random layers of mesh joining tape around some of the edges.


This was a little bit of an experiment to see how it would turn out, if I lay a stencil over the top and applied the paste....fingers crossed!


I used "Deep Water" paste and applied it with a palette knife.


It perhaps wasn't the clearest of looks but I really like how the tape created some unexpected messy spots.


Another layer, another stencil and another paste colour, this time in "Apple of my Eye".


As beautiful as it looks as a brick pattern,


a little Black Staz on ink and crackle stamp


can add some much needed character to an otherwise repetitive look. Love that it stays glossy looking on the Colour Blast paste and a matt finish on the distressed patterned paper.


And finally, the last of the green collection, this is "Envy" used through a splatter stencil and on a fairly similar coloured paper. It created more of a watermark effect, making it a little more subtle than the others.


As all of the layers began to build up, you can really see the impact all 3 colours  makes without even mixing any of them together.


There are very few embellishments added, a simple strip of film strip tape


held in place with some hand stitching, wood veneer and chipboard pieces finish it all off.

Make sure you drop by the website www.colourblastaust.com.au and Facebook page to keep up with all that is happening for Colour Blast in the coming months!

Thanks for stopping by,
Melissa


Thursday 26 May 2016

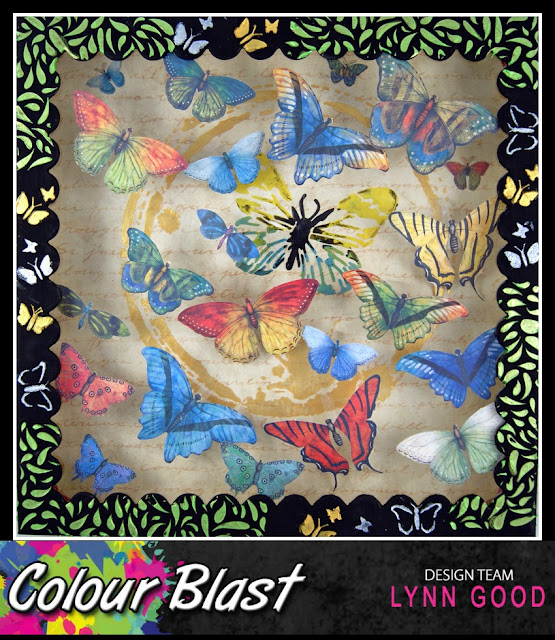
Butterfly Box - by Lynn Good

Hi everyone, Lynn here to show you how I transformed a display box that I had sitting in my cupboard since ... forever!!


I painted the entire box with two coats of black gesso.


I used a Hero Arts stencil and Colour Blast paste - Apple of my eye, around the edges and sides of the box.


I filled in the gaps using an Art C stencil and Colour Blast Paste - Bling and Snow White

For the centre of the box I used a Crafters Workshop stencil - Butterfly Collage and Colour Paste - Bling, Singin the Blues, Sunshine and Dusty Charcoal.


I then mounted butterflies onto strips of acetate that I bend so the butterflies were in a 3D effect.


Some Close ups :


Thanks for stopping by and I have provided a link to the products used at the bottom of this post.

Til next time Happy Crafting :)