Showing posts with label Colour Shimmer Spray. Show all posts

Friday, 19 August 2022

Fireworks Waikiki Beach by Tracey Campbell

 Aloha my creative Bee Arty crew, it is Tracey Campbell here with my latest Creative Team project to share with you. I have recently been away on two weeks holiday with my family, we had a great time in Hawaii and one of the highlights were the Friday night Fireworks on Waikiki Beach. I managed to get a few photos which I jsut knew I had to team with the Bee Arty Fireworks collection.

Fireworks on Waikiki Beach


To start off my layout I cut three of the cards from the Showtime paper from the Fireworks Collection. As I was scrapping my fireworks photos I picked the two cards with the fireworks on them and used a craft knife to cut out the image where it overlapped with the white space. 


I then slipped the photos under the cut out firework so that it sits overlapping the photo. 


Cut two strips of patterned paper. The first strip needs to be12 inches by 1 cm in length from the Magical patterned paper.  The second strip should be 12 inches by 3 cms from the Bonfire patterned paper. Run the strips along the righthand side of a 12x12 sheet of white cardstock. 


Using the Fireworks stencil, three coloured inks that matches the patterned papers and a dauber, ink the image. 


This is how the stencilled image looks with the three colours daubed through it.


For the second image I used a baby wipe and spread the excess ink from the first image through the stencil onto the cardstock. 


This creates a dull faded image, as you can see in the photo above.


Next use the straw from a bottle of Sunshine Colour Shimmer Spray and flick some droplets over the stencilled fireworks.


This is how the background looks after the Colour Shimmer Spray is dry.


Next fussy cut the letters of the title from the Alphabet patterned paper, the word "Fireworks" from the Colourful patterned paper and the fireworks from the Bunting patterned paper.


Arrange the photos and fussy cut elements so that it reflects the final layout.

Using the cards as mats for photos is a quick and effective way to use them in your scrapbooking layouts. Mahalo for stopping by and I hope that I have given you a bit of inspiration.

Hugs 
Tracey


Sunday, 13 March 2022

Breathe by Tracey Campbell

 Hello Bee Arty Peeps, it is Tracey Campbell here today with another Creative Team creation to share. I decided to give the Bee Arty Creative Hive (Facebook Groups) Monthly Challenge a go. The cool fresh colours and beautiful sketch made me wish for crisp spring mornings in this dreary wet weather we are having. I am in New South Wales and we have had two weeks of rain, with for to come, there is flooding and mud slides happening around us. So retreating into my creative zone with this months challenge was a great way to escape. 

Here is the sketch and colour combo for the March Challenge, no you don't have to use both, but I have. You can find the challenge here: Bee Arty Creative Hive


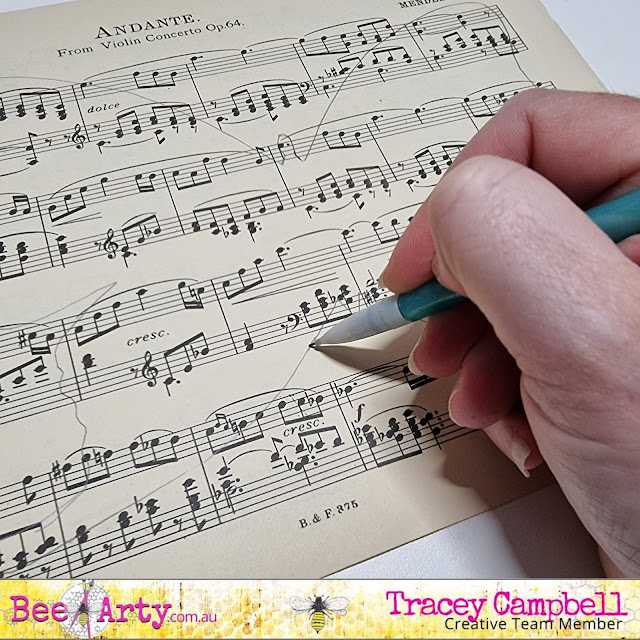
To start with I drew an outline of butterfly onto some sheet music.

Next I fussy cut the hand drawn butterfly and two butterflies from the Turning cut-a-part sheet in the Embrace Change collection


With a paint brush paint Tangareen Dream Colour Shimmer Spray in the centre of Steel Plate pattern paper from the Graffiti Grunge Collection. Graffiti Grunge is an older collection that is full of fun surprising papers that are great a starting place for messy backgrounds and perfect to represent the grey from the colour challenge for this creation.


Next I spread some Apple of My Eye Colour Paste through the Party Lights stencil. I repositioned the stencil so that the leaves ran off in three different directions, pointing towards the top left and top right corners and then bottom left hand corner. See the photo below to see the positioning. Once it was dry I repeated the stencilling process with Lemon Zing Colour Paste. Sorry I didn't take a photo with the Lemon Zing stencilling at this stage, but you can slightly see the two over lapping colours in the final layout, it is very subtle.


When the Colour Paste was dry I used the straw from the bottle of Stormy Weather Colour Shimmer Spray to splatter drops of the stray across the page.


To add the line boarder that is on the sketch I used a fine paint brush and some Stormy Weather Colour Shimmer Cube to paint the outline around the very edge of the base. Note: the Colour Shimmer Cubes are no longer available in the store as but you can substitute this part by using a thin paint brush and the Colour Shimmer Spray. If you choose to do this, don't shake up the bottle of the Shimmer Spray dip the brush in to get the thick sediment that settles on the bottom. It will give you a great amount of media to paint at the right consistency. If you do shake it up, then you will have to apply a few coats over the outline, letting to dry between each application. 


The photo below is how my base looked before adding the photo, title and embellishments.


Next while waiting for the Colour Shimmer Spray and Cube to dry I fussy cut a title and a few words. One of the great things of the Bee Arty Collections is that you can mix and match things from a few different collection. Here I have fussy cut from:
The word "Breathe" from the Breathe patterned paper in the Find Paradise Collection, the words "I Love You Even When You Do Dumb Stuff" from the Love Letter patterned paper in the Chit Chat Collection and the words "Happy Memories" from the Love patterned paper from the Love and Grace Collection.


Next I double matted my photo, I did a thin 2 mm mat with the blue side of the Journey patterned paper from the Aim High Collection and then a 7 mm mat with some of the lime green tones found in the Arty Farty Collection. 


I then adhered the music sheet butterfly in roughly the same position as on the sketch onto my base. Then stuck the matted photo down overlapping the butterfly. At this stage as I was embellishing with the fussy cut butterflies from the Embrace Change collection I decided that they were a bit dark and I wanted to add a pop of colour. So I pulled out some of my very ignored butterfly punches and punched out some from the blue and lime green paper that I used before to mat the photo. Tip: If you don't have butterfly punches you could always stamp the butterflies and emboss them to the colour you want. The Bee Arty Beautiful Butterflies Stamp/Die Set would be perfect for this and at only $10 (available at the time of this post) it is an absolute steal. 


I finished off the layout with some yellow and orange twine tied in bows and adhered the fussy cut words down.


Thanks for popping in and I hope I have inspired you to give the challenge a go and to pull out those collections you and an mix and match.

Hugs
Tracey


Sunday, 27 February 2022

Love This by Tracey Campbell

Hello everyone, Tracey Campbell back again to share with you today. Did you know that Bee Arty has a monthly challenge? You didn't !! Well if you would like to find it head to the Bee Arty Hive on Facebook, here you will find the challenge along with all sorts of inspiration from the Creative and Design Teams, beautiful layouts that the members of the Hive have done, along with a group of friendly lovely people ready to say hello and welcome you.  I used the Bee Arty February Challenge as inspiration for my layout, so grab a cuppa and sit back with me as I take you though my process.

The February Challenge was a sketch challenge with beautiful hues of purple. Now you do now have to use both the sketch and the colour palette together if it is too challenge. You can simply do the sketch or just use the colours. The choice is yours.
I deicide to give both a go.
I started by going through my stack of Bee Arty paper supplies to see what purples I had. I found lots of smaller pieces of  paper left over from the Trend Setter Collection and a piece of Symbolic from the Three Six Five Collection but I didn't find a complete 12x12 for the background so I had to create one.
To do this I took out a piece of  White Cardstock, the Vamp and Basket Background stamps
Using a clear Embossing Ink stamp the large image from the Vamp stamp set onto the centre of the white cardstock, the repeat so that the image spread across the base. See the photo below for the final placement of the stamping. You will only be able to see a slight image of the stamp at this stage, I have already applied Embossing Powder to this image below. Which is the next step I will take you through.
One at a time sprinkle some Colour Blast Embossing Powder randomly over the wet Embossing Ink and tip the excess back into the pots. I used Lovely Lilac, Blush and Rose Petal, all three colours beautifully match the colour selection for the challenge. Remember to sprinkle, then tip off the excess. Do not do another colour until you have tipped off the first colour or you will mix up the colours of the remaining Embossing Powders.
Next use a heat gun and activate the Embossing Powders. You will create a stamped background that has the image with various colours through it. 
Next use a purple ink and stamp the crosshatched flower image from the Basket Background stamp over the top of the Embossed Vamp image. Tip: I have actually cut the rectangle boarder off from the Basket Background creating two separate stamps. I did this simply by pushing through a very pointed pair of scissors through the blank corner of the stamp and cut around the Basket Background, being very careful where the two images get very close to each other. It can be a bit scary doing this but it gives you more flexibility with the stamp - creating two from one.
Next I used Lovely Lilac Colour Shimmer Spray and squirted it around the page. Hint: When using the Shimmer Sprays if you press the squirt head down slowly it creates large drops, when you press fast it created a fine spray.
The photo below is how the back ground looked after I had finished spraying the Lilac Colour Shimmer Spray on it.

I felt it need a bit more contrast to the background so when dry I took the lid off the Royalty Shimmer Spray and flicked drops of it across the page using the straw as the tool to create droplets.
Here is the final background. 
Next I cut and tore two pieces of the purple papers from the Trendsetter and Three Six Five collections. I left straight edges on the top and left hand side of the paper and tore the edges of the right and bottom edges. I then used the Vamp stamp set and the Rose Petal Embossing Powder to stamp the left and bottom of the rough rectangles and set it with a heat gun.
I then adhered the paper rectangles together, overlapping the bottom right corner of one and the top left corner of the other. I repeated this and adhered the photos the same way. This created a funky shaped photo mat.
I then glued the matted photos to the background, see the final layout for the positioning. The next step was to create a rectangle boarder around the photos.
To do this I used the rectangle edge from the Basket Background stamp. I covered up my photos with some scraps of cardstock, so that they wouldn't get any ink on them. I then used some purple ink and stamped the rectangle around both photos. 
I then decided that the background didn't look complete I felt it need a bit more of a mulberry colour to it to complement the colour palette in the challenge. So I mixed my own colour using two Colour Blast Colour Sprays. I poured a small amount of Bubblegum Colour Spray into a container then added two tiny drops of Indigo Colour Spray. I mixed them well and added a boarder around the very edge of my base. I then added a drop of the liquid to the edge and blew through a straw to make the liquid spread out across the cardstock. 
I embellished the layout by adding some paper flowers.
The final step was to add a title. 
I am happy with how it has turned out, I do know I need some more purple tones and hues in my scrapping supply for the future as I am now out of them. They are not usually a colour I use much but I really like the monochromatic way it all looks.
Thanks for stopping by.
Hugs
Tracey


Saturday, 20 March 2021

You Amaze Me by Tracey Campbell

Hello everyone, Tracey Campbell here with with my latest 12x12 layout using awesome Colour Blast by Bee Arty products. Do you ever set yourself a challenge? If I'm in a scrapping rut or finding myself without any mojo I set myself a challenge. As I have been busy with work and with my family I have found that my mojo is lacking so it was self challenge time..... "The Three Challenge". Pick three pattern papers, three stencils and three stamps and use them on a page. I picked the following materials to start my self challenge with from the Bee Arty range:

Stamp Sets: Meridian, Cool Words and Fearless

Stencils: Organised Chaos, Keep Going and Encircled

Patterned Papers: Transform, Fearless, Brave & Free, and Strength 


So this is what I did to create my layout. Fussy cut a few squares, triangles and a circle from the Fearless, Brave and Free patterned paper.  Chose and cut out a word title, I picked You Amaze Me. 
Place the Organised Chaos Stencil over the top of the Transform patterned paper spray the image using Envy and Singin The Blues Shimmer Spray. I sprayed the centre of the stencil with the Singin The Blues colour and used Envy on the outer edges.  Tip: place scrap paper over laying the edges of the stencil so that you do not get spray over the stencil to avoid the straight edges on your patterned paper. 

I sprayed in two parts, the top of the page first, then cleaned off the stencil and did the bottom half of the paper. Tip: Flip the stencil while it is still wet with spray onto another sheet of paper of some cardstock to get a reverse image to use as a starting point for another layout.  The photo below shows the imprint left from spaying the Shimmer Sprays on to the patterned paper. 

Using Stormy Weather Embossing Powder, the Meridian stamp and an embossing ink stamp down the right side of the of the patterned paper. 

Set with a heat tool.

Now more stencilling, grab some Heavy Black Gesso, a palette knife and the Encircled stencil. Position the stencil so that it run vertically down the right hand side of the page over lapping the embossing and spray images already on the paper. Spread the Gesso through with a palette knife. 


Flip the stencil and run the lines of the stencil horizontally across the paper, but only stencil half of the image. Set aside to dry.


Use the Strength patterned paper and mat two 3x4 inch portrait photos. Use black ink and stamp the Cool Words down the page running them over the top of the mixed media work you have already done. I apologise that I did not take a photo of me doing this, but you can see the position of the Cool Words in the finished layout. 


Finish off the layout by adhering the photos in the centre of the page where the lines of the Encircled stencil work intersect. Stick with white glue the triangles, squares and the circle so that they overlap with each other (shape cluster) and tuck them under the top left, top right and bottom right corners of the photos.
Adhere the title over the top of the top right hand shape cluster.  
Use a black Sharpie pen and add a bit of journalling and a circle and line boarder around the outer edge of the layout. 


Here are a few close ups.


The finished layout, a colourful funky layout of my youngest daughter just after her Colour Run at school.


If you have scrolled back to the start of my post to see the list of the 3 stamps, the 3 stencil and the 3 papers to see if I did actually use them all..... well I can say that I came close. I didn't end up using one stamp set and one stencil!! :) I got to the stage where I was happy with the layout and felt it was complete without using them all so I just popped them to the side, after all the really challenge was to find my mojo and I think I found it. I hope that I have given you an idea on how to help yourself of a scrapping rut when mojo is low. Let me know if this works for you. 

Hug
Tracey