Wednesday 29 July 2020

Rainbow Artist Ink Card Set by Julie Schinkel

Hi everyone, today I'm back on the blog sharing a set of cards I have made using various Bee Arty dies. I can't ever just make one card as I have so many ideas and want to do them all at the same time, so I usually end up making a set. I should warn you though, there is A LOT of die cutting in this project. Great to do if you're watching TV or don't have a lot of creative mojo.


The card bases are all A2 size - 4.25" x 5.5" cut from black cardstock. The white layers are all cut to 1/8 of an inch smaller. The backgrounds are made using Colour Blast Artist Inks and water layered at different stages to get different effects.


These are all of the die cuts used to make each background.


These are the die cuts you'll need to embellish each card. Each embellishment has been die cut three times from white cardstock and adhered together. I have used the same colours to paint the die cuts according to each card. Then to add some shimmer and shine I've used the Colour Blast clear shimmer pen and some Glossy Accents. For the sentiments, I've just used some from various stamp sets that I had on my table at the time.

*At the time of photographing I was planning to use all three flowers from the "Flowers of Paradise" die set but only used the medium flower. The Flower Power die cuts are also missing from the photo as at that stage I hadn't planned on using them.


Here are my cards plus a list of products used on each card so you can recreate them.

Products Used:
Background - Honeycomb Metal Die
Embellishments - My Flower Metal Die

Products Used:
Background - Brick & Wall Metal Die*
Embellishments - Desire Metal Die

Products Used:
Embellishments - Flowers Metal Die

Products Used:
Embellishments - Sweet Floral Metal Die

Products Used:
Background - Linked In Metal Die
Embellishments - Flowers of Paradise and Leaves of Paradise Metal Dies

Products Used:
Background - Web Metal Die
Embellishments - Flower Power Metal Die

Other Products Used:
Black cardstock
White cardstock
Glossy Acents
Sentiments used from various stamp sets from personal stash

I hope you enjoyed this project. Thanks for stopping by.
Until next time, happy crafting.
Julie xx


Tuesday 28 July 2020

Tick Tock - With Karyn Schultz!

Hi Bee Arty Lovelies!

It's Karyn here and today I have a scrapbook page to share with you made using lots of amazing products from Bee Arty!


I'm a huge fan of using white cardstock for the base of my scrapbook pages. I use lots of white cardstock so I'm always looking out for great quality thick white cardstock at a great price. Bee Arty has the most amazing white cardstock 350gsm 10pack for $8. I've ordered some but it didnt arrive in time for this project so I had to use a different brand cardstock that wasnt really the best for this project (as you can see from all the buckling), but it did the job.

I decided to use Colour Mica Powders to create a background for this project. I only have a few colours at the moment - but I have ordered more! I'm using Leather, Bling, and Deep Water Colour Mica Powders to coordinate with the Time Flies Collection papers I will use on the page later. There are so many ways to use Mica Powders. For this project I spritz my page with water, then use a fan brush to sprinkle each of the 3 colours across my page. Then I dry the project off and add splatters of each of the colour.
 

Next I wanted to add some texture with stencils. I'm using the Time Flies Hanging Time A5 stencil with some Bling Colour Paste and I tint some heavy gloss gel with Leather Colour Mica Powder to use through the stencil as well.  
 
Lastly I add some stamping using the Life is tough stamp set which has some grungy patterns. Then I use a black marker to doodle around the edge of my page.
 
 
I colour some muslin to use on the page also using the Leather Colour Mica Powder mixed with water.
  
 
I made some diecuts using the Time Flies Tic Toc metal die and i cut off the chain part as I only want to use the clock and cogs on this project. 
 

Here is my finished page.

 
I mat my photo on some papers from the Time Flies collection pack. I add some of the words from the Curious word sheet.  

 
Under 2 of the photo corners I add the Tic Toc die cuts, coloured muslin, and paper flowers.
 
 
Old flair from my stash are a fun addition to the page.


Thanks so much for stopping by

Crafty Hugs xx


Monday 27 July 2020

Confidence by Anita Enright

Hi Everyone, welcome back again to the Bee Arty blog.

For my share today I created another layout using items from several different collections.  I think I have an addiction to these ranges, but these are gorgeous so why not :)

This page I did a couple of months ago for a challenge entry.  You know how sometimes everything just falls in to place.  I knew what I wanted to do and it just seemed to come together perfectly.


To start I took the Sassy patterned paper from the Trendsetter collections and coated it with a clear gesso.
Next using the Heavy White Gesso and the Interwoven stencil from the Three Six Five collection add the image to the patterned paper.


Next, taking the Calypso Artist Ink add a couple of droplets to the page over the stenciling.  Hit the page with a spray of water.  Remember you can always add more water, so take it easy to start. I move it around the page firstly by picking up the paper and tilting it in directions for it to move.  If it needs further movement I use my fanned brush to give it a hand.


Allow to dry naturally if you can, but you can always use your heat gun to speed up the process.
Taking the Passion Shimmer Dust lightly sprinkle over the stenciling and again spray with water.  Move the colour around the page.
Next, on a piece of watercolour paper, I used the Calypso Artist Ink and the Passion Shimmer Dust to create a piece of patterned paper.


From the patterned paper created with the Artist Ink and the Shimmer Dust die cut 3 of the Diamond metal die from the Forever My Always collection.
I then created the layering behind my chosen photos using smaller pieces of patterned paper from the Trendsetter collection, the Diamond die cuts and a paper doily.


When you are happy with the layering cluster with your photo, attach it to the page.
I added a few extra embellishments from my stash including a matching purple paper tag, a Charms Creations embellishment, flower and sequin bow.
To finish I chose a title from the word sheet in the Trendsetter collection, deconstructed it and mounted it on 3D foam tape to the reverse before mounting it on the page. To finish framing the layout I took a white pen and did a freehand frame around the edge of the patterned paper.
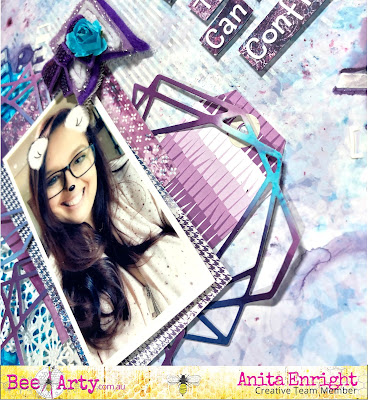
Below are a stack of photos of the layout showing the details a little closer.


I hope you enjoyed stepping in to my world for a little while, and enjoyed my tutorial.

Take time to find some 'me' time in your week and create with all your heart.

Until next time..... keep safe.

Anita E


Sunday 26 July 2020

Bee Happy by Tracy Jackson

Good morning Bee Arty fans...

Today I have a card I wanted to share using this stunning stamp called Forever Always 


As with any cards I make I always pick out the paper first and base my colours around that.
So for inspiration I picked out a sheet from the Love and Grace paper collection


The following photos gives you an idea of the colouring sequence I tend to use. Although I would normally do the skin in any image first I was quite keen to start on the flowers.
I used copics as my basic background the prisma pencils to highlight.


All red and blue spaces filled - time for the yellow daises


And finally the skin and hair. 
Time to fussy cut


At this stage I inked all around the edges of the lady, cut all my paper layers, and because her face will take up the majority of the card face I felt it didn't need any embellishments
I also for "Bee Happy" in the Love and Grace collection to use for my words


Finally I placed all together.
I really enjoyed losing myself in this card while colouring her. Its the sort of image that calls for a lot of colouring but you will be rewarded with the end result

Until next time... Happy crafting

Friday 24 July 2020

Follow Your Dreams by Tracey Campbell


Hello Bee Arty Peeps, 

Tracey here with my latest layout using some wonderful Colour Blast
by Bee Arty products. Today I wanted to create a quick, simple and colourful layout using the Serendipity stamp, it is such a fun and funky butterfly and I have been dying to give it a go. 

Start by using a waterproof black ink and stamp the Serendipity butterfly onto some white cardstock. Sprinkle the tiniest amount of Amber, Passion and Lollipop Colour Shimmer Dust over the stamped image and then activate with a few sprays of water.


Here is what the Colour Shimmer Spray looks like activated. You will only need one Serendipity butterfly image for this layout.
Spray some Road Base Colour Spray onto an art mat or into a small container, use a sponge dauber, dip into the pool of Colour Spray and sponge over the 100% stencil "Follow Your Dreams" and the "arrow" on to a piece of 12x12 cardstock. 
This is the positioning of where I have stenciled.
Adhere a strip of black and white stripes and a colourful piece of pattered paper across the 12x12 cardstock.
Once the Colour Shimmer Spray is dry cut out the Serendipity butterfly and adhere it with 3 dimensional tape across the patterned paper. Next adhere a 4x4 square photo under the wing.
Use the straw from the Road Base Colour Spray to splatter some droplets under and above the Serendipity butterfly.
Use the DeVine metal die to cut out three vines and seven small flowers from the Runaway metal die. I have cut them out from the scrap cardstock that I cut off from around the Serendipity butterfly. Adhere the vines coming out from the bottom of the butterfly to represent the flight movement.

Adhere the flowers thorough the vines and in the air above the butterfly. Use a small amount of glue just in the middle of the flower and then bend the pedals up to give them some dimension. Finish off with a gem in the center of them.


Here is the finished layout. A quick and simple layout that is a lot of fun to create.


I hope that I have inspired you to pull out a stamp and some of the incredible Shimmer Dusts to colour them with. 

Happy Scrapping
Hugs 
Tracey