Saturday 25 February 2023

Using up scraps I Mixed Media I Birthday Card I Sunila Mahajan

 Hello lovelies,

Sunila here, and I'm back with inspiration for you'll. Many times when using paper collections, we end up with odd sized paper scraps that we don't feel like discarding as the pattern is so pretty.

Today, I'm using these to create a layered greeting card. 

Here's a look at the card:


I picked out a pattern paper piece, and depending on its size, I chose my card base size. I like leaving a nice white border on my cards. This time though, I played a lot with the white space.


I cut out pieces that would add the sentiments and layered them. I used the pattern paper to mimic a pocket, to hold the flower bouquet.


I die cut flowers and leaves with other scraps of paper and layered them. I competed it with sequins and mica powder and shimmer dust colour splatter.


I hope you enjoyed this! Follow me on Instragram (@sunilamahajan) for more inspiration!

Supplies used:

Shimmer Dust

Friday 24 February 2023

Spread your wings created by Linda Pearson

I created this tag to showcase one of my favourite techniques that I love to do and I thought, what better paper collection than using the vibrancy of colour that the Fireworks collections designed by Queenie Y offers.
This technique could easily be adapted to suit a scrapbook layout and would look amazing on a card or journal page.  Enjoy and I hope you are encouraged to have go.
 
Fireworks paper collection pack designed by Queenie Y.
bonfire 12X12 scrapbooking paper
magical 12x12 scrapbooking paper
candles A4 stencil
white cardstock 250gsm
on-point metal die
Colourblast colour paste – fire engine (or rose petal)
 
paper cutting machine
liquid adhesive, double-sided tape
masking tape
cutting blade
4 cabochons
paint pens
quote and embellishment
 
 
Images 1a – 1b – 1c
1a – Cut the magical scrapbooking paper into around 5mm thick strips (you can use other offcuts from your stash also).  Cut from the white cardstock a large tag (95mm X210mm).  Cut the tag shape from the bonfire scrapbooking paper.
1b and 1c – Cut similar size cuts into the tag shape (also around 5mm thickness – this can vary also if preferred).  Begin weaving the blueish strips through the tag (follow the pattern -  row 1 under and over then row 2 over and under – each row is opposite to the previous row threading).  
N.B. don’t despair if you notice you have mis-threaded at some point, it will not be that noticeable at the end.
After each row gently push the strip upwards to secure. There will be lots of overhand that will be dealt with later.


Images 2d – 2e
2d and 2e -  Continue threading until you reach the bottom.  Use a craft knife to level the cut lines if necessary.  Also, as you get towards the end it becomes a little more difficult but work it.  when threading complete cut all the excess strips back to the edge of the tag. Add a dot of liquid adhesive at the end of each row to secure the strips, 4 edges (top and back of tag).


Image 3f
Mask off the candles on the candles stencil so that only the stars border is going to be added to the tag.  Apply the colour paste with a catalyst tool (or palette knife) through stars on the stencil.  N.B. in this sample I used Fire Engine (I thought I was picking up Rose Petal but I ran with it and think it is okay – oopsie!!).   Allow to dry.
 
 
Images 4g and 4h
4h – Run the on-point die through the die-cut machine onto white cardstock, twice.
4g -  Using a blending brush or similar tool, dab some of the colour paste onto left over one of the die cut shapes (I did 2 coats).
 
 
Images 4i
Add double-sided tape onto the white tag then secure the bonfire tag over the white tag to give extra stability.
 
 
Image 4j - assembling tag
-          Add some splatters in coordinating colours ( used teal and red) to the tag. 
-          Cabochons – colour the bottom of the domes with paint pens (teal and red), allow to dry.
-          Secure the white die cut shape to the top of the tag (with large triangle facing to top of tag).  Next, secure the coloured die shape with liquid adhesive -  large triangle facing towards the bottom of tag.  Outline the shapes with fine black pen
-          Add the cabochons to the tag with high stick adhesive; large, small (red) small, large as per sample)
-          Distress the tag border with black archival ink
-          Add appropriate quote and embellishment.  I chose this butterfly as the colours reflect the background colours.
 
Thanks for stopping by, please leave a comment to let me know how you might use this technique in your own creative way.
Cheers from Linda 
linda@yourcreativepalette.com.au

Inspired Art Journaling with YCP

Sunday 19 February 2023

Crazy Love - With Karyn Schultz!

 Hi Bee Arty Lovelies!

It's Karyn here and today I have a Scrapbook Page to share with you made using lots of fun arty products available from Bee Arty.  

 
 I was inspired by the January Mood Board and Sketch challenge.

 
I created a mixed media background on a sheet of 350gsm Heavy White Cardstock. I used a fine black Life of Colour paint pen to draw a series of large circles in the middle of the page. Then I painted circles of Fern, Tan and Navy Colour Shimmer Dust (colours inspired by Mood Board and circles inspired by the sketch). Then I added splatters of each of these colours. Once dry I added coordinating coloured sequins as well as wood veneer. The flowers were cut from the Rustic Blossom Paper collection pack and painted with Navy Colour Shimmer Dust. I painted some resin flowers with Navy Colour Shimmer Dust mixed with heavy white gesso. The photo is matted on Crackled paper.


Thanks so much for stopping by

Crafty Hugs xx


Friday 17 February 2023

Laughter with Rikki G

 Good evening how are you? I am so excited to be joining the Bee Arty Design Team so let me introduce myself  name is Rikki G or Just Too Obsessed, depending on where you follow me. I live in Western Australia with my family DH Scott, my children Tristan , Ethan, Amelia and fur baby Jax.

 I have been scrapbooking since 1996 and really started to document life when I had my first son, now its more than a hobby it has become a lifestyle. I started the design team journey in 2011 and to be honest I haven’t looked back. I love being on design teams I love the creative process and how it pushes my work out of a comfort zone and allows me to promote some amazing products.

 I love sharing knowledge with people and teaching in my local scrap store has been a great growing experience, I love hearing people saying, “I didn’t think of that” and “I didn’t think I could do that!”.

 My style, well there’s a Pandora's box…. I love everything from fussy cutting to mixed media and then anything in between, anything creative.

You can follow me here:

Blog: https://justtoobsessed-rikki.blogspot.com/

 Facebook: https://www.facebook.com/JustToObsessed

You Tube:  https://www.youtube.com/channel/UCPcAA2u1Q-IHh31isXi4RqQ

Instagram:  http://www.instagram.com/just_to_obsessed

Pinterest: https://www.pinterest.com.au/justtoobsessed/


Now enough about me, its time to show you my first ever design team project......


To start off my layout I fussy cut out the second piece of the flower and the doily from the piece below, there is method to the madness, I love working with heights so I can add my embellishments in and through the layers. This will be the base in which the photo will rest on. 

Plus you might have noticed I have turned the page so it runs vertically.


Now its all about stamping my flowers I used the three different size daisies from the Pretty Poise stamp set on the back "Love'', focusing on the orange scale. 

If you dont want to waste another piece of paper stamp on the back of the ''Hope".


***  Use any archive ink as it wont run when you add other mediums.

Once you fussy cut out the flowers your ready to colour... I am using the Colour Artist Dye Inks.


Now if your patient leave them to dry naturally this will allow all the puddles of colour to be more intense.


While you wait stick the fussy cut doily down over the top of the background sheet.


Once dry its all about sculpting your flowers into a 3 d shape rather than flat.


Stamp and cut out leaves from the "Perfect Petal" Stamp set. 

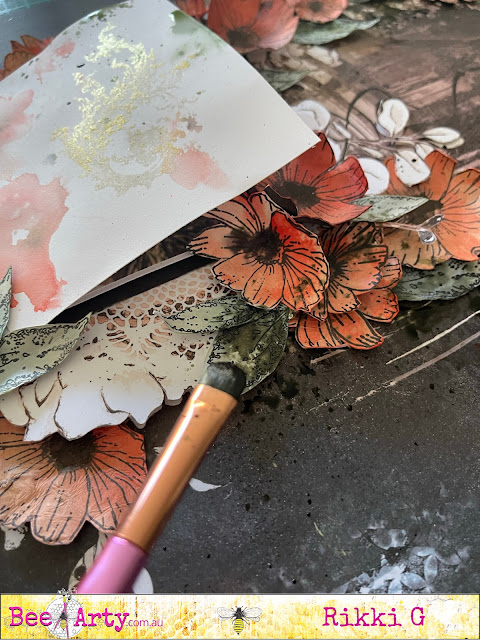
Once they are coloured use a combination of the Oasis, Citrus and a small touch of Walnut Colour Artist Dye to make a olive green mix to colour the leaves, make a fair bit up as you will need to splatter that colour after you construct  the layout. 


Now its about constructing the layout.....


Now with the left over ink that you made its about splatting over the green leaves and some onto the background as well.


Dont forget to cover your photo so you dont splatter it.


Now add some glue to the center of the flowers and add Art Stone or prills or micro beads.


Colour the art stones with Colour Artist Dye Walnut, dont worry about filling in the colour completely.....


Now splatter and run the Shimmer Spray - Bling, in the centers of the flowers then once you have completed that add it under the clusters of flowers and leaves add a lot and give the page a bang on the table to make it run.

*** With the shimmer spray when you use a paint brush plunge it right the bottom and give it a good mix to pull up the mica powder for a real big hit of gold.


Add glass cabochons to the petals to add like water droplets.


Finsh off with a title.....


Hope


Love


Grateful Heart - Paper Collection Pack


I hope I have inspired you, till next time have a creative day.

Rikki G 
xxxxxxxx


Monday 13 February 2023

ART IS ...... by Linda Pearson


Inspired by a recent journal page from Paige utilising several Bee Arty stamps, dies and stencils along with texture paste and shimmer dusts to create an interesting journal page. 

Bee Arty products used include:

Organised Chaos A4 stencil

Distressed bricks A5 stencil

Script stamp Bokeh clear stamp set

Aussie Flowers metal dies

A4 white card 250 gsm  1 sheet

A4 black card 220 gsm  1 sheet

White Gesso

6 well paint palette

Colourblast shimmer sprays; amber, candy, lush, cobalt, peacock,  fern, tan, wine, jacaranda

Catalyst mini tool

Other products used:

No 10 white tags (3)

Texture Paste

Round paint brushes small and large

Black Archival ink pad


Apply texture paste onto the tags through the Organised Chaos A4 stencil.   Allow to dry thoroughly.


Randomly add black Archival ink stamping randomly over the tags using the Script stamp Bokeh clear stamp set.  Also add some black splatters over the stamping.  Allow to dry.


In the 6 well paint palette add small amounts of shimmer powders (blues/greens/jacaranda).  

Pipe in some water to activate the powders.


Spray each tag lightly with water then add 2 colours per tag using a small round paint brush as per samples above.


Allow to dry naturally.


Apply white gesso to journal page, dry off.

Apply texture paste through Distressed bricks A5 stencil in a triangulated shape over the page.  

Allow to dry thoroughly.


In 6 well paint palette add small amounts of shimmer powders (yellow/orange/reds).  Pipe in some water to activate the powders.  Lightly spray the page with water.

With the larger round paint brush to brush blocks of liquid colours over the page.  Allow to dry naturally.


Carefully press the archival ink pad onto the textured areas across the page to create a ‘grungy’ effect.  Add some black splatters over the page also.  

Tap the page onto table to encourage the splatters to drip slightly.


Run the   through the diecut machine onto the Aussie Flowers metal dies onto A4 white card 250 gsm 3 flowers and 6 leaves. In the 6 well paint palette add small amounts of shimmer powders (wine, amber, lush, tan, fern).  Pipe in some water to activate the powders.

With small paint brush add the colours to 3 flowers and 3 leaf die cuts (may require two coats).   Leave 3 leaves white to add depth and relief to the coloured page.  Allow to dry naturally.


Assemble and adhere the flowers onto each of the tags.   The order – white leaf (right side), coloured leaf (left side) and flower in middle towards the bottom of tag.

Add details with black paint pen, add sentiment to each tag.

Adhere the tags to the black card then cut fine border around the tags stagger the two cards.

Adhere two tags to the outer edges of the page and one to the lower centre.

Outline the whole page with black paint pen.


 Thank you and look forward to creating for you again soon, cheers from Linda

Email:  linda@yourcreativepalette.com.au 

Inspired Art Journaling Facebook Group