Wednesday 31 August 2016

Pegasus by Tina Connolly

I've been wanting to do this project for ages, but finding the horse had proven elusive!  I finally found Barbie's trusty steed and began the transformation.  
Chipboard pieces were painted with Colour Paste, Deep Water and Just Blue and then extra layers of Colour Embossing Powdering Deep Water and Just Blue for depth.

Give the horse a quick sand and a few coats of black Gesso to prepare the base.
The lace was dyed with Violet Colour Shimmer Spray and the metals coloured using various Colour Pastes.


Thanks for visiting,
Tina


Tuesday 30 August 2016

Chaos and Love Art Journal Page with Melinda Sweetman

Hello there fellow Colour Blast lovers, Melinda here with you today sharing an entry I made in an art journal as part of a circle journal swap I am a part of!!

AND I have a process video of my pages coming together! You can see that here!! Otherwise, read on for close up's and more details!


So, first up I started with a coat of gesso on both sides of the brown paper bag album I was working in and then I used a black paint marker to write a bunch of seemingly random words all across the pages. My theme in this journal was "A Day In Your Life" and it was the middle of school holidays when I received it so my first thought was "Really, how does one scrap/journal chaos?!" Haha! So all the words are very relevant to a Mum in the middle of the school holidays with a pair of little boys who are a bit crazy!!

After that was all dry I grabbed a bunch of my Colour Blast Colour Pastes - Rose Petal, Lovely Lilac, Singin' the Blues, Sunshine, Tangerine Dream and Steel and random applied colour with a palette knife!


This is what the page looked like when I had finished applying all the different colours! Chaotic, yes?! Some of the paste is quick thick in places and in others not so much but I love the depth that that helps to create!


I had googled "family chaos quotes" or something to that effect and found this one and thought it was perfect! "Our family has just the right mix of chaos and love" I pulled a bunch of alphas from my stash, some old thickers that I knew I wouldn't use, some random chippy letters I have had in my stash for years and also (the littlest ones!) some chippy ones from Dusty Attic. They all got a coat of black paint and after that was dry I went in with a silver paint marker through all the middle of the letters for an extra pop.


I didn't feel that the silver was enough of a pop, they kinda blended into the page a little with that chaotic background, so did some outlining with my white paint maker.


The extra pop I was hoping for with the white paint marker around didn't quite do enough so I decided to put some of the same marker onto the letters and BOOM! there was that pop I had been hoping for! I finished up with some splatters of Roadbase  Colour Spray and some enamel dots in all the different colours.

I love how this spread came together and in the end I think it totally captured where my days were at that point in time!

Here are some close ups of my completed page, I hope you like my pages and that you get your fun goodies out to have a play!


Thanks again for stopping by and make sure you get your products out and just play, you just never know where your projects will end up! Oh, and if your not already a part of the fun FB group that has been set up for CB fans head over here to join up, share your creations and see what everyone else is doing with their Colour Blast products!! Have a fab scrappy day!


Melinda


Monday 29 August 2016

Beautiful with Amy Prior

Hi there Colour Blast fans! Amy Prior back with you all again today this time sharing a quick step-by-step tutorial using lots of gorgeous Colour Blast products to create this beautiful layout of my daughter Mia. 


Step 1 - Using some Matte Gel Medium, adhere a doily onto some white cardstock. Ensure you have painted the matte medium all the way to the edges of the white cardstock to ensure an even surface to add water based paints over the top. 


Step 2 - When the matte medium is dry, spray a large puddle of water on top of the cardstock and sprinkle some Colour Mica Powder over the top. I have used three different colours of Mica Powder including Polar, Cool Mint and Wisteria. You can use a clean dry palette knife like I have here or fill some old salt shakers with the mica powder for a fun effect. 


Step 3 - Spray a little bit more water over any dry looking areas of mica powder. Try not to spray too much as you want to avoid mixing the colours.


Step 4 - Dry the Mica Powder water puddles with a heat tool until completely dry to touch. 


Step 5 - Smear some Snow White Colour Paste over the top of the stencil using a palette knife. Do this randomly over a few different areas on the page. Heat dry the stencilled pattern using a heat tool or allow to dry naturally. 


Step 6 - Mix some Cool Mint Colour Mica Powder with some Matte Medium and paint these little shabby resin pieces. Allow them to dry naturally as you layer together the rest of your page to avoid bubbling. 


Here are a few closeups of the finished layout...


Lots of gorgeous layers of Kaisercraft papers underneath the photograph.


Beautiful Ephemera also from Kaisercraft have been tucked in around the layers as well as a fun doily.


Lots of pretty flowers from Scrappers Garden really finished this layout off perfectly! 


That's it from me today, until next time, happy scrapping!

Amy Prior xx

Sunday 28 August 2016

Adorable by Farrel Tailor

Happy Sunday Colour Blast Peeps!!!
I'm back again to share with you my second layout. It was so hard to choose what layout I was going to share with you guys but I decided that since spring is only a few days away why not celebrate it with a  beach layout.


My first step was to cover my white cardstock with gel medium and I used a gloss so that I had a light shine to the cardstock. Once dried, I then used modelling paste onto my stencil.


I dried the modelling paste until it bubbled for extra texture. I then used Colour Shimmer Sprays Deep Water & Just Blue to randomly spray over the stenciled area. I then used Colour Spray Lagoon. To help the colours blend together I also spritzed with some water and used a heat gun to dry.

Next I tore some corrugated cardstock and rubbed some white gesso, Colour Paste Envy & Apple of my Eye - then set a side to dry.


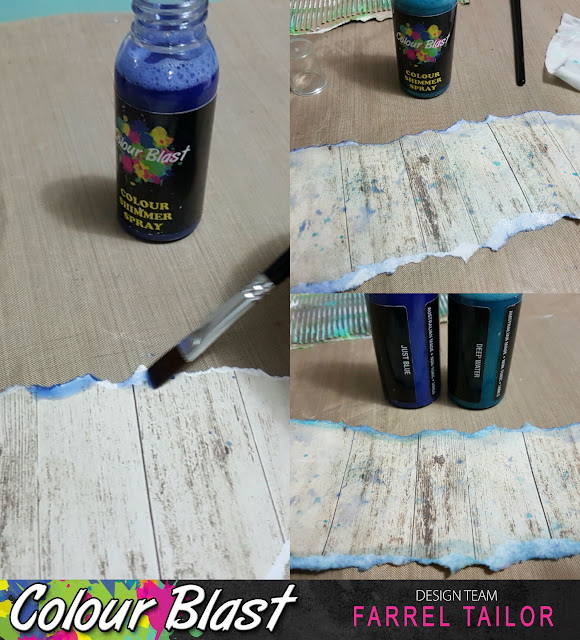
I tore a piece of patterned cardstock just smaller than the corrugated piece and with a paint brush, I painted and splattered with Colour Shimmer spray Just Blue & Deep Water.


I added some stamping with Kaisercraft Grid Stamp and Black Archival Ink.


I wanted to add some colour to a chipboard starfish I had in my stash so I first dabbed Sunshine Colour Paste with my finger making sure I left some parts raw. I then wet my paint brush with water and dipped it into my Mica Powder Cool Mint tub and randomly added to the chipboard.


After I assembled my paper layers to my layout, I then used  Envy Colour Paste on my stencil and randomly sprinkled Colour Embossing Powder Sunshine - I didn't want to cover the whole word.


I then used my heat gun to dry the paste, letting it bubble in parts. ( I love how the paste bubbles) I used my black gel pen to trace around the outside of the stencil to make it pop a little more on the layout.


Last of all I inked around the edges of the tag with Deep Water Colour Shimmer Spray and gave it a light spray. 


Thanks for dropping by and I hope you enjoyed my post. 
To purchase any of the awesome products I used please click onto the product names. 


Happy Scrappin' 
Farrel xx

Saturday 27 August 2016

Happy Together by Danielle Vertigan

Did someone say Mica Powders????
I'm yet to really play with these.
 I love the shimmer powders and thought it was time I get stuck into theses little pots of fun.
After selecting my colours and I began with a thick cardstock and attached it to chipboard.
When I'm working with water I like a thicker card to help prevent the cardstock from breaking down.
I attach this to the chipboard because I feel it gives me a more stable foundation to start that is less likely to buckle or warp.
My next step was to select a Paste and Stencil.
Today I'm going with Snow White Colour Paste and a Damask Stencil.


I used the stencil in the top right and the bottom left of the page.
Turning the stencil upside down in the bottom section.
Whilst waiting for drying I picked my Colour Mica Powder colours, Lemon Zing,  Peach Nectar and Watermelon.
First I sprinkled a selection of colours directly onto my page.
Using a similar technique to the shimmer powders I spritzed directly to the page.
(Its important to note the spritzer moved a lot of the powder)
At this point I got out a water cup and paint brush.
I added the water using the paint brush and began merging my colours.
This was much more effective.

I added some more colour and continued with this technique adding water till I had found my desired strength of colour.


Using a black acrylic paint I mixed this with water to create a thinner consistency.
Using a skewer I drew large circles on my page,
sprinkling sections with Dusty Charcoal Embossing Powder.
I set this using a heat gun.
I created a cluster of flowers both paper and metal that complimented the Mica Powders.

Some Enamel Dots and Patterned Papers finished of this layout nicely.
The depth of colour in the Mica Powders is fabulous!
There vibrant and a lot of fun.
One tip is to seal them so they don't rub off the page or transfer all that beautiful shimmer.
I did this using a spray.
I hope you have as much fun with them as I did.
For all you Colour Blast needs pop over to
Till next time
Danni





Friday 26 August 2016

Delight Layout With Anita Bownds

Hi everyone,
Anita here with my second post for this month 
With this layout I wanted to use some of the Colour Shimmer Sprays with the Colour Paste 
using purple and yellow colour tones and a touch of pink
I started with a simple design idea in mind going across the page


Starting with the Colour Paste in Royalty and Sunshine with a stencil
Picking random spots down across the page


Here is my process video 


I hope you enjoyed my video 
I really how sublime the the Sunshine Colour Shimmer Spray giving it that beautiful 
Light yellow tone across the page


With the brighter tone of the Sunshine Colour Paste 
It looks amazing in real life.
I also used some of the butterflies leftover from my last layout that I embossed
with the Sunshine Colour Embossing Powder 
And that added touch of pink on the chipboard heart corner 
using the lovely Rose Petal Colour Embossing Powder for that extra touch of colour 


My photo was the inspiration for the colours
A beautiful vine growing in our garden 


And I thought I would share how I made my flowers shimmer 
and here is a little flower tutorial using the Colour Mica Powders


Here are the Colour Blast Products I've used
Thanks for checking out my post today I hope I've inspired you with my layout.
To give the awesome colour blast products a go!!


Happy crafting..xx