Sunday 25 October 2020

Enjoy by Tracy Jackson

                                                                 Morning Bee Arty Fans

I am back again to share my latest Design Team card


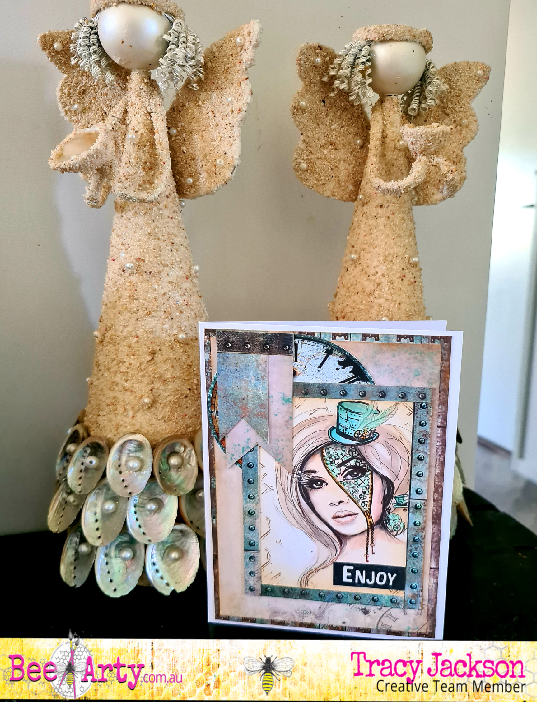
In case you aren't aware - and I'm sure all you Bee Arty fans are... Time Flies collection has a 12x12 page in it that is Time -  cut and colour.
This perfect for all you card makers like myself, for a quick easy solution if you don't happen to have any stamps.


As always with people I colour skin and hair first with my copics
Then the rest is coloured matching the paper I have chosen - in this case I have picked from the same collection Time Flies


Below I cut out strips to frame her on the card


But before that I wanted to add a bit of stamping to the background.
I used a stamp out of a set called Life is Tough


I then gathered some elements from Time Flies collection that were left over from previous projects and hand cut 2 banners.
Once I had destressed all edges I placed and glued all together


I really do love this collection. I'm down to my last scraps and really not sure what to do next!

Until next time... Happy crafting

Friday 23 October 2020

It's Negative by Tracey Campbell

Hello and welcome everyone, it is Tracey Campbell here with a Design Team share.  I have used some of the COVID Capers Range which is perfect for these troubling times, when COVID is on every ones minds and testing has become the new norm as soon as you get a sore throat or cough.

I wanted to create a COVID inspired background on white cardstock so I went to my BEE Art stencils and pulled out two that I thought could work; Honey Hive and Circulate .
Next with some scrap paper under the stencil, I used a pencil to places dots on the outer lines of the circle that looks like a radiating sun.
I took the stencil off the paper and then drew a circle around (about 2 millimeters) the dots, then cut the circle out. I then cut out five more circles the same size (six in total).
 I placed the circles on a 12x12 piece of white cardstock  - the papers circles are being used as a mask to stop the Colour Shimmer Shine form going onto the cardstock in these places. Place the Honey Hive stencil over the top of the circles  (I placed packaging above and below where I wanted the spray to go to mask out any surplus spray going on to my cardspock where I didn't want it) and spray with Envy Colour Shimmer Spray, I repeated this process so that I had Envy Spray on the top and bottom halves of the cardstock. Remove stencil, paper circles and the packaging and let dry.
Once dry take the Circulate stencil and position over a white gap (circle shape) in the sprayed Envy Shimmer Spray. Using a palette knife spread through Blush Colour Paste, repeat so you have six of the radiating suns. 
See final layout for the positioning of theses suns.
While the Colour Paste is still wet take a skewer or the back of a paintbrush and dip it in the Colour Paste to form a small circle on the end of the lines radiating out form the Sun to create a COVID germ. Repeat on all six radiating suns.
Use a pallet knife to fill in the center of the COVID Germ to complete it.
Here is how they turned out. Please note that the Colour Shimmer Sprays give a light colour, shimmery effect that is subtle on white cardstock.
Cut out some of the images from the COVID Capers cut-a-part sheet. I also added a few diecuts to the pile that I cut out using my Silhouette Cameo.
To finish off the layout I adhered two 6x4 portrait photos into the center of the cardstock and arranged the die cuts and cut-a-part images on either side of them. Add some journalling and a title.


Wednesday 21 October 2020

Kind Fierce Brave by Ros Aggett-Madley

Hi everyone.
Sharing another art journal again today.  I really have only a few pics to share.  I got so lost in this one I totally forgot. 


The background was done by paining on different colours of Bee Arty Colour Shimmer Dust.  Starting with Lush for the grass, then adding some Peacock and finishing off with Cobalt.

For darker shades I just use a higher concentration of the colours.


I then used one of my fave stencils, The Owl and the Pussycat.  I have used this with some Heavy Black Gesso, applied with a wedge makeup sponge.


The stars have been added the same way, this time with Heavy White Gesso and the That Way Stencil.  Of course as I finished my page I dropped black gesso right in the middle.  I just added some more stars to help hide this.
The sentiment along the bottom has been done with the Kind Heart Stamp Set.


Hope you've been inspired.

Friday 16 October 2020

Mixed Media Cards by Elisa Ablett


Hi Crafters,

Elisa here from the design team with my inspiration for October, a couple of mixed media cards featuring loads of your favourite Colour Blast by Bee Arty products.

Starting with a lovely bright background of 'smooshed' watercolour inks in bold colours - Slipper, Calypso and Mermaid. I spritzed water over the top once they were dry to re-activate the watercolours, this creates great 'salt' patterns in the colour. Let the background dry thoroughly and then lay your chosen stencil on top - I used 'Organised Chaos' Stencil for the first card along with 'Envy' Colour Paste and 'Directions' stencil for the second card along with 'Dusty Charcoal' Colour Paste.


Let's take a closer look at each card!


Awesome Card - Add some gold accents to your card, I used yellow sparkle embossing powder which gives a fantastic coverage for the title and also the gold accent on the die cut 'Abstract Circles' from Fiona Paltridges new collection. I also smooshed a bit of gold - Bling shimmer spray over the top of my Colour Paste to create gold accents on the stenciled background. Add some dodgy sewing for a bit of texture and you have a finished unique mixed media card.!


Brave card - After stencilling, add some shimmer by spraying Bling Shimmer Spray onto your craft mat and use a makeup sponge or your finger to rub some of the gold spray over the top of your stenciling to create gold shimmery accents. Use the yellow sparkle embossing powder on a spare piece of card and cut some triangles to add to your card. Fussy cut a few of the hanging feathers from the 'Possibility' paper (Follow your dreams collection) and colour using your watercolour inks to match your background.

Product links -


Thanks for stopping by the blog today, you can catch more of my projects on my blog - 
make sure you hit subscribe to follow along!

hugs 

Elisa x


Thursday 15 October 2020

Anything But...II Chrissi Mannix

 Hello Lovelies

So I've been in a bit of a creative funk lately. When that happens, I find it helps to some times, just play in my junk journal. Junk Journals are good for this purpose, in the sense that, it's not an entirely blank page you are starting with, and I find this really helps.


I like to start by grabbing some supplies, and just not thinking about it too much. I don't always end up with something I love, or even something I like, But the process gets my hands in the art supplies.


In this case I grabbed some of the older Artist Inks- I recently found these when reorganizing my supplies. I wanted to use them up, and they were a great size to dip a paint brush into. Just by dipping my brush and adding it to the paper, my background came together quite easily.

One of my go to supplies for backgrounds is mark making stamps. It is easy to effortlessly add some interest to your background with some stamps.
Then all that is left is to add a focal image or a quote of some kind to complete the page. I love the Bee Arty quote stencils for this exact purpose. 
Its a great activity to help get the mojo flowing and get your hands messy- something that always makes me feel better. 

I hope you have enjoyed this simple project, and it inspires you to do some mindful creating when you're in a creative funk. 
Happy Creating
Chrissi xxx


Products Used:

Mermaid Artist Ink

Lime Artist Ink

Different a5 Stencil

Going my Way Stamp Set

Sunday 11 October 2020

Escape The Ordinary by Tracy Jackson

                                                      Good Morning Bee Arty Fans

I'm back again again to share my latest design team card


I have wanted to use this stamp for a long time, its called Kind Heart.
At this stage I had no idea on what I was making , I just kept stamping, and what you cant see is a bowl of chips which I ate while waiting for inspiration!! LOL


After some thought... and a lot of chips later I picked out some paper from Time Flies Kit and started colouring..... still at this stage... no clue as to what I was doing... but.... I did know I was going to fussy cut, (no surprise there!)


And here we go... out with the scissors


I carried on, until I had enough coloured to layer up using foam dots


Once all layered, on the main stamped picture I grunged it up a bit using inks one of the stamps from Life is Tough Stamp Set


Fussy cut pieces and words from Time Flies Paper Collection


And glued it all together


I loved how this card turned out considering I had a complete mind blank to start of with.

If you have this stamp I would love to see your take on it :-)
Until next time... Happy crafting