Showing posts with label Life is Tough stamp set. Show all posts

Saturday, 28 August 2021

Please !!! by Tracey Campbell

 Hello Bee Arty fans I hope that you all happy and healthy. I have popped in to day to share my latest fun creation using the new min collection release Electric Dreams, it is fun, it is bold, it is funky, it is such a blast to use. Teamed with the new fluro colours and you have a winning combination.

I used some older photos of my girls and made a fun page to reflect the fun they were having in the photos

My first step was to use some black water proof ink and stamp the grid lines from the Life is Touch stamp set onto a pieces of 12x12 white cardstock

Here you can see how I have placed the stamp images.

Next I cut some strips of the Electric Dreams patterned paper in a variety of random widths. I cut the strips from four different patterns. 1. Black with coloured lines. 2. White with rainbow coloured water drops. 3. White with hand drawn circles and patterns and 4. Black with Xs.

Using a distressing tool distress the edges of the strips. Note: you might tear some of the strips a bit or even in half, do not panic as you will tear them some more in the next step.

Layer the distressed strips over the inked grid lines. Tear off smaller pieces of the strips and layer them over the larger ones.  This is how I built it up.

Next I mixed a small amount of the Pink Fluro Mica Powder with some water in a small spray bottle and slowly squirt the cardstock. Tip: the slower you squeeze the lid of the spray bottle the bigger the droplets you will get.


Here is what my base looked like after spraying with the Pink Fluro Mica Powder


I decided it needed more colour so I mixed up some of the Orange Fluro Mica Powder with water and using an old stiff glue brush I flicked splats of the Orange Fluro colour onto the base.


Then to tie the colour back to the black in the Electric Dreams papers I decided to add black splats to the base. This time I used Road Base Colour Spray, I took the lid off the spray bottle and used the straw to flick the splats across the page.


Next was matting the photos. I used two different black and white papers from the Electric Dreams mini collection and left a 3 mls boarder around the top, right and bottom edges of the photo. On the left side I left a 1.5 cm boarder. I then used the distressing tool to distress the edges. 
Next adhere the mated photos at fun angles over on the right hand side of the base (see the final layout for the exact positioning). 


Next fussy cut out some of the hand drawn and coloured circles and some of the titles/words that suit your photos from the Electric Dreams paper. 


Tuck the circles behind the photos, under and over lapping some of the strips. Just randomly place them around the page. I added a title with some Foam Thinckers.


Adhere a Charms Creations felt hear beside the title.


Use the cut out words from the Electric Dreams papers as sub titles and adhere them to the page.


I ended up with two sub titles as they suited the layout. Love that this collection comes with so many options. 


Here is my final layout. I love how it turned out, fun and colourful.

Thanks for popping in and I home that I gave you some inspiration for this fabulous mini collection.

Hugs

Tracey

Sunday, 25 October 2020

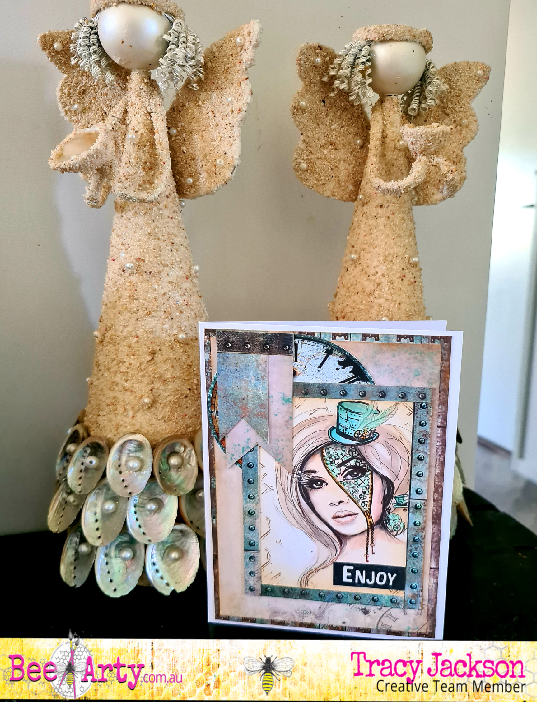
Enjoy by Tracy Jackson

                                                                 Morning Bee Arty Fans

I am back again to share my latest Design Team card


In case you aren't aware - and I'm sure all you Bee Arty fans are... Time Flies collection has a 12x12 page in it that is Time -  cut and colour.
This perfect for all you card makers like myself, for a quick easy solution if you don't happen to have any stamps.


As always with people I colour skin and hair first with my copics
Then the rest is coloured matching the paper I have chosen - in this case I have picked from the same collection Time Flies


Below I cut out strips to frame her on the card


But before that I wanted to add a bit of stamping to the background.
I used a stamp out of a set called Life is Tough


I then gathered some elements from Time Flies collection that were left over from previous projects and hand cut 2 banners.
Once I had destressed all edges I placed and glued all together


I really do love this collection. I'm down to my last scraps and really not sure what to do next!

Until next time... Happy crafting

Sunday, 11 October 2020

Escape The Ordinary by Tracy Jackson

                                                      Good Morning Bee Arty Fans

I'm back again again to share my latest design team card


I have wanted to use this stamp for a long time, its called Kind Heart.
At this stage I had no idea on what I was making , I just kept stamping, and what you cant see is a bowl of chips which I ate while waiting for inspiration!! LOL


After some thought... and a lot of chips later I picked out some paper from Time Flies Kit and started colouring..... still at this stage... no clue as to what I was doing... but.... I did know I was going to fussy cut, (no surprise there!)


And here we go... out with the scissors


I carried on, until I had enough coloured to layer up using foam dots


Once all layered, on the main stamped picture I grunged it up a bit using inks one of the stamps from Life is Tough Stamp Set


Fussy cut pieces and words from Time Flies Paper Collection


And glued it all together


I loved how this card turned out considering I had a complete mind blank to start of with.

If you have this stamp I would love to see your take on it :-)
Until next time... Happy crafting

Friday, 9 October 2020

Happy by Tracey Campbell

 Hello lovely people, Tracey Campbell here today with a fun and funky layout using a few different medias, stamps and metal dies. 

Happy Always

To start the layout grab a piece of 12x12 cardstock to use as the base. Have you seen that Paige has an exceptional quality cardstock in store? It comes as a 350 gms, 12"x12" 10 pack for just $8. I just love the quality and feel of this cardstock - no bleeding through on the back from wet medias. 
Anywhoo back to the instructions; so next up I used a bowl and drew a circle in the center of the base cardstock with a light led pencil. Using a paint brush paint in the circle with Colour Blast Artist Ink in Marine.
Paint the whole circle in.
Cut the bubbles out from the Progress Patterned Paper in the Arty Farty range. 
 Using a thin black marker draw crossing lines running vertical and horizontal across the base cardstock and over the circle. Then using black ink stamp the dotted circle stamp from the Meridian Stamp Set over the lines.

Next using the cross hatch stamp from the Life is Tough Stamp Set randomly stamp the image onto the base cardstock. I kept the images close to the stamped circles and lines.
Use the metal die Honey Comb and Create to cut them out of white cardstock. I cut two Create frames and I used the Honey Comb small center pieces for this layout. Now grab a bottle of Envy Colour Shimmer Spray and spray the Create and Honey Comb die cuts. Set aside to dry.
Once the Shimmer Spray is dry adhere the elements to the base cardstock by cutting one of the Create frames in half so that it can be put on the two separate sides of the layout. Add the photo to the center of the circle where the lines cross over, place a frame over the photo. Stick the bubbles down as can be seen in the photo below.
Putting the finishing touches onto the layout by sticking the little Honey Comb pieces on the page, adding a title, a few black stikers and journaling. For the final tocuch I drew some black lines around the outer edge of the cardstock.
 Here is the finished layout, a fun and funky page that can be used for a variety of themed layouts. It is a good layout to try your hand at mixed media if you are a bit hesitant or a newbie.
Thanks for popping in and I hope that you like my layout. 

Hugs
Tracey

Sunday, 27 September 2020

Together Forever by Tracy Jackson

                                                      Good Morning Bee Arty Fans

Today I am sharing my grungy distressed card which I think could go to a female or male


As always I start with the paper I want to use - in this case it is from Spread Your Wings collection. I also fussy cut a label that I wanted to fit behind the image.
I then stamped and coloured the rose image from Forever Stamp Set


Next I wanted to add some detail to the backing paper so it wasnt so plain - I used the stamp from Life is Tough set. 
When Im adding a stamp onto the background, I never used a stamping block, I dont want a perfect impression as its just in the background and not the focal point


Yes, yes, yes... more fussy cutting... got to have those butterflies!


Finally I inked up all the edges giving it a grungy distressed look


Once I had an idea on placement all elements were glued down

Hope you are having a wonderful day and I have inspired you to get those stamps out.
Until next time... Happy crafting

Sunday, 13 September 2020

Stamps - by Tracy Jackson

                                                          Good Morning Bee Arty Fans

 Today I am showing you a great idea on how to use those scraps you just cant bare to throw away

I am always on the hunt for ephemera for my cards and now my very first junk journal. So I decided to make some stamps using left over paper from Spread Your Wings collection

Firstly I cut the paper to the size I wanted - 3 x 4.5cm. Stamped and coloured the rose from Forever Stamp set to match the paper and then fussy cut the butterflies from the same collection 


I then used the brick stamp that comes in the Life Is Tough Stamp set as a background element


Fussy cut the roses then glue into place. I then inked up the edges


Now time to glue onto an old paper page. You can use any glue for this, I brushed matte meduim over the top to give it a bit of protection.


I left to dry for a couple hours then cut around edges making sure to left some of the text from paper showing as a boarder

I was really pleased on hoe these turned out... I ended up spending a whole afternoon relaxing making at least 50 of stamps!

Until next time... Happy crafting