Thursday 25 February 2021

Boho Gypsy by Linda Pearson

 Hi Bee Arters!!  

In this journal project once again I have integrated the Bohemian Bliss collection designed by Sue Smyth.  I wanted to create a page that incorporated a face surrounded by a bouquet of flowers and feathers coming back to thoughts of the iconic artist Frido Khalo for inspiration.  I hope this project inspires you to create your own page using this amazing collection.


Bohemian Bliss collection designed by Sue Smyth

Ava face A4 stencil

Bow chic metal die

White Cardstock 350gsm 10 pack - 12"x12"

x-press it double sided tape 6mm

Art Glitter Designer Adhesive 

Colour paste  - Tangerine dream (added Pyrole red to paste) and Stormy Weather (with Payne's Grey paint added)

Shimmer dust  -  Duke

Colour Spray  -   Lagoon

Life of colour pens - black

Dorlands wax

Black archival ink

Glitter Card

Coloured string

Muslin sprayed with Lagoon colour spray 


Used the market place card as the under paper, tore wildchild (both sides) strips and pasted to left hand side of base paper (Bohemian Bliss collection paper).  On the right hand side added Delicate clear stamp set to top and bottom of base paper.

Add Colour paste - tangerine dream through the Daisy Daze A6 stencil.  Sprinkle Shimmer dust  -  Duke over the stencilled flowers, then spray with water to spread over the shapes.   Wipe off excess.


Apply the Ava face A4 stencil to the base paper using black archival ink.  

Hair:  Colour paste  Stormy grey (with payne's grey paint added) to make a deep blue applied the paste to the paper following the outline of the stencil.  Scratch lines into the paste to create hair strands.

Lips:  Colour paste - Tangerine dream mixed with Pyrole red paint fill in lips and nails.

Eyes:  Paint the eyes in green with turquoise 

Eyebrows and eyelashes:  add detail to the eyebrows using Life of colour pens black to add long lashes to the eyes and strands to eyebrows to create messy brows (like Frida Kahlo).


Fussy cut flowers and butterflies from the cutout sheet (Bohemian Bliss collection paper).


Using the Bohemian Bliss collection paper - 12x12" scrapbooking paper  -  patchwork, glitter card cut lots of shapes using the above die cut 


Adhere the flower cut outs and dies around the hairline.  Glue the muslin to the bow tie die cut.
Feather braid:  glue the cutouts together add string to feathers, glue under the bow tie.  
Add butterflies around the page.  
Add the sentiment cut out from the word sheet Bohemian Bliss collection paper.


Thank you for stopping by!


Linda Pearson
linda@yourcreativepalette.com.au


Monday 22 February 2021

The German Cake Shop by Charmane Koch


Happy Monday everyone! Today I wanted to share with you a layout using a mix of different Bee Arty Stencils I have used from different collections including the NEW Daisy Daze Stencil, Live Life & Dusk stencil.


I have used the Colour Artist Ink Citrus & watered down Bling, Sunshine & Sienna Mica Powders.... I've coloured the background using a paint brush to move the colours around, and dried them with a Heat Gun.


I've also used the NEW Bohemian Bliss stamps - the bee from Wonderful & Delicate


How awesome are the colours mixed together... 


Love the glittery shiny Mica Powders... how gorgeous are they??


I've doodled around the edges of the bees & the quote to highlight & give more definition.


I've trimmed down the White Cardstock so that I could back the page with Kraft cardstock to bring the page together.


And here is the finished page. Love how it's turned out and what a memory to scrapbook... 4 generations in one photo!

Thanks for looking and hope you are inspired to get the stencils out :)

PS - did anyone notice that I've used packaging on this layout??? It was a perfect match!

Happy Creating!


XO Charmane

Sunday 21 February 2021

Follow Your Soul...by Belinda Spencer

 Hello Bee Arty fans!!


It's Belinda here with you today to share my latest layout featuring lots of awesome Bee Arty products.


'Follow Your Soul'


I started my lay out by cropping a sheet of the Tangled patterned paper from the Untangle collection. I then added it to a sheet of the fabulous Bee Arty 350gsm White Cardstock for extra strength and support.

I sprayed the background paper with Saffron Colour Spray and let it drip down the page. Next I added Slipper Colour Artist Ink and let that drip down too. I dried the page with a heat gun and then added more Slipper Ink letting it run down the page again. I flicked some of the ink over the page too using a soft wet paintbrush and then dried with the heat gun again. I repeated this process using Citrus Ink too.


How gorgeously vibrant are those colours??!!

Next I added two lacy scroll borders die cut from the Desire Metal Die Set as well as some wire thread, a doily and flowers fussy cut from the Embrace patterned paper


I used the same inks to colour these super pretty die cut leaves from the Leaves of Paradise Metal Die Set. Once dry I added them to the layout along with all other embellishments, my photo and title.


Here is my finished layout:


You can see that I fussy cut some leaves and added some uncoloured die cut leaves too. I sprayed the Polaroid Butterfly die cut with the Saffron Colour Spray, let dry and then doodled a border with a black pen before adding over the top of my photo.


Here's what I used:


Thanks so much for stopping by the blog today. I hope you are feeling inspired to have a play with your Bee Arty stash too.

Cheers
Belinda


Saturday 20 February 2021

Super, Fabulous, Awesome, Amazing by Tracey Campbell

Hi Bee Arty fans. Tracey Campbell here today with a colourful rainbow Creative Team share highlighting the magical Shimmer Dusts. I'm going to let you in on a little secret of mine..... the Shimmer Dusts are my all time favourite Colour Blast by Bee Arty Product ever!!! Yes ever. I mean where else can a little dust sprinkled onto a project create such vibrant shimmery colours and as an extra bonus.... a tiny pot last such a long time.  

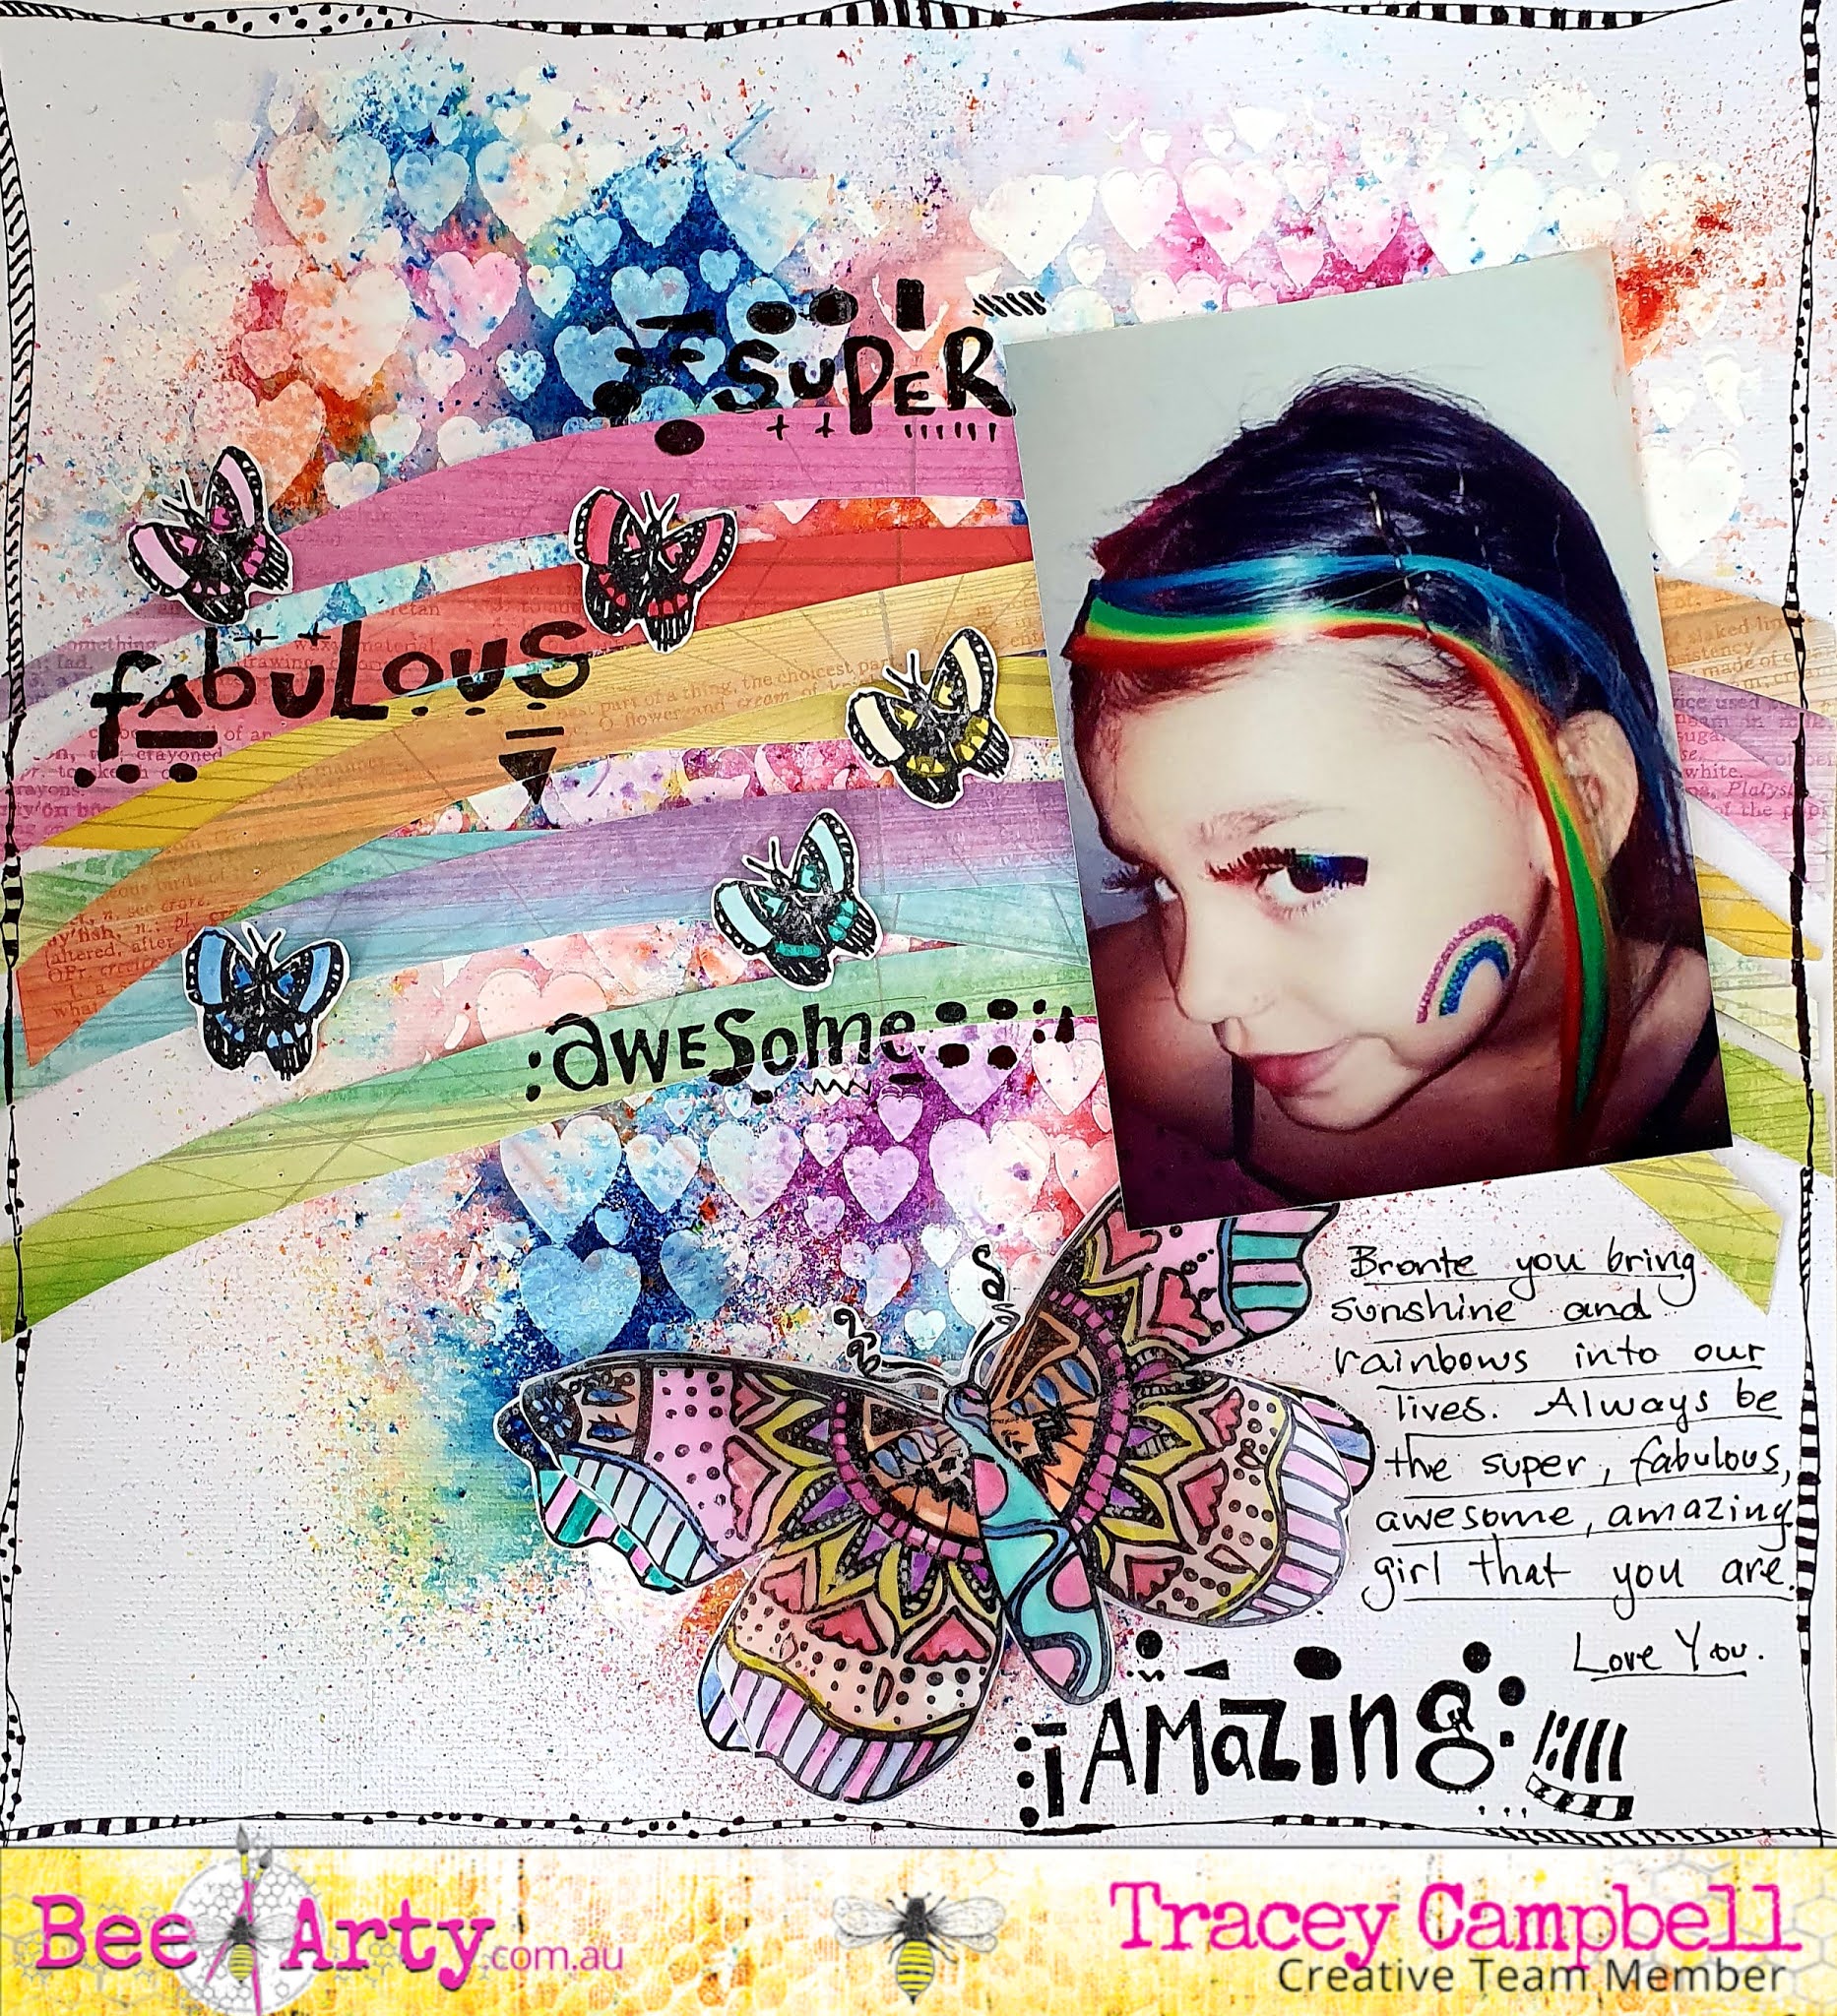
My layout today is of my oldest Daughter when they had a"Circus" theme at school and had to go in dress-ups. Bronte being Bronte just couldn't go as a clown, she had to be something different a "Rainbow Acrobat".   

Here is a list of all the products that I have used to:

Bee Arty Products:

Stamps: Cool Words set, Serendipity, the butterfly from City Lights.

Paper: Artist from the Arty Farty collection

Colour Shimmer Dust: Sunflower, Duke, Amber, Lollipop, Candy, Peacock and Passion

Heavy White Gesso

Stencil: Devotion

Inspired Collection Pan Watercolour set


Other materials:

White cardstock

Black Stazon ink

Black marker pen

3 Dimensional tape

Glue

Velum 

Scissors 

Lead pencil

Paint pallet Knife 

To create by back ground I started by using the Devotion stencil with some Heavy White Gesso, I  used a Paint Pallet knife to spread the gesso through the hearts pattern of the stencil and onto a 12x12 sheet of cardstock.
In the photo below you can see how I spread the gesso through the stencil in a thick "T" shape. Put aside to dry.
While the gesso was drying I cut some arches, roughly 1 cm in thickness from the Artist pattern paper in the Arty Farty collection
Making sure that the arches stretched across the whole patterned paper and at least one of each colour.
Using some Stazon black ink stamp the Serendipity butterfly onto some white cardstock and then repeat and stamp the image onto some vellum. Next stamp five small butterflies from the City Lights stamp set.
Using the Inspired Collection Pan Watercolour set and a water paint brush paint all five small and the two large butterflies. TIP: Only use a small amount of water on the vellum butterfly and it will curl and buckle if too much water is applied. 
Once the Heavy White Gesso is dry lightly sprinkle the Colour Shimmer Dust over the hearts. I have used seven different colours, Sunflower, Duke, Amber, Lollipop, Candy, Peacock and Passion. I actually sprinkled all seven colours onto the page making sure not to over lap them too much as I didn't want it turning into a "hot mess" nor mix colours too much. Then I sprinkled a little water onto the background and activate the Colour Shimmer Dust. 
I must admit, watching the colours magically appear and move together is one of the reason I love this product. It makes my heart happy. 
Before the water dried I took a roll of paper towel and rolled it over the top of the activated Colour Shimmer Dust. TIP: Not sure why this works but it does - rolling the paper towel stops the colours from running or smudging together, if you place a piece of paper towel over the top of the Activated Colour Spray it smudges!  
Here is the background. I love the rainbow patches of bright colour and how the hearts show through. 
Now I put it all together by layering the arches across the page, roughly in the centre of the page but more towards the top to create a rainbow. I used white glue to adhere them to the page. Adhere the velum stamped butterfly image to the white cardstock butterfly to create a double butterfly. The photo was next, I placed it on the right side of the layout and tucked the large butterfly underneath the bottom left hand corner. 
Lastly pop the smaller butterflies across the rainbow as if they are randomly flying in all directions. 
Here you can see the position of the elements as they come together.
Next I used Stazon black ink to stamp the words form the Cool Words stamp set across the page.
Here you can see where I have positioned the words; Super, Fabulous, Awesome and Amazing on the page.
To finish off I doodled a funky boarder around the edge of the cardstock and did a bit of journaling with a black marker. 
I really love how fun this was to create and how bright and funky it turned out. 
I hope I have inspired you to try using a few different Colour Shimmer Dust colours at the same time. It can be a bit scary giving it a go but the result is awesome. 

Hugs
Tracey


Wednesday 17 February 2021

DATE NIGHT by Charmane Koch


Hey guys! Happy Wednesday! Today I wanted to share with you a layout inspired by the February Moodboard... I was very inspired by the layering in the sketch and the positioning of the photo/s...


I went nuts with my Die cutting machine, cutting out the NEW Bohemian Bliss Fine Feathers & Calendula Die Cuts. I used NEW Bohemian Bliss Harmony & Boho Tags papers & also White Cardstock.


To create my layered background I have started with using the gorgeous Bohemian Bliss Kaleidoscope stencil - I decided to add a bit of Bling Colour Paste - to add a touch of Gold to the page...


I've also stamped the beautiful Bohemian Bliss Wonderful clear stamp onto a piece of White Cardstock that I have also coloured using Just Blue Mica Powder. I've distressed the edges and layered it behind my photos, along with torn cardboard, that I have gesso'd with Heavy White Gesso, then coloured using Punch Mica Powder.


For my title I have used the 365 Alphas - using White Cardstock again, I have then got out some Bling Mica Powder and dabbed onto the letters, giving an extra coat once dry.


And this is the finished product... I hope you like!


I hope I've inspired you to give the sketch a go!

Thanks for stopping by!