Showing posts with label City Lights Stamp Set. Show all posts

Monday, 14 November 2022

Bricks and mortar by Linda Pearson

 
For today’s blog entry I was feeling in a painterly mood and wanted to try out a new technique using a stamp in a different way.  I chose the City Lights stamp and the Distressed Bricks A5 stencil to create this painting.  The substrate I used was a canvas media board from Dina Wakely but a heavy cardstock (350gsm +), journal or canvas can easily be utilised.
 
Bee Arty products used in the project:
 
City lights clear stamp set
Shimmer dust – (assorted colours)
Mica powder (assorted colours)
Distressed bricks A5 stencil (Rustic Dreams collection)
Catalyst silicone mini blades tool
Craft Powder Spoon
Darice 6 well paint palette
 
Bee Arty has a variety of stamps that could be used alternatively with this process:
Eye spy clear stamp set
Kind heart clear stamp set
New dawn clear stamp set
Serendipity clear stamp set
Time flies clear stamp set
Zen red rubber stamp set
 
Other products used:
Moulding paste (thick texture paste)
Dina Wakley media board
Dark brown (umber) fluid paint
Dark brown archival ink and blending tool


Apply a layer of texture paste through the
Distressed bricks A5 stencil (Rustic Dreams collection) over the top section of the media board using a Catalyst silicone mini blades tool.  While still wet apply a liberal amount of textured paste over the rest of the substrate.


Press firmly the City lights clear stamp set into the wet texture paste to form a good impression in the paste.   Remove stamp and allow to dry thoroughly as watery mixes of colour will be added to the dried paste.


In the Darice 6 well paint palette add small amounts of Shimmer dust in a variety of colours to suit the stamped and stencilled images.  Using a small round brush to colour the images as desired.  Please note: some colours were mixed together and some Mica powder was added to produce colours also.   Also the water mixes may activate the textured paste if not died sufficiently before adding colour to piece.  Allow to dry thoroughly when complete.


Add detailing to the image by using a darker brown (or appropriate colour e.g. black to suit colour choices).  A fluid mix is required and a fine liner brush to add the brown colour to the shape of the indented sections of the stamped image.
Distress around the border of the substrate with dark brown archival ink and blending tool.
 
Thank you for stopping by, look forward to sharing with you again soon.
Cheers from Linda


linda@yourcreativepalette.com.au
FB:  inspired art journalling group


Saturday, 20 February 2021

Super, Fabulous, Awesome, Amazing by Tracey Campbell

Hi Bee Arty fans. Tracey Campbell here today with a colourful rainbow Creative Team share highlighting the magical Shimmer Dusts. I'm going to let you in on a little secret of mine..... the Shimmer Dusts are my all time favourite Colour Blast by Bee Arty Product ever!!! Yes ever. I mean where else can a little dust sprinkled onto a project create such vibrant shimmery colours and as an extra bonus.... a tiny pot last such a long time.  

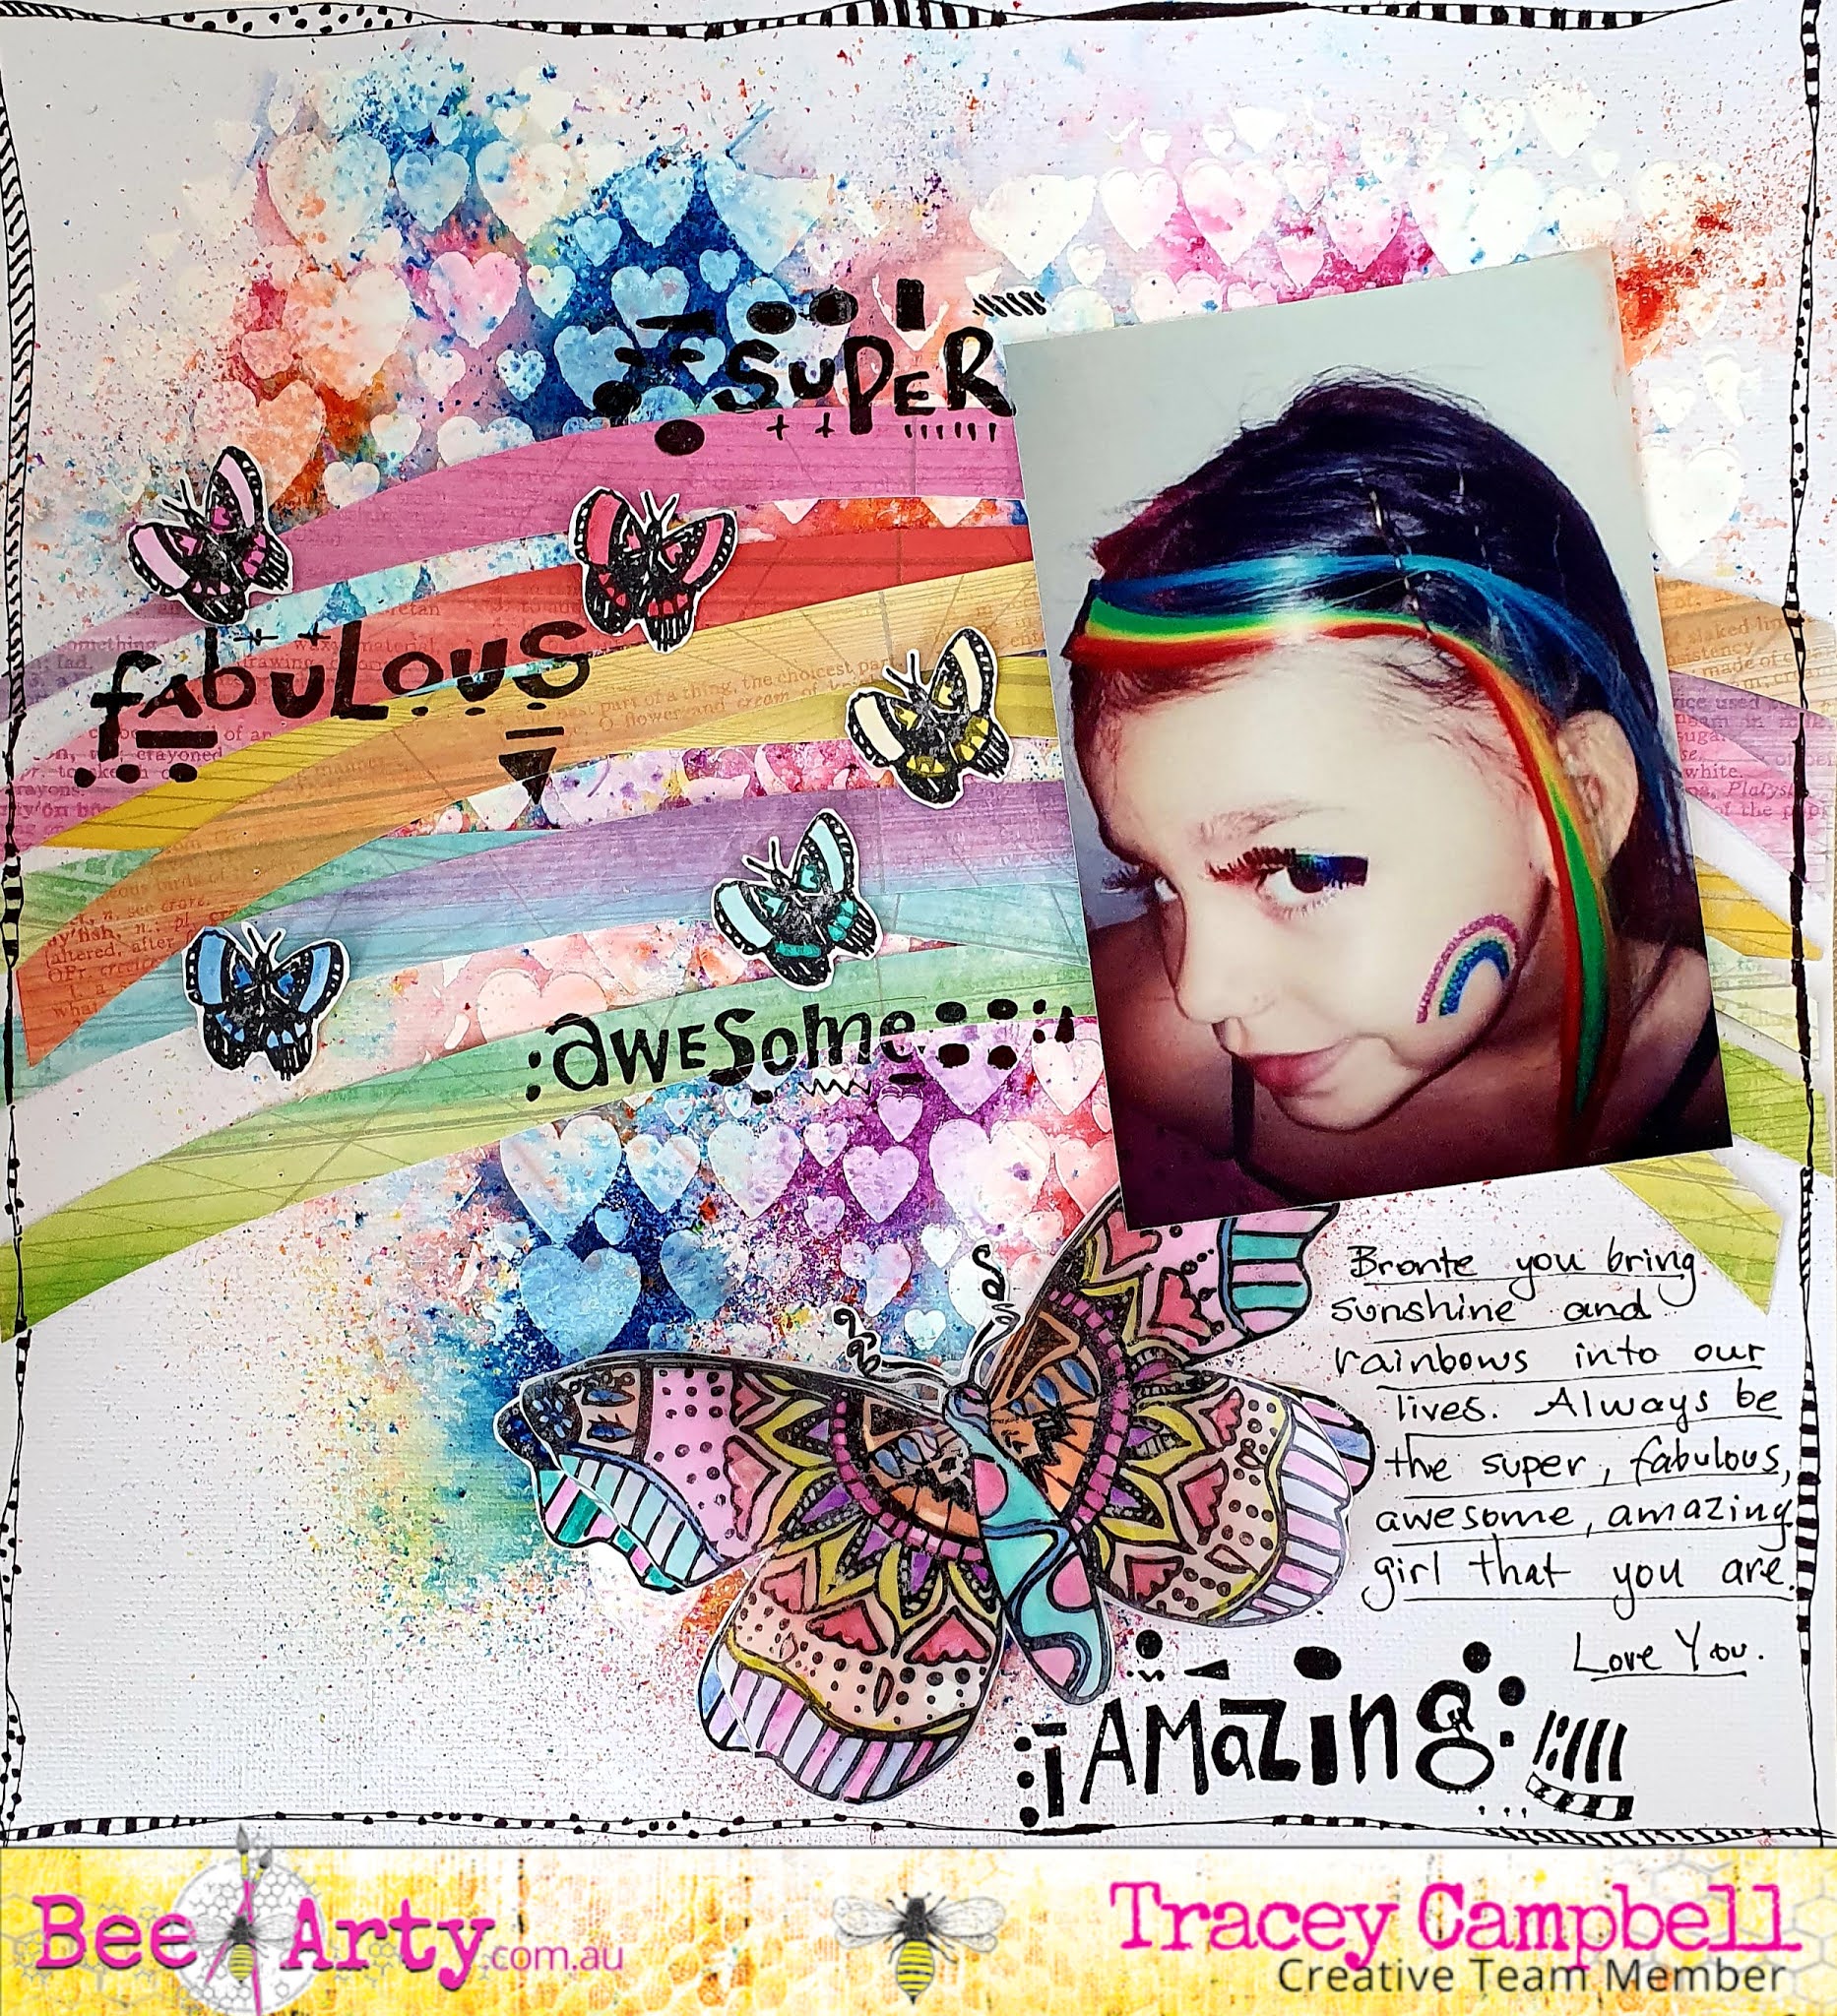
My layout today is of my oldest Daughter when they had a"Circus" theme at school and had to go in dress-ups. Bronte being Bronte just couldn't go as a clown, she had to be something different a "Rainbow Acrobat".   

Here is a list of all the products that I have used to:

Bee Arty Products:

Stamps: Cool Words set, Serendipity, the butterfly from City Lights.

Paper: Artist from the Arty Farty collection

Colour Shimmer Dust: Sunflower, Duke, Amber, Lollipop, Candy, Peacock and Passion

Heavy White Gesso

Stencil: Devotion

Inspired Collection Pan Watercolour set


Other materials:

White cardstock

Black Stazon ink

Black marker pen

3 Dimensional tape

Glue

Velum 

Scissors 

Lead pencil

Paint pallet Knife 

To create by back ground I started by using the Devotion stencil with some Heavy White Gesso, I  used a Paint Pallet knife to spread the gesso through the hearts pattern of the stencil and onto a 12x12 sheet of cardstock.
In the photo below you can see how I spread the gesso through the stencil in a thick "T" shape. Put aside to dry.
While the gesso was drying I cut some arches, roughly 1 cm in thickness from the Artist pattern paper in the Arty Farty collection
Making sure that the arches stretched across the whole patterned paper and at least one of each colour.
Using some Stazon black ink stamp the Serendipity butterfly onto some white cardstock and then repeat and stamp the image onto some vellum. Next stamp five small butterflies from the City Lights stamp set.
Using the Inspired Collection Pan Watercolour set and a water paint brush paint all five small and the two large butterflies. TIP: Only use a small amount of water on the vellum butterfly and it will curl and buckle if too much water is applied. 
Once the Heavy White Gesso is dry lightly sprinkle the Colour Shimmer Dust over the hearts. I have used seven different colours, Sunflower, Duke, Amber, Lollipop, Candy, Peacock and Passion. I actually sprinkled all seven colours onto the page making sure not to over lap them too much as I didn't want it turning into a "hot mess" nor mix colours too much. Then I sprinkled a little water onto the background and activate the Colour Shimmer Dust. 
I must admit, watching the colours magically appear and move together is one of the reason I love this product. It makes my heart happy. 
Before the water dried I took a roll of paper towel and rolled it over the top of the activated Colour Shimmer Dust. TIP: Not sure why this works but it does - rolling the paper towel stops the colours from running or smudging together, if you place a piece of paper towel over the top of the Activated Colour Spray it smudges!  
Here is the background. I love the rainbow patches of bright colour and how the hearts show through. 
Now I put it all together by layering the arches across the page, roughly in the centre of the page but more towards the top to create a rainbow. I used white glue to adhere them to the page. Adhere the velum stamped butterfly image to the white cardstock butterfly to create a double butterfly. The photo was next, I placed it on the right side of the layout and tucked the large butterfly underneath the bottom left hand corner. 
Lastly pop the smaller butterflies across the rainbow as if they are randomly flying in all directions. 
Here you can see the position of the elements as they come together.
Next I used Stazon black ink to stamp the words form the Cool Words stamp set across the page.
Here you can see where I have positioned the words; Super, Fabulous, Awesome and Amazing on the page.
To finish off I doodled a funky boarder around the edge of the cardstock and did a bit of journaling with a black marker. 
I really love how fun this was to create and how bright and funky it turned out. 
I hope I have inspired you to try using a few different Colour Shimmer Dust colours at the same time. It can be a bit scary giving it a go but the result is awesome. 

Hugs
Tracey


Wednesday, 25 March 2020

Life is a Work of Art, by Ros Aggett-Madley


My project today has been done on some card I cut to 8x6 inches.


I stamped the row of houses from the City Lights stamp set onto this.  I repeated this 3 times on a separate piece of card so that I could do some layering for a 3d look.


I've then coloured each piece with some water mixed in tiny amounts of Colour Shimmer Dust.  Mixing some to get different shades.
I've done this to my base piece and any piece I wanted to build up into layers.  


Foam tape has been used to layer the pieces.  The little yellow garage is 2 layers.  The trees are 2 and 3 layered.
The tall pink house is 3 layers and the other 2 are 2 layers.


Once these were all assembled I have added a wash of water and Colour Shimmer Dusts to the background.  
A quote has been added with matte gel from Scrap FX Creativity Phrases Rice Paper and a few birdies from the Lifes a Beach stamp set


Hope you've been inspired 💙


Friday, 7 February 2020

Fun with stamping and Colour Blast Artists Inks! with Elisa Ablett

Hello Hive members, 

Elisa here from the design team with a special blog post today.

Last year I was lucky enough to teach a few classes for Colour Blast at the Brisbane Expo using a few stamp sets I designed especially for the classes. 

We have a few sets left over and now Paige has put them up for sale on the website and I get to show you what you can do with these beauties!

Here are a couple of mixed media cards that I made with both sets of stamps. Perfect fit for the front of a standard size card. Easy to use and add colour to as well! 


With the Serendipity stamp set, I stamped with embossing ink pad and then used Dusty Charcoal Colour Embossing Powder and heat set with a heat gun.  I then coloured the butterfly using Colour Artist Inks in Mermaid, Slipper and Citrus using a thin round paint brush, washing between colours.


With this card, I started by tearing a few strips of old book or music paper and layering them on the bottom of the card. Then used Colour Artists Inks in Citrus, Barley, Cranberry, Spice, Cider, Soot and Mermaid to add my sunset and grassed area. Once your background is complete, dry completely and then Stamp your City Lights stamp over the top using a black archival ink pad. You can also heat emboss using the Dusty Charcoal Colour Embossing Powder.


Here is another photo of the Serendipity Stamp Set, used on two card fronts, one heat embossed and hand coloured in and the other heat embossed using Snow White Colour Embossing Powder and then a colour wash applied over the top using Colour Artist Inks. 

The embossing powder makes for a great resist and watercolour wash technique.

Here are the two stamp sets I designed, perfect for cards, art journalling and scrapbooking!!


 What else can  you make with these stamp sets and Colour Artist Inks I hear you say???

Here are a few projects I created using the stamp sets.


Well that's it from me today, 
make sure you stop by the store for a peek at all the awesome products we have available.

Til next time, 

hugs 

Elisa