Showing posts with label Colour Paste. Show all posts

Saturday, 23 April 2022

Beauty All Around by Tracey Campbell

 Good morning everyone, hope this post finds you all well. Today I am sharing with you a layout I created using the Whispering Woods Collection. This collection is such a cute delicate collection filled with whimsy and wonder. It was just crying our for me to find some an older photo of my daughter dressed up as a fairy....which I was happy to oblige too. 

Beauty All Around

Cut off 14 cm from the Fernery pattern paper and adhere it to the bottom of a piece of white cardstock with the woodgrain side facing up. Use some green ink, I varied between dark green and light green and stamp the leaves and fern frond image from the Celebrate Nature Stamp Set around the outside of the base cardstock.  
Arrange the stamping so that the leaves and fronds face inwards towards the centre of the base.
Using the Forest Whisper A4 Stencil, and some Punch Colour Paste I applied the flourish running up from the middle to the top right hand side of the woodgrain base. If you have not tried Colour Paste before you are missing out. It is a quick and easy way to add texture and movement to you creations, there are many ways to apply it. It spreads like butter through stencils and comes in a large variety of colours to suit any project.
Here is what the base looked like before I started to ad more to it.
Apply a piece of light pink lace across the join where the woodgrain over laps the cardstock.
Fussy cut the flowers from side and top flowers from the Magnolia pattern paper, be careful not to cut up the centre of the pattern paper as I used this part to mat my photo. I did in and one continuous piece so that I could use it as a floral frame, but it is alright to do it separately and arrange the flowers. Adhere the floral frame to the base, stick it so that it over laps the top of the woodgrain pattern paper and runs up the edges and over the top, it should create a boarder overlapping the stamped leave images. See the final layout for the positioning.
Double mat a 4x6 inch portrait photo with a white boarder and the centre spare paper from the Magnolia pattern paper where the fussy cut flowers were from. Ink the edges with a brown ink and then distress them with a distressing tool. Cut out the title "If you love nature you will find beauty all around you", two of the tags (one large and one small) and a bird from the Natures Words, Imagery and the Woodland Tags pattern papers. Cut out the centre of the tag hole and tie some lace through it. Repeat the technique of distressing the edges of the title and tags with the ink and distressing tool.
Adhere the photo tot he base with some cotton thread or gauze spread out under the photo poking out form the edges to add texture. I place my photo on an angle, as can be seen in the final layout. Adhere the title around the page so that it is positioned around the photo. I adhered with 3 dimensional tape a bird at the top of the photo so that it looks like my daughter in the photo is looking up at it.
Tuck the tags under the photos bottom left hand corner, the tags are a good place to adhere some more of the title. Finish off with a few wood dot embellishments.
Here is the final layout. I love the soft magical feel to the Whispering Woods Collection, so delicate and light. I can see myself pulling this collection out and using over and over with all my daughters photos.
Thanks for stopping in and I hope that I have inspired you to check out the Whispering Woods Collection and get creative.

Hugs
Tracey


Sunday, 13 March 2022

Breathe by Tracey Campbell

 Hello Bee Arty Peeps, it is Tracey Campbell here today with another Creative Team creation to share. I decided to give the Bee Arty Creative Hive (Facebook Groups) Monthly Challenge a go. The cool fresh colours and beautiful sketch made me wish for crisp spring mornings in this dreary wet weather we are having. I am in New South Wales and we have had two weeks of rain, with for to come, there is flooding and mud slides happening around us. So retreating into my creative zone with this months challenge was a great way to escape. 

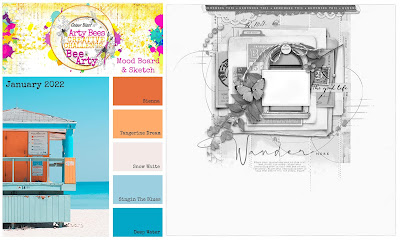
Here is the sketch and colour combo for the March Challenge, no you don't have to use both, but I have. You can find the challenge here: Bee Arty Creative Hive


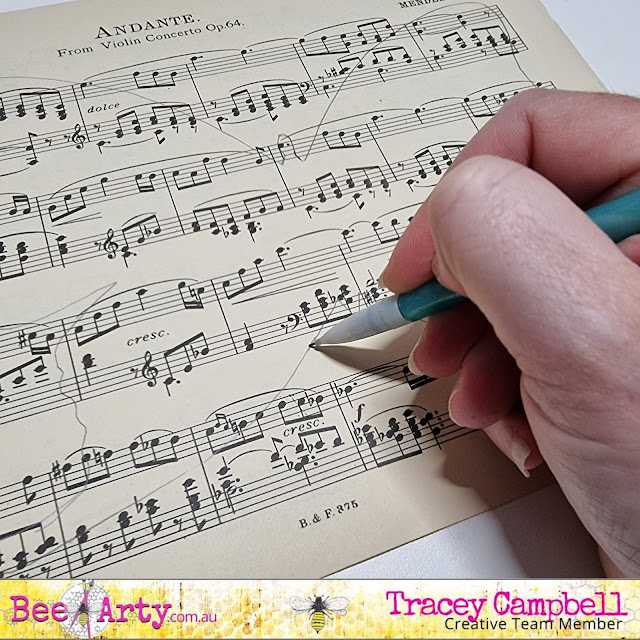
To start with I drew an outline of butterfly onto some sheet music.

Next I fussy cut the hand drawn butterfly and two butterflies from the Turning cut-a-part sheet in the Embrace Change collection


With a paint brush paint Tangareen Dream Colour Shimmer Spray in the centre of Steel Plate pattern paper from the Graffiti Grunge Collection. Graffiti Grunge is an older collection that is full of fun surprising papers that are great a starting place for messy backgrounds and perfect to represent the grey from the colour challenge for this creation.


Next I spread some Apple of My Eye Colour Paste through the Party Lights stencil. I repositioned the stencil so that the leaves ran off in three different directions, pointing towards the top left and top right corners and then bottom left hand corner. See the photo below to see the positioning. Once it was dry I repeated the stencilling process with Lemon Zing Colour Paste. Sorry I didn't take a photo with the Lemon Zing stencilling at this stage, but you can slightly see the two over lapping colours in the final layout, it is very subtle.


When the Colour Paste was dry I used the straw from the bottle of Stormy Weather Colour Shimmer Spray to splatter drops of the stray across the page.


To add the line boarder that is on the sketch I used a fine paint brush and some Stormy Weather Colour Shimmer Cube to paint the outline around the very edge of the base. Note: the Colour Shimmer Cubes are no longer available in the store as but you can substitute this part by using a thin paint brush and the Colour Shimmer Spray. If you choose to do this, don't shake up the bottle of the Shimmer Spray dip the brush in to get the thick sediment that settles on the bottom. It will give you a great amount of media to paint at the right consistency. If you do shake it up, then you will have to apply a few coats over the outline, letting to dry between each application. 


The photo below is how my base looked before adding the photo, title and embellishments.


Next while waiting for the Colour Shimmer Spray and Cube to dry I fussy cut a title and a few words. One of the great things of the Bee Arty Collections is that you can mix and match things from a few different collection. Here I have fussy cut from:
The word "Breathe" from the Breathe patterned paper in the Find Paradise Collection, the words "I Love You Even When You Do Dumb Stuff" from the Love Letter patterned paper in the Chit Chat Collection and the words "Happy Memories" from the Love patterned paper from the Love and Grace Collection.


Next I double matted my photo, I did a thin 2 mm mat with the blue side of the Journey patterned paper from the Aim High Collection and then a 7 mm mat with some of the lime green tones found in the Arty Farty Collection. 


I then adhered the music sheet butterfly in roughly the same position as on the sketch onto my base. Then stuck the matted photo down overlapping the butterfly. At this stage as I was embellishing with the fussy cut butterflies from the Embrace Change collection I decided that they were a bit dark and I wanted to add a pop of colour. So I pulled out some of my very ignored butterfly punches and punched out some from the blue and lime green paper that I used before to mat the photo. Tip: If you don't have butterfly punches you could always stamp the butterflies and emboss them to the colour you want. The Bee Arty Beautiful Butterflies Stamp/Die Set would be perfect for this and at only $10 (available at the time of this post) it is an absolute steal. 


I finished off the layout with some yellow and orange twine tied in bows and adhered the fussy cut words down.


Thanks for popping in and I hope I have inspired you to give the challenge a go and to pull out those collections you and an mix and match.

Hugs
Tracey


Sunday, 23 January 2022

The Best Memories - With Karyn Schultz!

 Hi Bee Arty Lovelies!

It's Karyn here and today I have a scrapbook page to share with you made using the Road Trip collection from Bee Arty.
 
 
I'm playing along with the January mood-sketch challenge. We would love for you to join in with this challenge and be in the running to win a Bee Arty online voucher. You have until January 30th and you need to upload your challenge here (please follow challenge rules). 
 

I have been inspired by the colours of the moodboard and also the sketch (turned on the side).
 
I used a painting with plastic technique to add Oasis, Calypso and Mermaid Colour Artist ink to some 350gsm Heavy White Cardstock, then I added splatters of each colour.
 
I used the City Nights A6 stencil from the Road Trip collection and Deep Water Colour Paste to add dimension to the page.  

 
I added stamping using the Mapped stamp and the Making Tracks stamp set from the Road Trip collection, and Black Archival ink.  
 
 
 Here is my completed page.
 
 
 I've used a sheet of Road paper and cut matts for my photo using different designs on the front and back of this paper. My photo is 9cmx12cm printed with a white border. I've added 5 different patterned paper layers, some book paper, a kraft tag, and torn cardboard layers.   
 
 
 I've fussy cut elements from the Spy paper as well as leaves from the Road Trip Collection Cover paper. The words are cut from the Vacay paper, also from the Road Trip Collection.  
 
 
 Lastly I've added some orange enamel dots and outlined my page using a fine black Life of Colour paint pen.


Thanks so much for stopping by

Crafty Hugs xx


Sunday, 9 January 2022

Escape The Ordinary - With Karyn Schultz!

 Hi Bee Arty Lovelies!

It's Karyn here and today I have an art journal page to share with you made using lots of cool products from Bee Arty.
 

  I'm using a cotton rag watercolour page in my DWM art journal. I start by painting Steel and Stormy Weather Mica Powders across the page. 

 
I used the Free Hand Stencil and applied Navy Colour Shimmer Dust mixed with water using a sponge. Then I used the Directions Stencil with Sienna Colour Paste to add some stencilling across the page.  


I then added stamping using the Mapped stamp and the Making Tracks stamp set from the Road Trip collection, and black Archival ink.  


Here is my completed page.

 
The image is from the Tick paper from the Time Flies collection.  I've embellished with fussy cuts from the Time Flies collection pack. The title is cut from the Curious paper. I've added a white cardstock Compass die cut, and a book paper Grungy Filmstrip die-cut. I've outlined my page using a fine black Life of Colour paint pen.


Thanks so much for stopping by

Crafty Hugs xx


Friday, 17 December 2021

"Mask On" by Charmane Koch

 Happy Friday Everyone! Hopefully it is anyway! I know I am glad it's Friday! I have 5 more days of work including this one, then it is HOLIDAY TIME! CAN>NOT>WAIT!

Today I thought I would share a layout I have been meaning to finish for ages! It went through a long process... firstly a while back I had a play with combining Colour Paste Snow White with Embossing Powder (I had excess of a mix of different Embossing powders I didn't want to throw out!} so I did a couple of backgrounds using Bee Arty Stencils... {check this blog post out!}

So I have had this background in my stash for quite a while. I used the Boxed In Stencil. I also have had the Covid papers to use for a while too, I knew I wanted to document Mask wearing, although had NO IDEA we would be wearing masks for so long! If you want to document Covid - there is an amazing Step by Step Mini Album you can create - FIND THE COVID MINI ALBUM HERE!

To colour my title, I have used a shimmer cube & a splash of water... here's a quick video... you could also use Shimmer Dust and water to create a similar effect!


I love the effect the Snow White Colour Paste and the Embossing Powder creates!

As you can see I have also added the Distance Stencil using the Envy Colour Paste. I did test out a few different Colour Paste colours to work out which one would match the best...

Loved the little Cut-Outs from the Covid Papers - 


And here is the final layout! Lots of journalling on this one!


Thanks again for popping in & I hope I have inspired you to experiment with Snow White Colour Paste & Embossing Powders! It truly does give an awesome effect! 

Merry Christmas & a Happy New Year to you all! 

XO Charm