Showing posts with label Chit Chat collection. Show all posts

Saturday, 18 June 2022

Masculine Wallet Card by Sunila Mahajan

 Hello Bee Arty Lovelies,


Sunila here, and I'm back with a fun pictorial for you'll. Today I'm using the Chit Chat collection for a paper crafting project. When it comes to making Masculine cards, it's a challenge for me. So today I thought of trying out a different idea, and I created a Wallet style card. This is a unique greeting card with space for a gift card/voucher/money. 

Here's a look at it:


Let's dive in, into the process of creating this.

Step 1:
Cut a piece of pattern paper at 10 3/4" x 3 1/2"


Step 2:
Score on the long side at 4 1/2", 4 3/4", 9 1/4" and 9 1/2". Rotate to left and score on the shorter side at 1 1/4" and 2 1/4" until the second score line. This is our base piece.


Step 3:
Cut another piece at 9 3/4" x 3". Score on the long side 1/4", 4 3/4", 5" and 9 1/2". On the short side score at 2 3/4". This is our first pocket piece.


Step 4:

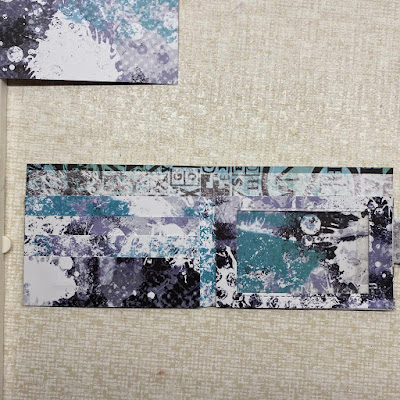
Score and burnish the base piece and trim off the two shorter squares along the side as shown in the image below.


Step 5:
On the first pocket piece, cut the smaller square along the middle score lines, and the 2 corner squares. 


Step 6:
Time to glue the two pieces together. Place the pocket piece over the base. The middle score lines should align. Apply glue onto the side and bottom flaps and glue it to the base. This gives us a nice pocket for notes. 


Step 7: 
Cut three pieces for the inserts measuring- 2 1/4" x 4 3/8", 1 3/4" x 4 3/8" and 1 1/4" x 4 3/8"
Adhere tape along one long side and both shorter sides, stick them on top of each other to form the three pockets on the left inner side of the wallet.


Step 8:

Cut another piece measuring 2 3/4" x 4 3/8" . I then used a rectangle stitch die smaller than the piece to cut out a window. This creates a see through pocket for the inner right side of the wallet. Adhere tape on the bottom and the two sides and stick it on the wallet.


Step 9:

Fussy cut elements from the paper pack, and decorate the front. For the closure, you can use magnets, or velcro. I simply created a slit and inserted the flap in. Cut out elements and insert in the pockets, along with the gift card or a photo. 


I've used the Chit Chat Collection for this project. 

Hope you enjoyed this project!
Hugs,
Sunila


Saturday, 21 May 2022

Romantic Layout by Sunila Mahajan

 Hello everyone,


Sunila here, and today I'm sharing a mixed media style layout with you all. I was inspired by this month's sketch for the challenge and I thought I'll inspire you all with a layout. 

I've used the chit chat collection for my fun layout today. 

Here's a look at the layout:


 The collection helped me create a cute, romantic layout. I've added texture with background stamping, colour paste with a stencil, and then layered die cut and fussy cut elements for complete the composition.


To balance out my main photo composition in the centre right, I've added a small cluster of elements on the bottom left. This creates a sense of movement and balance in the entire layout, still keeping the focus on the main cluster. 


Products used:

Bee Arty Chit Chat Collection

Stamps- Memories, Wonderful

Stencil- Interwoven

Colour Blast Colour Paste

Die Cuts- Polaroid Butterfly


Have a great weekend!

Hugs,

Sunila

Monday, 14 March 2022

CHIT CHAT mini journal

 Join me today as I create a mini journal utilising the ‘Chit Chat’ collection designed by Tanya Froud as well as incorporating other bits and pieces from other Bee Arty Collections and using ephemera from my own stash.  This project allows you the freedom to create a mini journal that suits your own situation …. ENJOY!

JOURNAL BOOK construction

Chit Chat collection kit

Chit Chat scrapbooking paper collection

50mm wide Kraft adhesive book tape (Officeworks)

Xpress it 50mm wide double-sided tape

Paper cutter

Gridlock stencil

Black Archival Stamp Pad

We all have lots of cardstock from various paper collections left over in our stash.  Today we are going to cut up several sheets of cardstock to create a mini art journal that can be used for any number of purposes.  With this project anything goes, and you can include as many pages as you need for the desired purpose of the journal.  Also, an opportunity to use up all the left-over ephemera you have lying around is perfect for decorating the pages of the journal and photos can be added to finish off.

You can decide how many pages will suit your particular needs, up to 10-12 folded sheets is very doable if using 50mm wide tape for binding. 

For the sample journal made here I cut 12”x12” cardstock sheets in half to make a 6”x6” (folded) journal book. 

Another option could be to sheets into 3 to make a 4”x6” journal (landscape view).

Open View of journal below

Steps for assembling the mini journal

a.     Determine the number of pages you want in your journal.  One piece of 12” cardstock will yield 2 - 6” square height pages.

b.    Use paper cutter to cut each piece of cardstock into 2 horizontally.


c.     Fold each page in half to form a ‘booklet’, use boning tool along fold line.


d.    Sort each single ‘booklet’ into required order

e.     Continually check the book pages are facing correctly … pencil mark the word top and back when you decide which way the paper will sit when bounded together.

f.      Cut and secure double side tape to the back off one ‘booklet’, be sure to place tape as close as possible to the edges (DO NOT REMOVE the top protective film just yet.

g.    Pick up next ‘booklet’, remove one of the protective film layers from first ‘booklet’, be sure to line up carefully before pressing down properly.  Remove other protective film pieces and press down in turn.


h.    Repeat steps ‘F’ and ‘G’ until all ‘booklet’ pages … IMPORTANT: be sure to check the spines of each booklet line up exactly so the journal doesn’t fan out.

i.      Once all booklets are adhered together cut off a piece of Kraft book tape, place along the spine of the journal book to bind all the pages together.  A second layer can be adhered along the spine if desired but not necessary.


Your journal book is now ready for adding lots of cool elements such as Stencils, Stamps then add bits of papers and ephemera from your stash to decorate your new Art Journal.

 The following images provide some inspiration for decorating your own mini journal using bits and pieces from your own stash.


Together

White Gesso

Chit Chat - Metal Dies - Peeps

Chit Chat - Clear Stamps - Happy Stamp, Scrabble

Chit Chat - Stencils OXOXO A5

Untangle -  Flowers Metal die

Checkered washi tape

Aqua shimmer card

Colour Spray -  Caribbean, Bubble gum,

Focal elements -  photo frame, chit chat ephemera cut outs


Look around


White Gesso

Electric Dreams paper collection

Untangle -  Flowers Metal die

Fearless Brave and Free - Girl card cut out card

Abstract circles

Focal elements - Ephemera – own stash, Photos, title


Choose calm 

Untangle collection - flower cut out

Colour Spray -  sunflower

Fearless Brave and Free - Girl card cut out card

Beehive stencil

Focal elements -  I choose calm and follow your bliss stamps own stash, Photo frame, Photos


Party

Fireworks collection

Washi tape – own stash

Focal elements – pocket, celebration photo tags, supporting ephemera cut outs


Earth Angels


 Beehive stencil

Spread your wings collection  Elegant tags cut out page

Chit Chat collection kit - Clear Stamps - Happy Stamp

Versamark Ink pad

Charcoal embossing powder

Corrugated Board

Washi tape – own stash

Focal elements -  Pocket, Photos, Tags for photos, Mini photo book


My Happy Place

Gridlock stencil

Spread your wings collection  Elegant tags cut out page

Chit Chat collection kit - Clear Stamps – Scrabble

Leaping cut out page

Chit Chat collection kit Marked stencil

Washi tape – own stash

Focal elements – Flip out photo tag, Journal tag , Handwritten title, Studio photos


A Moment to Love

Circulate stencil Arty Farty collection

Bohemian Bliss paper collection – large pocket, cut out cards and ephemera

Washi tape – own stash

Focal elements - Mini photo/journal notebook, Finch bookmark


Journal Cover

Gridlock stencil

Black archival ink pad apply ink through stencil to the kraft paper tape using a blending tool.

Add a title to the front cover of the mini journal.


Thank you for joining me today … I hope you are inspired to create your own mini journal using up odd papers from collections you have in your stash.


Cheers from Linda


linda@yourcreativepalette.com.au


Sunday, 13 March 2022

Breathe by Tracey Campbell

 Hello Bee Arty Peeps, it is Tracey Campbell here today with another Creative Team creation to share. I decided to give the Bee Arty Creative Hive (Facebook Groups) Monthly Challenge a go. The cool fresh colours and beautiful sketch made me wish for crisp spring mornings in this dreary wet weather we are having. I am in New South Wales and we have had two weeks of rain, with for to come, there is flooding and mud slides happening around us. So retreating into my creative zone with this months challenge was a great way to escape. 

Here is the sketch and colour combo for the March Challenge, no you don't have to use both, but I have. You can find the challenge here: Bee Arty Creative Hive


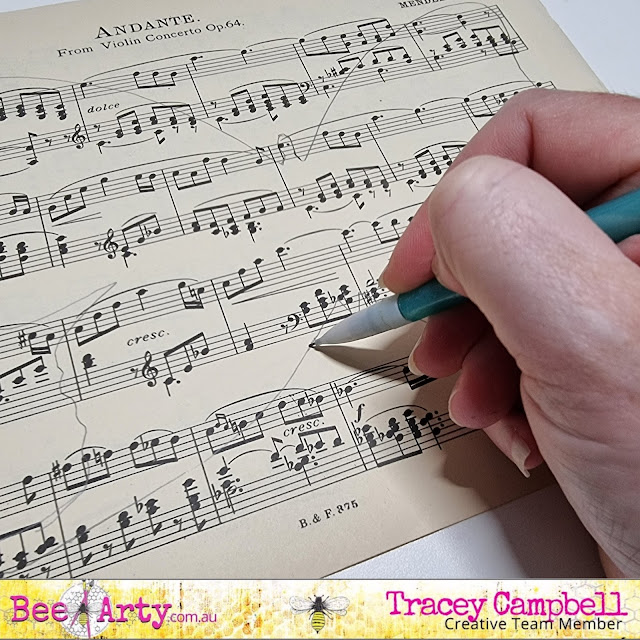
To start with I drew an outline of butterfly onto some sheet music.

Next I fussy cut the hand drawn butterfly and two butterflies from the Turning cut-a-part sheet in the Embrace Change collection


With a paint brush paint Tangareen Dream Colour Shimmer Spray in the centre of Steel Plate pattern paper from the Graffiti Grunge Collection. Graffiti Grunge is an older collection that is full of fun surprising papers that are great a starting place for messy backgrounds and perfect to represent the grey from the colour challenge for this creation.


Next I spread some Apple of My Eye Colour Paste through the Party Lights stencil. I repositioned the stencil so that the leaves ran off in three different directions, pointing towards the top left and top right corners and then bottom left hand corner. See the photo below to see the positioning. Once it was dry I repeated the stencilling process with Lemon Zing Colour Paste. Sorry I didn't take a photo with the Lemon Zing stencilling at this stage, but you can slightly see the two over lapping colours in the final layout, it is very subtle.


When the Colour Paste was dry I used the straw from the bottle of Stormy Weather Colour Shimmer Spray to splatter drops of the stray across the page.


To add the line boarder that is on the sketch I used a fine paint brush and some Stormy Weather Colour Shimmer Cube to paint the outline around the very edge of the base. Note: the Colour Shimmer Cubes are no longer available in the store as but you can substitute this part by using a thin paint brush and the Colour Shimmer Spray. If you choose to do this, don't shake up the bottle of the Shimmer Spray dip the brush in to get the thick sediment that settles on the bottom. It will give you a great amount of media to paint at the right consistency. If you do shake it up, then you will have to apply a few coats over the outline, letting to dry between each application. 


The photo below is how my base looked before adding the photo, title and embellishments.


Next while waiting for the Colour Shimmer Spray and Cube to dry I fussy cut a title and a few words. One of the great things of the Bee Arty Collections is that you can mix and match things from a few different collection. Here I have fussy cut from:
The word "Breathe" from the Breathe patterned paper in the Find Paradise Collection, the words "I Love You Even When You Do Dumb Stuff" from the Love Letter patterned paper in the Chit Chat Collection and the words "Happy Memories" from the Love patterned paper from the Love and Grace Collection.


Next I double matted my photo, I did a thin 2 mm mat with the blue side of the Journey patterned paper from the Aim High Collection and then a 7 mm mat with some of the lime green tones found in the Arty Farty Collection. 


I then adhered the music sheet butterfly in roughly the same position as on the sketch onto my base. Then stuck the matted photo down overlapping the butterfly. At this stage as I was embellishing with the fussy cut butterflies from the Embrace Change collection I decided that they were a bit dark and I wanted to add a pop of colour. So I pulled out some of my very ignored butterfly punches and punched out some from the blue and lime green paper that I used before to mat the photo. Tip: If you don't have butterfly punches you could always stamp the butterflies and emboss them to the colour you want. The Bee Arty Beautiful Butterflies Stamp/Die Set would be perfect for this and at only $10 (available at the time of this post) it is an absolute steal. 


I finished off the layout with some yellow and orange twine tied in bows and adhered the fussy cut words down.


Thanks for popping in and I hope I have inspired you to give the challenge a go and to pull out those collections you and an mix and match.

Hugs
Tracey