Hi Everyone, welcome back again to the Bee Arty blog.
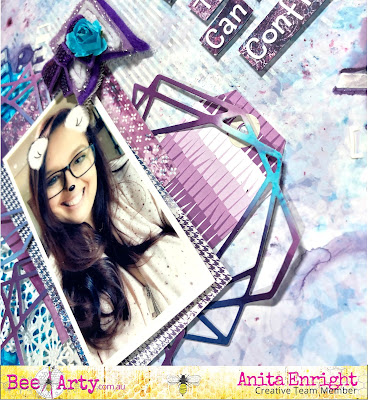
For my share today I created another layout using items from several different collections. I think I have an addiction to these ranges, but these are gorgeous so why not :)
This page I did a couple of months ago for a challenge entry. You know how sometimes everything just falls in to place. I knew what I wanted to do and it just seemed to come together perfectly.
 |
To start I took the Sassy patterned paper from the Trendsetter collections and coated it with a clear gesso.
Next using the Heavy White Gesso and the Interwoven stencil from the Three Six Five collection add the image to the patterned paper.
Next, taking the Calypso Artist Ink add a couple of droplets to the page over the stenciling. Hit the page with a spray of water. Remember you can always add more water, so take it easy to start. I move it around the page firstly by picking up the paper and tilting it in directions for it to move. If it needs further movement I use my fanned brush to give it a hand.
Allow to dry naturally if you can, but you can always use your heat gun to speed up the process.
Taking the Passion Shimmer Dust lightly sprinkle over the stenciling and again spray with water. Move the colour around the page.
Next, on a piece of watercolour paper, I used the Calypso Artist Ink and the Passion Shimmer Dust to create a piece of patterned paper.
From the patterned paper created with the Artist Ink and the Shimmer Dust die cut 3 of the Diamond metal die from the Forever My Always collection.
I then created the layering behind my chosen photos using smaller pieces of patterned paper from the Trendsetter collection, the Diamond die cuts and a paper doily.
When you are happy with the layering cluster with your photo, attach it to the page.
I added a few extra embellishments from my stash including a matching purple paper tag, a Charms Creations embellishment, flower and sequin bow.
To finish I chose a title from the word sheet in the Trendsetter collection, deconstructed it and mounted it on 3D foam tape to the reverse before mounting it on the page. To finish framing the layout I took a white pen and did a freehand frame around the edge of the patterned paper.
Below are a stack of photos of the layout showing the details a little closer.
I hope you enjoyed stepping in to my world for a little while, and enjoyed my tutorial.
Take time to find some 'me' time in your week and create with all your heart.
Until next time..... keep safe.
Anita E


No comments:
Post a Comment