Showing posts with label Arty Farty Collection. Show all posts

Sunday, 13 February 2022

Beautiful Mistake part two by Tracey Campbell

Hello everyone, happy Sunday to you all. Here is my latest layout I have created.

The other week I ended up creating this Dream Catcher from a mistake that I made. 
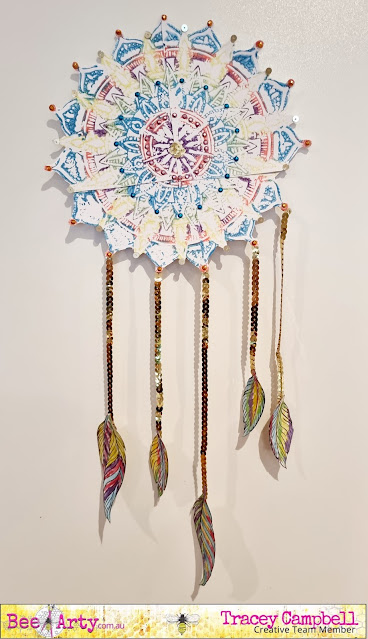
I blogged about it here... if you want to see how I create it. This week I am using the Dream Catcher on a layout and continuing my Beautiful Mistake journey. 
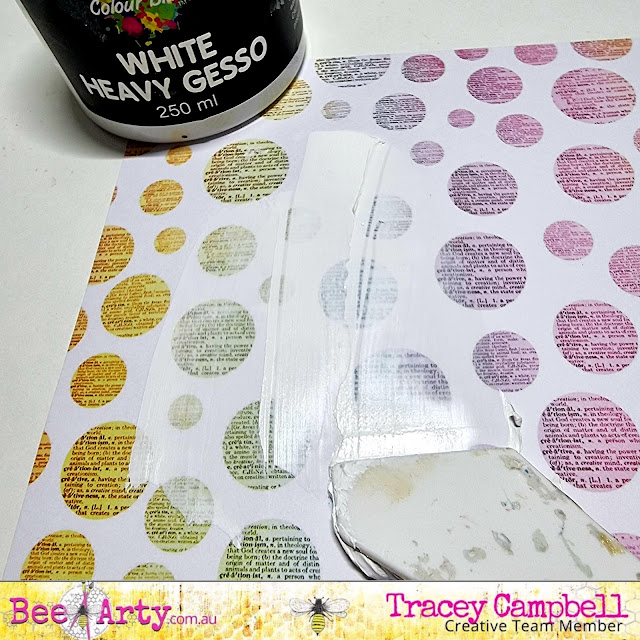
I used the patterned paper with the word circles on from the Arty Farty Collection as my background I applied a layer of Heavy White Gesso to the area where I was going to position the Dream Catcher. 


Applying the Gesso dulls down the printed area of the paper to create a colour block, " a perfect space" to create. The duller background allows the photo or the embellishment to stand out more.


When the gesso was dry, I used some Bling Colour Paste and the Boho Mandal Stencil to add the beading of the Dream Catcher back. When fussing cutting the Mandal out to create a Dream Catcher I had to cut off the vines and beads, as they were way too fiddly for me to cut out. I positioned the beads roughly to the positon where they would have sit fir still attached and where I knew I wanted to glue my Dream Catcher down to, on the background.


I also added the small half mandala from the Boho Mandala Stencil to the right hand side of my background paper.


Here is the positioning of the stencilling with the Bling Colour Paste. I must admit of all the colours of the Colour Paste, the Bling is my favourite, the gold is perfect (not too yellow or dull) and the way it dries makes my heart pitter patter. Once dried I adhered the Dream Catcher over the top, see the final photo for the positioning.


Next I found a photo (4x6 inches) that I thought would suit and cut out 6 different rectangles, the same size of the photo. I also cut out two pieces of vellum the same size. For my papers I used a variety of patterns and colours from the following collections:


Next I distressed the edges of the rectangles with a distressing tool, then screwed them up into loose balls of paper, untangled them and flattened them out. Tip: if you don't have a distressing tool use the edge of a pair of sharp scissors and run the blade across the paper edge but be careful of your fingers. 


Once flat I stacked them under my photo so that at least two of the edges of each rectangle were peaking out. This creates a photo mat with "attitude"  :) it is quiet hight and adds lots of dimension to the layout. Adhere the photo stack to the bottom right hand side of the Dream Catcher. 


To create some addition layouts I tucked in some gold paper doilies and string wreaths that I cut out of some white cardstock with the Sting Wreath metal die. 
I shortened up the gold sequins string, that attached the feather to the Dream Catcher so that they didn't dangle off the page.


Next I cur out a stack of single words from Sweet Talker cut apart in the Bohemian Bliss Collection and distressed the edges. I then adhered them around the layout in random places (see final layout below for positions).


Some close ups.


So I hope I have inspired you to keep going if you make a mistake and not to throw it away, try and create something from it. 

Hugs until next time,
Tracey


Monday, 24 January 2022

To The Moon And Back by Tracey Campbell

 Hello it is Tracey Campbell back for 2022 sharing my latest creations and hopefully inspiring you to pull out the absolutely awesome Bee Art Collections and Colour Blast Products. 

For my first Blog Post for 2022 I wanted to share a layout that I created mixing and matching a few different Bee Arty Collections. I must admit that one of my favourite things about the collections is that you can use your left over scraps from multiple collections together to create wonderful new layouts.

To The Moon and Back

Bee Arty Collections used:

Grateful Heart

Find Paradise

Bohemian Bliss

Arty Farty

Embrace Change

My first step was to use some Bling Colour Blast Paste with a paint palette knife and scrape it through the Scripted A5 Stencil onto the Faith patterned paper from the Grateful Heart Collection, making sure that it is white woodgain side. Colour Paste is as soft as butter and so lovely to spread; tip: start with just a small about (around the size of a 10 cent piece) at it spreads easily and by using only a small amount you don't waste any of it.

Continue to move the stencil around the Faith patterned paper to spread the image around the paper. See the photo above for the final positioning, let dry. The Scripted Stencil is one of my favourite Bee Arty Stencils, because it gives you bot a nice script writing and the small diamond shapes which both add lots of texture to a background and is very versatile. 

When dry I applied some Saffron Colour Spray with a Brayer to spread it out across the page.

Here is what the base looked like after the Colour Spray was applied.

Once the Saffron Colour Spray was dry I used a stiff paint brush and dipped it in a bottle of Sunset Colour Spray and flicked dots across the Faith patterned paper. 

Leave it to dry thoroughly. 

While waiting for the Colour Spray to dry mat three 10x7.5 cm photos (landscape orientation) with Festival from the Embrace Change Collection.

Cut three sperate rectangles using the following measurements and papers listed below:

27x6 cm from the Transform patterned paper in the Arty Farty Collection

21.5x11cm  from the Botanicals patterned paper (using the B side pattern) in the Find Paradise Collection

16x14cm from the Free Vibe patterned paper (using the B side pattern) in the Bohemian Bliss Collection

Once the rectangles were cut out I tore off the bottom edge from each triangle and then scrunched them to give them a distressed look.

Adhere the matted photo strip and the patterned papers to the base like in the photo above.


Fussy cut the following elements from the cut-a-part sheets:
2 x lace doilies from the Grateful Heart Collection. 
The Tile "To the Moon and Back" from the Embracing Change Collection. 

Cut the lace doilies in two and then position everything on the layout. You can see the positioning of the fussy cut elements in the final layout below. 


Well I hope that I have inspired you to pull out all your Bee Arty and see what pieces go together. It is so much fun seeing how the final layout turns out. 


Friday, 6 August 2021

"get on ya bike!" by Charmane Koch

 OK, so it's LOCKDOWN for most of Australia, HOWEVER... SA is lucky at the moment! I have to say I am feeling for each and everyone of you, and although we are safe for the moment, it's like walking on eggshells and feels like anything can happen at any moment!

SO.... WE NEED SOME BRIGHT HAPPY COLOURS! Let's GO FLURO!


I've played with the fabulous {get it?} NEW Fluro Coloured Mica Powders - Fluoro Pink, Green & Yellow...


And the Circulate Stencil from Michelle Grants Arty Farty Collection, and the Cool Words Stamp from Fiona Partridges Fearless, Brave & Free Collection...

First of all I used the Heavy White Gesso through the Circulate stencil onto the Inspirations paper from the Untangle Collection designed by Tanya Froud - just LOVE that it's quite possible to mix so many ranges together!


Once dried, I got out the 3 different Fluro Mica Powders and mixed with water, and coloured each "circle" with alternate colours...


I stamped the "cool" stamps after positioning my photo, that I matted using black cardstock and coloured tissue paper...


I then doodled around the edge of the circles to highlight them...


I decided that I need to also Matte the background paper with black cardstock as well. I cut about half cm around the background Inspirations paper, then distressed it and stuck it onto the black cardstock.

I then added the Charms Creations Fluoro Stars and title, along with the journalling on the page.

Here are some closeups...


I hope I have brightened your day... and you are inspired to play with some Fluoro Colours!


Thanks for popping by!

XO Charm

Monday, 21 June 2021

A Colourful Life! by Linda Pearson


Hi Bee Arters ... today I am sharing a ‘by chance’ page I created recently.  Working on another project I had a quantity of .. colourblast colour paste left over so applied the paste through the Beautiful mess stencil in my kraft paper journal.

Bee Arty Products used:

-   Beautiful mess – stencil from the Arty Farty collection designed by Michelle Grant

-   Colourblast Colour paste - Rose Petal

-   Colourblast Colour artist inks – slipper, barley, marine, calypso, grass

-   Colourblast Shimmer dust  – duke (added to grass ink with water to make a spray)

-   Craft Powder Spoon

Kraft paper journal
Water spray
Black watercolour pencil
Acrylic gloss spray – white
Pipette


Later after the paste had dried, I decided to add some ink colours to the page.  Firstly, I sprayed the Kraft paper with water then added some drops of the Colour artist inks (slipper, barley, marine, calypso), drying off each colour in turn.  I used a paint brush to spread the ink over the surface.  I mixed grass Colour artist inks with water and some Shimmer dust duke to make a shimmer mix with a pipette over the page.

The colours dried a little darker due to the Kraft paper.

I added some Acrylic Gloss spray paint lightly over the page.  Using the black pencil, I outlined the wording to highlight then added water to the pencil to blend the pencil and anchor the text.


Thank you, it was a pleasure sharing this simple page with you and look forward to seeing you next time!


Linda Pearson

https://www.yourcreativepalette.com.au

Saturday, 5 June 2021

Never Give Up On Yourself by Tracey Campbell

 Rainbows and Butterflies! What more could a girl ask for? Good day lovely people, Tracey here with you to share a fun and bright layout that is simple to make and looks lovely when finished. It brings a smile to my face when I look at it and I hope it does to you too. 

For this layout I gathered the following Bee Arty products:

Artist, Vision and the wordsheet from the patterned papers of the Arty Farty Collection

The cover sheet of the Love and Grace Collection 

The Serendipity stamp

Colour Artist Inks in the following colours; Sunburnt, Spice, Citrus, Lime, Slipper, Mermaid and Calypso, 


I created the butterflies first by stamping with Stazon Black Ink onto some velum. Tip: Stazon takes around 20 minutes to actually dry on velum so put it aside somewhere you won't be tempted to start working on the colouring until it is fully dry. 


Draw some arched lines across the Artist patterned paper, try and keep the arches in roughly the same colour sections as these will be used to create the rainbow.


Cut the arches from the Artist paper.


Group the strips in a shape of a rainbow, making sure that you have one at least one line to represent each colour in the rainbow colour spectrum. Adhere them to the Vision pattern paper.


I know that I really love a range of papers when I am looking at the title/advertising sheet of the collection and contemplating using it for my layout (as the old saying goes; waste not, want not). I did actually fussy cut the flower and bird clusters from the cover sheet for this layout - but if you have any of the Love and Grace papers left just use those to fussy cut. 


Next up was colouring the velum butterflies. I used a paint brush and the Colour Artist Inks to do little sections at a time. 


I took my time to colour separate sections as I did not want the inks to run and blend together. I was trying to get a stain glassed window effect. It took awhile but I eventually got the butterflies coloured and let them to dry. The ink does not go on to the velum very well, it tends to pool together away from the Stazon Ink leaving a white edge but I did find that when the ink was also dry you could spread it out more.


I finished the layout by matting a 4x6 inch portrait photo with white cardstock and adhering it to the bottom of the rainbow. I then placed a butterfly behind the top right hand side of the photo and the other one to the left of the paper so that it looks like it is flying off the page. I then finished off with the fussy cut bird and flower clusters, the title and some journaling. 

I hope that I have brought a little brightness to your day.

Hugs
Tracey