Showing posts with label mixedmedia. Show all posts

Friday, 28 July 2017

I can't believe I made this! - by Fiona Hughes

Hi my fellow crafters. I'm here with you all again to share this layout of my eldest, Georgia. This pic was on her Year 12 Formal. She looked so beautiful, I couldn't help thinking, "I can't believe I made this"....... How did that happen.....????


Anyways, I started with some heavy gauge cardstock, spritzed with water, (in a diamond shape), and also some Colour Shimmer Spray in Deep Water & Stormy Weather. I moved the colour with some more water and a watercolour brush, until I was happy to leave it alone to dry. 
After the background was dry, I added some flicks of Stormy Weather Colour Shimmer Spray, by unscrewing the spray nozzle and simply  tapping the tubing part and allowing the solution to splatter....and again allowed to dry naturally.


One of my embellishments was this piece of plain white, medical gauze. I sprayed it with  Colour Shimmer Sprays- Stormy Weather & Steel, setting it aside to dry.... I admit, I did give it a little attention with the heat tool to finish off! Lol.


Ok, let's look to the background again.
 I took a damask-type stencil, a palette knife and my favourite Colour Paste- Steel. I worked  the paste through the stencil, making sure it was over the diamond shape of the dried Colour Shimmer Sprays.


I love the crisp pattern over the randomness of the background colour.


I then, began to put it all together. 
I matted the black & white photo on some black tissue paper. and gathered all the other embellishments- Flowers, die cuts, flair button, black cotton & my coloured gauze. 


2 clusters of these subtle embellies,  some of which i puffy mounted, was just enough, to compliment and highlight my beautiful girl.


With my title down the right of the photo, I am done.
I love working with these great quality pastes, mists and  other coloured yumminess. I hope it shows in my pages.
Thanks for looking my friends. Have a great day.

Bye for now, 

Fi. x x x


Wednesday, 28 September 2016

Altered Frame by Tina Connolly

Hi everyone, I thought I'd share my altered frame with you today.  Now unfortunately my computer died so I lost all my progress shots, so I'll just describe what I did.  

I found an old frame and sanded it slightly.  I collected lots of charms, chipboard pieces, broken jewelley, old paint brushes, diecuts, and other found items, which I adhered to the frame using heavy gel medium.  I allowed it to dry completely before covering everything with black Gesso.  

I coloured the frame using Just Blue, Stormy Weather and Deep Water Colour Pastes.


White flowers were sprayed with Deep Water Colour Shimmer Spray and then smeared with Colour Paste and attached to the frame.  The raised edges of the diecuts and metal charms were highlighted using Bling Colour Paste.  Using a lighter colour on the high points creates the illusion of greater depth.


More diecuts were heat embossed using Deep Water Colour  Embossing Powder, then attached using heavy gel medium.


Thanks for visiting today, I hope I've inspired you to get creative.
Happy scrapping,
Tina xx


Tuesday, 12 July 2016

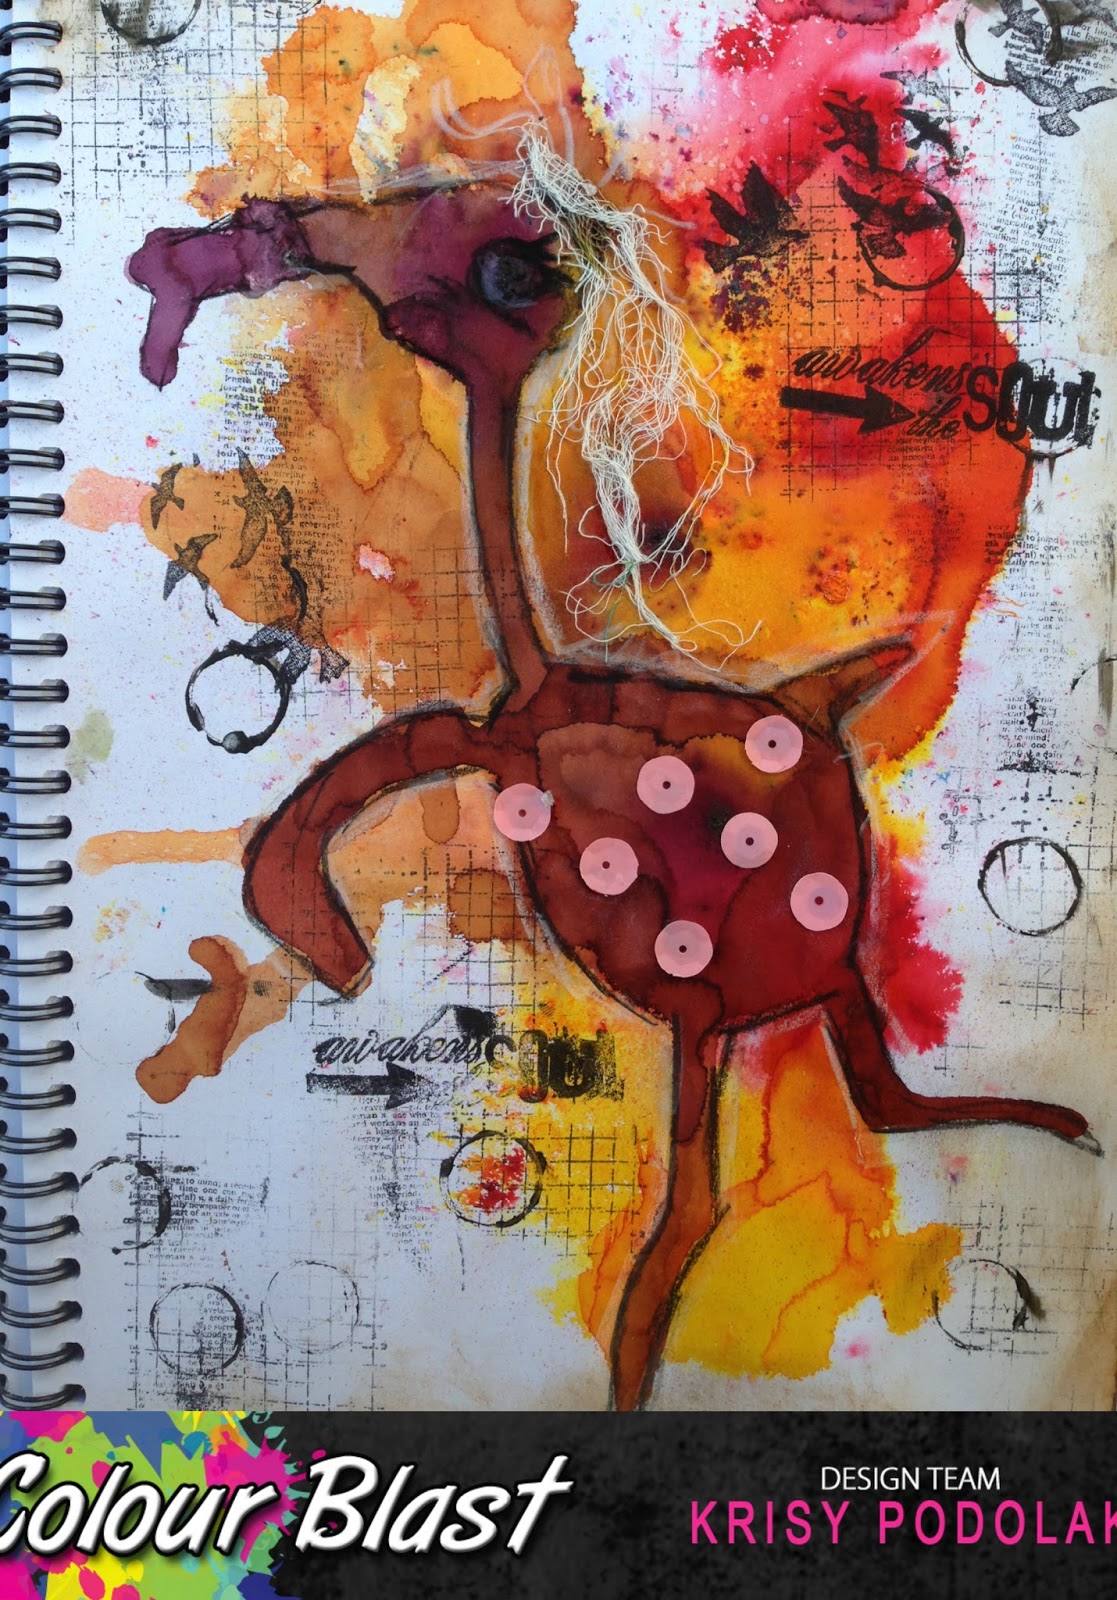
ART JOURNAL | Flamingo dancing in the sun by Krisy Podolak

Today I'm sharing an Art Journal Page.  I recently went back to basics and purchased an art journal like I had in high school.  You know the A4 spiral bound one?!?  Well, it has released something in me that has made me happy.  I love the way pages look in it and the pages hold up really well to mixed media.  When I got my new Shimmer Dust I couldn't wait to have a play and just let the colour do the talking to see what I came up with.


First, I spritzed the paper with water then using a palette knife dropped tiny bits of colour onto the page.  I stuck to using the Candy and Sunflower.  I wanted to use colours that would mix nicely to create a third colour - Orange.


Once the powder was dropped onto the page, I just sprayed on more water and tipped the page up to allow the colour to run and mix.  I added even more paper and then used a heat gun to dry it and move the colour around in the process.

Once it was pretty dry, I added a third Shimmer Dust - this time the Velvet.  I only added it to the middle of the page and then spritzed it with water to dissolve it and move it around.  I dried it the same way as I did the other two colours.


Once it was dry, I found a shape in the purple that I wanted to make the focus of the page so, I drew around it with a Black pitt pencil and smudged the out line to blend it.  I then used a white pencil to add highlights to the outline and some hair.  I then added some textural stamping to the background, inked the edges of the page and added a few embellishments and the page was finished.  A flamingo dancing in the sun.

Art Journaling isn't always about starting with a plan or a page in mind.  It's about letting the colours and media talk to you.  And in this case that is what I did.  Don't be afraid to experiment. You can watch my process video on my YouTube channel POPLEOPOD.

To see the full range of Colour Blast products including the new Shimmer Dust, click on the Link.


Monday, 16 May 2016

Life is Beautiful by Nirvana


Hi Everybody!!!!

Today I present you a small canvas "Life is Beautiful".... Because... Life is beautiful no?!!!!


Pop Up Image    Pop Up ImagePop Up Image
I have applied one by one, then I mixed slightly with a spatula over my mask! 
After, I've embossed my dreamcatcher with 
Colour Embossed Powder Fire Engine, and Deep Water!!!
I stuck a badge in the middle, then made some ink stains here and there!!!
My tuto/vidéo:


Sunday, 3 April 2016

Water Lillies Layout by Elisa Ablett

Hi everyone,

Elisa here again with my newest creation for the Colour Blast Blog.


I am sharing a layout called 'Water Lillies' I created using Royalty and Sunshine Colour Blast Paste and Apple of my Eye, Sunshine and Royalty Shimmer Sprays all of which can be found on the Colour Blast Australia website. Click on the links and see the amazing colours available.

I was going through my photo's the other day and came across this photo of a couple of gorgeous water lilies that I took near my Mum's property and thought it's perfect for showcasing the Royalty and Sunshine Colour Pastes and Sprays.


Here is a close up of the gorgeous shimmer and shine of the pastes and sprays and of the details of the Oriental inspired screens, rub-ons and stamping.


Now lets go through some of the techniques that I used to create my layout.

Firstly, I gathered together the Colour Blast Pastes and Sprays I needed to go with my photo along with my stencil and laid out a rough plan for my layout.


Here I used the very tip of the palette knife to control the placement of the different coloured Pastes on my Stencil. After each flower was completed I washed and dried the stencil and moved it around my page as required.


While I waited for the background to dry I decided to work on my Oriental inspired frames. I found some gorgeous tissue paper that went beautifully with my colour scheme. As you can see from the photo, I turned the Chipboard frames upside down and glued them to the tissue paper. Once dried I cut around the frames, I liked the look of a couple of the screens left with the tissue paper stretched over the top of the frame and had the great idea to create my own Asian inspired paper screens. To get a smooth edge I used a bit of glue on my finger and smoothed it over all the edges.


Next step !! gather together all your old rub-ons and grab your desired stamps, using Black Versafine ink stamp in a mirror image on both screens, you can achieve this by stamping the image on the left screen on top of the tissue paper. Then grab the right screen - turn it over- then stamp the image on the underside of the right screen, so when you turn it over it becomes the mirror image of the left screen. You can only do this with certain paper types like tissue paper.


Here is the left screen.


and here I am stamping the underside of the right screen.


The next step is to Spray over the top of your Stencilled and dried lillies, I sprayed then used a spray bottle filled with water to disperse the colour around my page, tilting the page left and right at times to spread the colour.


Once dry I decided to do a little more background stamping with my chosen stamps, I also decided to take a bit of the intensity of the ink off the stamp by stamping on my mat first then stamping on my page, works a treat!


Let the ink dry completely before this next step, 'roughly' add your desired rub-ons to your page - you do not have to be concerned if its not particularly neat, I wanted mine to look weathered and worn. It is adding extra texture and depth to your page.


Time to put your layout together!  Firstly stick your frames down on your page, arranging them in a central position. Also I decided to put one of the frames on a tilt in the middle to add a little interest drawing the eye to the photo in the middle. I framed the photo in a chipboard frame, covered in black ink just to further showcase the photo as the background is quite bright and busy.


Here is the finished layout! there is plenty of shimmer and shine from the Colour Blast Products and I think a new purpose for all those rub-ons I have in my stash.


Well that's it from me today, I hope you have enjoyed the techniques I have used to create my layout, make sure you leave some love....


By Elisa Ablett


Monday, 28 March 2016

Mixed media card for a good friend by Wilma Voermans

Hi, Wilma here today with a card 
I hardly make cards and never send them.
But a good friend of me can use a cheerup moment, so I decided to send her one.


I started with a leftover piece water colour paper.
Spread gesso random with a pallete knife, let dry, sprayed with Colour Shimmer Spray, let dry, gesso again etc
This way you get a very rough background.


I cut off the piece that was too big for the card .
Two rectangles, gave them some color and stamped a butterfly image parts on it.
Added  fluffy thread, a few chipboard negative leftovers .
I spread a little of the paste in the same colors on the chipboard.
A few little flowers, title and mounted it on black cardstock.

She sure can use a good day and hope she likes it.
Thanks for visiting the blog!


Monday, 21 March 2016

Selfie Crazy By Nirvana!

Hello!!!

Today I present to you a page of my Art Journal "Selfie Crazy".... Because I'm crazy!!! LOL! 

I used these products on the page,  Colour Shimmer Sprays  in 'Deep Water' and 'Lovely Lilac' on background, and I used 'Lovely Lilac' and 'Snow White' Embossing Powders on chipboards (smartphone, and word "selfie"!)


I put 3 layers of 'Lovely Lilac' embossing powder on the word  "selfie" to get this nice thick smooth effect and one layer of 'Snow White' on the smartphone to just get the shimmer!!!


On this last photo, you see highly-rated spangled of Colour Shimmer Spray!!!

Thanks for stopping by
Nirvana


Tuesday, 1 March 2016

Adding details with Colour Blast by Lisa Oxley

 Howdy Bloggers, Lisa Here with a new March update.
This month, I am sharing an Art Journal page in which 
I have used Colour Blast to add a little extra something-something to the piece.

Here is how I did that.
After completing my overall design of my journal,
 I added a little "Royalty" Colour Blast Coloured Texture to my featured portrait ,
by smearing the paste through a stencil.
and repeated the process on the opposite side of the page to create balance and support the image and pattern that I added.
 Then using a word stencil and modelling paste, to that medium 
I attatched/stuck embossing powder in Deep Water, and set with a heat tool.
-I could have just used the coloured paste.
 But my pot is empty and the powders are fun to play with too.
Love the lush effect it achieves .
I also spritzed my page with the Colour Blast Coloured Spray "Bling", which added a super shimmery sheen over 
 Within the details of my background, I have added shapes and elements, which I have created,using Colour Blast coloured paste.It adds lush texture and interesting detail to the overall design and look to my work.

I hope I have inspired you to get out your art journal and
 add some fun and funky colour blasting details to you pieces.
"Every Artist dips her brush into her own soul and paints her own truth into her pictures."
Lisa x