Showing posts with label Paint. Show all posts

Monday, 19 November 2018

Paint by Suzanne Franin

Hey Everyone Suzanne here

For my Colour Blast Blog post this week I couldn't decide which photo I like so I did both as they were both to do with paint

You will find the Colour Paste here at the Colour Blast shop or find your nearest Stockist here


Colour Paste Canvas


So for the first canvas after painting with White Gesso  I used the Colour Paste as a paint rather than a paste to paint my very uneven stripes the colours I used are - Apple of my Eye, Blush, Fire Engine, Singin the Blues, Sunshine and Tangerine Dream I did two coats so the colours came out intense like they do when you use them as a paste through a stencil


I also painted the paintbrush that was covered first in BlackGesso which makes the colours look different - I used Fire Engine, Sunshine and Apple of my Eye


Then to do the stencilled dots I used Colour Paste Stormy Weather


I added a few embellishments like the transparent butterfly and the Today which I've had forever I think they were Heidi Swapp 
The dotted card I'm not sure if it's Project Life or Kaiser and then the words are from Tim Holtz's Small Talk sticker book
The paint Brush I just added some flowers and a butterfly that I can't remember where it came from I've had it that long 

Colour Shimmer Cubes Canvas


The second Canvas I splattered the watered down Colour Shimmer Cubes over the canvas after painting it with White Gesso the colours I used are - Apple of my Eye, Fire Engine, Punch, Singin the Blues, Sunshine and Tangerine Dream


Then to do the little frame from Memory Maze I used Colour Shimmer Cube Leather


I painted a small piece of watercolour paper with Tangerine Dream Sunshine and Singin the Blues and used a flower sticker I've had for ever I think it came with the green butterfly from the other canvas and the butterfly on this canvas


I had some old paint brushes that I dipped in the same three colours so it looked like they were the brushes I used to paint the canvas then put a few flowers across the bottom 


I also used another card this time stripes from either Project Life or Kaiser with a Small Talk sticker quote


I had a little clear arrow I've had in my stash for ever - these canvases have been great for using up older pieces 

Thank you for visiting and I hope you will come back soon x


Monday, 9 July 2018

Owls with Selena Stevens

This is a fairly simple page today.  I have also included a process video for you to watch.  Click here to see the video.


To start this page I used one of my new favourite mediums, a resist spray, through a homemade stencil.  Once it was dry I sprayed Colour Spray (Sapphire & Indigo) and Colour Shimmer Spray (Lovely Lilac) once it dries then the resist starts to show through.


I painted some simple owls in with acrylic paint using several colours.


Colour Paste (Sunshine) was applied with a palette knife to give large luminescence eyes.


Heavy Black Gesso was used to add in pupils to the owls’ eyes.


To give the wings the effect of small feathers, a watermark pen was used to make marks for the feathers. Colour Embossing Powder (Lovely Lilac) was poured onto the watermark areas, the excess tipped back into its jar. The Colour Embossing Powder was set with a heat gun. 


With a white pen used for highlights, bring us to the end of this page.


I  hope you enjoyed it.
Selena

Sunday, 6 March 2016

Under the Sea Canvas by Elisa Ablett

Hi Crafters,
It's Elisa from the Design Team again and it's my turn here on the blog today with a very colourful and fun 'Under the Sea' themed porthole Canvas. As you can see from the finished project that it shimmers and shines and has tones reminiscent of gems.
Apart from the chipboard sea grass, anchor, coral, sea horse, the title and fish, the rest of the embellishments were created using a toilet paper pulp technique and silicone molds, the technique is easily found on YouTube. BUT trust me this technique is amazing and you can pretty much create any embellishment using your old cake decorating moulds, mod podge or silicone moulds. A wonderful friend of mine, Lilian made most of these 'toilet paper' embellishments for me to use on this canvas and my son and I made the cute little turtle. 

The first step in creating a 'porthole' canvas is to paint your canvas with a layer of gesso then once dry, draw your circle onto your canvas, I used a dinner plate that was at hand. I then choose my spray colours, stencils and the most important thing - a masking fluid pen! The masking fluid is for use with watercolours and is a barrier, you lightly squeeze it on where you require it (in my case around the outside of my circle) and it dries to a rubber consistency, once you have finished your project you can use an eraser to rub it away or gently lift and pull the dried rubber up. The beauty of this product is that it lets you put your colours where you want them and provides a barrier to stop them leaking out! Well worth the purchase.

The Colour Blast pastes, sprays and embossing powders that I have used with this project are as follows:- Tangareen Dream, Snow White, Bling, Envy, Deep Water and Just Blue. Click on the link to take you to the Colour Blast shop!!


Next step is to place your embellishments on your canvas and work out placement so you can direct your sprays and stencilling in the way you want. 


Once you are happy with your plan, you can go ahead and spray your embellishments with your chosen colours. I also embossed the chipboard pieces with several colours to build up subtle colour layers. (I actually overheat the powder so that it becomes quite runny then tilt my chipboard from side to side to create a great multicolour effect). Use a paintbrush to brush a layer of colour paste over your embellishments. As mentioned earlier the textured sea themed pieces are actually made out of toilet paper layers thoroughly wet and pressed into wet silicone moulds, there are many YouTube videos explaining this amazing technique. I used to make my own paper when I was younger and I used a 'pulp' instead of torn layers either way you end up with amazing handmade embellishments. I gave my pieces a layer of gesso or you could use clear gesso or gel medium to seal the paper before you spray. 

From the close up below you can see the embellishments coming together.

 
While the embellishments thoroughly dry, I started with the background to my canvas with my chosen stencil and 'Bling' Colour Blast Paste. Gently spread the paste with a palette knife and keep away from your edges. I put an old book under the canvas to keep a flat surface as well.


 Next step! Once the first stencil had dried I added my second layer at the bottom using Just Blue Colour Blast Paste and once that had dried I gently sprayed close to the surface with my first layer of Colour Shimmer Sprays.

The next photo shows a few layers of the shimmer sprays, this is the part where I open the lids and use them as watercolours with a paint brush. I find that at this stage I can get greater control and intensity of  colour with this technique as an end layer.


The next step! once thoroughly dry I sprayed with a thick protective coat of fixative spray called Crystal Kote Fixable in Matte by Helmar to keep the colours vibrant and to avoid smudging. At this stage I painted the white surrounds a brilliant white acrylic paint. I then added my embellishments and the title and added another coat of the Helmar spray over the top. Then I removed the masking fluid carefully from around the circle and used a small paint brush with white acrylic paint to clear up any little spills or messes.


A close up of the intense colour and shine. 


 And lastly a photo of the canvas on my bookcase, I think it fits right in with my coloured bottles, jars and shells.


Well that's it for me today, I hope you have enjoyed watching how the canvas came together. Make sure you leave some love....

Thank you

Elisa xx 


Tuesday, 1 March 2016

Adding details with Colour Blast by Lisa Oxley

 Howdy Bloggers, Lisa Here with a new March update.
This month, I am sharing an Art Journal page in which 
I have used Colour Blast to add a little extra something-something to the piece.

Here is how I did that.
After completing my overall design of my journal,
 I added a little "Royalty" Colour Blast Coloured Texture to my featured portrait ,
by smearing the paste through a stencil.
and repeated the process on the opposite side of the page to create balance and support the image and pattern that I added.
 Then using a word stencil and modelling paste, to that medium 
I attatched/stuck embossing powder in Deep Water, and set with a heat tool.
-I could have just used the coloured paste.
 But my pot is empty and the powders are fun to play with too.
Love the lush effect it achieves .
I also spritzed my page with the Colour Blast Coloured Spray "Bling", which added a super shimmery sheen over 
 Within the details of my background, I have added shapes and elements, which I have created,using Colour Blast coloured paste.It adds lush texture and interesting detail to the overall design and look to my work.

I hope I have inspired you to get out your art journal and
 add some fun and funky colour blasting details to you pieces.
"Every Artist dips her brush into her own soul and paints her own truth into her pictures."
Lisa x

Saturday, 13 February 2016

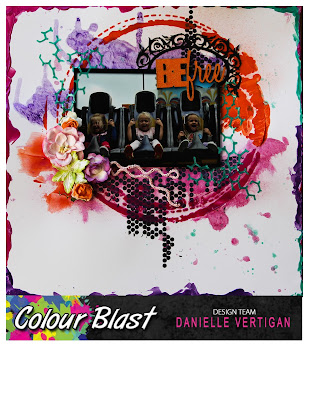
BEfree by Danielle Vertigan

Yay its my turn!!!
Today is my first official blog post as a Design team member for Colour Blast
and I'm a complete newbie so its going to be fun!!!

I was so excited when these goodies arrived and I know you wont be disappointed when you play with them!
My challenge to myself was to see how I could use the Colour Pastes differently and they certainly are fun to play with!! The Shimmer is DIVINE!!! Not to mention the depth of colour that intensifies as it dries!


My first Step was an application through the stencil of Stormy Weather.
Its smooth, clean and fast drying. The product itself is super light and goes a long way.
Next was to mix up a pea size of Rose Petal with some water to create a water paint. I applied it with a brush and allowed the water to run around the page as directing it with movement. splatters also worked well by flicking my brush.
It also dried with the same shimmer.

Once dried I layered a second stencil over the top.
I love layers!! I created a mix with the colour using Rose Petal and Tangareen Dream blending them on the left.
Any excess on my spatula was used to create the smears.
No wastage.....
once dried I repeated the water colour process using Royalty.
I turned the project upside down tapping it on my work station to help create the reverse drips.
When almost dry I added some extra paste to my water colouring with a paint brush to help add a little more intensity and give some roughage to the surface.
Then finished off with a flick of the Shimmer Spray Stalk, Envy around the top and bottom right.


 Through my stencil using Envy I applied the paste to my craft mat and waited for it to dry.
I peels off like a dream!!!! 

Use your stencils and create your own layering embellishments.....
Will definitely be doing more of this.
I was able to use my stencil around my page and layer it on my photo which was foam taped for dimension with no mess! I used my skewer to help add glue (Keeps your fingers clean) and away I went.

You can see how the chicken wire is able to wrap into the photo. I couldn't pass the layout by without embossing my title and WOW! What a product!! Love, Love, Love it!!
Plenty more playing with that to be done!
A little layer of colour with the paste and the spatulas around the edges to create a frame and we are done!  Even with this technique you can layer the paste without the colours blending or bleeding.


I hope you enjoyed my little journey. Don't forget to pop on over to www.colourblastaust.com.au for all these amazing products.
Thanks for stopping by and till next time
Danielle