I'm back!! Yay!
And I must say I'm so in love with what I have to show you today!!!
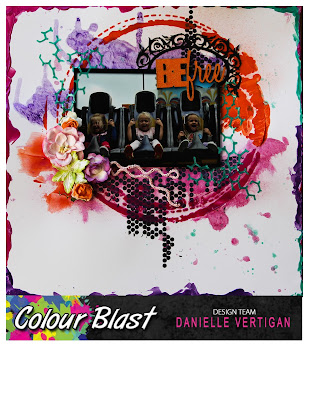
I would have to say completing a layout where you just have to go back again and again to look at it is just the best feeling ever. I'm certainly wasting my day away staring at this one.
Its all about texture, layers and a little more texture!!!
So grab a cuppa, sit back, relax and I hope I can share a little something for your next creative project.
I started with white cardstock (My usual Preference) Backing board, tissue paper, gel medium, stazon and a selection of stamps.


The selection can be anything. We are
creating our background. Think of the textures you can use and get inspired by the background in your photos.
Adhere your white sheet to the backing board. Its going to get wet and this will help add strength. I use a wide double sided tape and make sure to do all 4 edges and 6 extra strips through the middle.
Stamp randomly using a stazon Ink across your page.
You can use any colour, I have chosen Black. The stamps can over lap and run in any pattern you choose.

Once that's complete you can cut a section of tissue paper to cover your 12x12 sheet. Liberally apply your gel medium using a paint brush. Make sure to cover the entire page well. I work on half the page at a time as it is fast drying. While wet apply your tissue be firm but gentle you don't want any tears. Wrinkles are good and add to the look we are after. I encourage wrinkles....
Lift the excess tissue paper and repeat this process for the second half of the page. Set aside to dry.

Now you have your completed background and your ready to start thinking about colour!!

I have chosen to work with Envy and Singing the Blues.
Your also going to need a paint brush and some water.
Ive used a palette so I can mix up a little water paint in each of the chosen colours and you will also need some water for your fingers. Please have some wipes on hand its going to get messy....

Set this aside to dry. You can use a heat gun to speed up the process. I leave mine to the side.
Starting in the corner apply your chosen colour and work it around. You will need to have wet fingers for this and keep them wet.
Continually dip them into the water pot and apply excess water using a brush or mini mister to help spread the colour around.
You can also use the water colour you have pre mixed to add a washed effect in some area and apply excess paste to deepen the colour where necessary.
Complete this process across the whole page blending the chosen colours together.
It will be quite wet and need to be set aside to dry well I left mine over night.

Once it was dry I got stuck into it with stencils.
My first layer was the chicken wire and I blended the 2 colours half and half.
Keeping in mind the position of the photo I added a second layer with my mini circle stencil using Stormy Weather.
I then smeared the singing the blues over to take away the harshness.
Once dried I stamped using stazon and then roughly blended the Envy and Stormy Weather together and used the mix to stencil in my leaves. It added another depth to leaf having the colour 2 dimensional.


Using some excess tissue paper I cut 2 pieces that would layer with my photo.
I sprayed them liberally with shimmer sprays in Envy, Stormy Weather (To add a depth on the edges) and Singing the Blue. I dried this with the heat gun and got a crisp waxed effect.
The first sheet I removed the center so it looked like a frame and attached the frame piece under my photo crinkling the edges to create a ripple.
The centre piece was cut in 2 and added on opposite corners using the same crinkled effect.
I had a chicken wire chipboard I inked in pearl blue and embossed using the Stormy Weather.
I cut this into pieces so that I could frame my tissue adding another layer of texture. this was adhered at the back of my photo and tissue stack.
Then layered on my 2nd sheet of pre misted tissue paper.
Once all layers where attached I adhered them to my page keeping the same crinkled effect.

The Embellishments where kept simple.
The background really is the show in the layout.
The twine added another element with our final frame and was bound in sections with a coloured wire.
This wire was also manipulated to create part of the title.

The last element was the embossing around the entire layout edge. I used a rich dark green ink and then the envy embossing powder. It is a rough edge and adds another dimension to the layout making it pop.
I did go without flowers which is unusual for me but I found my sparkle with a little addition of the sequins.


And with all of that
Its Done!!
The effect is gorgeous!!
The depth of colour and richness on the page is what i love the most.
The photo really is apart of the art and the background is your embellishment.

I hope there is a little something there to inspire you for your next creation.