Showing posts with label Roadbase. Show all posts

Tuesday, 16 June 2020

'Be Free'
with Lisa Amiet


Hello all!
It's Lisa here on the blog today,
to share some crafty inspiration with you all.

Here is my layout,

'Be Free'


For this one, I have started with a white cardstock base.
I have used some of my Colour Sprays,
in 'Bubblegum', 'Roadbase' and 'Saffron',
to splash my page, in a circular pattern.


I have fussy cut the flowers from 'Heart - Cut & Colour' page from the 
Love & Grace collection. I have used my Colour Sprays to paint them.
I have used 'Saffron' as the base colour for my flowers, 
and I have added some highlights with the 'Bubblegum'.

For the leaves I have mixed 'Saffron' and 'Lagoon' to make the green. 
I then adhered them to opposite corners. 


I have fussy cut the floral frame,
from the 'Annie' 12 x 12 paper, 
and have adhered it to the centre of my page, 
overlapping the flowers.


I have then used the daisy square from the 'Lucas' 12 x 12 paper,
adhered as a diamond rather than a square.


I have then adhered my photo to the centre of the diamond.
I have also used the 'Sweet Floral' Die, to die cut from blue cardstock. 
I have trimmed it up a bit to suit my page.  


I have then adhered sentiments from the 'Love' Word Sheet Paper,
to my page. I have also added a fussy cut bee from the 'Heart' paper.


I really love the boho hippy feel to the page, 
it describes my daughter and her bestie perfectly.

I hope that you like what I have created,

Until next time!

Lisa


Bee Arty Products Used:

Wednesday, 22 August 2018

"Art Is......" Journal Page- Chrissi Mannix

Hi Lovelies,
Chrissi back today, to share an Art Journal page with you.
 I probably art journal more than anything else. It is my favourite creative outlet. I love experimenting in my journal. Whenever I get new mediums, the first thing I will do is open my journal and just play. I like to see how the mediums and colours work together, and most of the time, I end up with a page I really like.
Today, I really want to experiment with my Gel Plate, and Colour Sprays!!! I've used paint before, many times, but never colour sprays and I was very curious how it would turn out, and I have to say, I love it!

I started out by playing with, what would be my focal image- I HAVE to have a focal image on my pages, its a me thing lol. I used Colour Sprays in the colour's Saffron and Carribean- (which I'm almost out of, its totally my fave). I sprayed these liberally over my gel plate.  

Then I just got some good old copy paper and pulled up the ink. I replaced the paper in different sections of the gel plate, and reapplied more colour spray when I wanted more colour. I continued doing this until I was happy with the coverage. 

When I was happy, I then dried the page off with my heat gun. I wanted to add some interest to the paper, so I grabbed a collection of background stamps, and randomly stamped these over my page. 

I drew out my shape and then cut it out. Simple.
So using my mixed media supplies I made my own personalised paper, and focal image. Now to move on to my page.

While I had my Gel Plate out, I decided to use it to make my backround aswell. I did the same thing, using a different colour palette. I applied Saffron, Sunset and a small amount of Bubblegum Colour Sprays.

I applied the Gel Plate directly to my journal. Again, I reapplied the colour and gel plate untill I was happy with the coverage.

So this is what I like to call the Hot Mess stage of an Art Journal page. This is the point where it looks like a hot mess, and I would probably not be very happy. BUT, I have learnt too work past this stage. Very important, and remember that it is just a background.

Now this is where things start to come together. I start adding my layers. I'm using some Black Heavy Gesso to add some stenciling, and some splatters around my page. I also use a makeup sponge to randomly go around my page.

Now its starting to look a bit better, and I'm much happier. Now to add my focal image. 

Before I added my heart, I wanted to give it a mat of some kind. So I decided to use one of my favorite textures- cheesecloth. I dyed it by spraying it with Road base colour spray. 
To finish off my page, I layered the cheesecloth and my heart, using gel medium to adhere. I then added staples, once it was all dry, just to add some grunge.  I went with a contrasting colour to really make this pop. I then outlined it using a water reactive pencil and bled the lines with some water. And that's my art journal page. I hope you enjoyed my play with gel plates and colour inks, I sure did. I love finding new ways to use my tools, other then the way they were originally intended. 


Chrissi xxx

Friday, 1 June 2018

‘Mixed Media Tags’ by Amy


Hi there ColourBlast fans! I hope you all have been doing some creating. I wanted to share with you, a project based on using mixed media. 


I love making tags, as gifts, as you never know when they might come in handy as a handmade present for someone!


To begin I heavily sprayed water over an A4 sheet of water colour paper. While still, wet, using Sunset, Sunshine, Violet and Sapphire Colour Sprays, I sprayed various areas of the paper then dried it completely with a craft heat gun.


Then I randomly splattered water around the page: this creates a cool water droplet look that I love.


Once all dried again, I trimmed the paper to tag size – if you have a tag-shaped die – even better!


As an experiment, using the water and stencils of my choice, I sprayed the tags with the water, then heat-dried them. This did not quite work out as I had hoped – but you never know until you try!


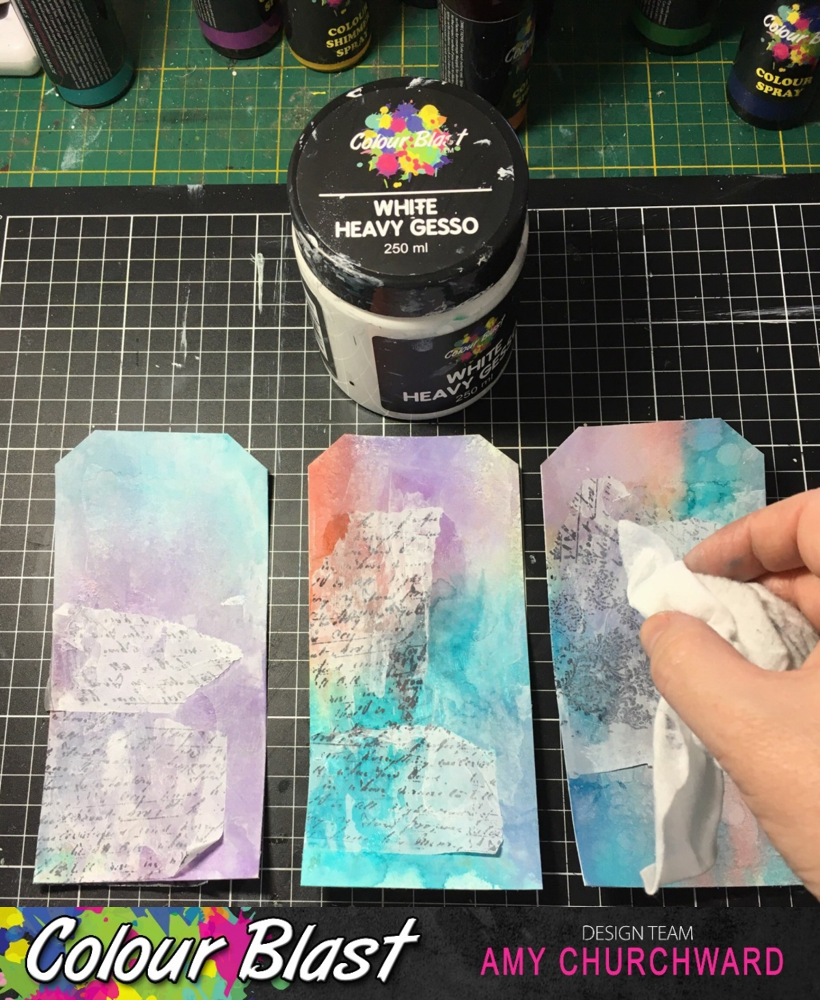
To continue with the mixed media theme, to give some texture, using gel medium, I adhered some plain tissue paper that I stamped with a permanent ink in my stash. To allow the tissue paper to blend in, I rubbed some 'White Heavy Gesso' with a baby wipe.


As pictured here, I stamped the tags using a permanent black ink and various stamps from my stash. To give more dimension to each of the tags, I used various stencils to apply Envy, Lovely Lilac, and Tangareen Dream Texture Paste. I then dried this with a craft gun.


To create an outline for each of the tags, I used the stalk of the Roadbase colour spray and ran it around the edges. 


Then, before the Roadbase outlines dried, I sprayed over the outlines with water and held the tag vertically, (not like in the picture, sorry!). This allowed the ink to run down the tag. I repeated this step for all the tags, and heat dried them.

Next, to brighten the tags, I lined them up and splattered some water mixed with 'White Heavy Gesso' over them – and set them aside, flat, to dry.


While they were drying, I started to browse through my stash of embellishments to choose some to compliment my prepared tags.
And here are the close-ups. 


It was great fun making these tags. I’m really looking forward to seeing your projects for this month’s challenge!


Please join in the ColourBlast Creative Corner!

Amy 😊


Friday, 18 May 2018

‘Dream Catcher Tags’ by Amy C


In this tutorial, I’ll show you how to make mixed media tags.
This demonstrates the use of several techniques. I love the transformation from plain white paper to an amazing piece of art!


First, as this project uses a lot of water and spray liquid, it is ideal to use either watercolour cardstock or to use a heavy-duty piece.
Using a spray bottle, I sprayed the paper with water completely. Using Rainforest, Sunset, Violet, and Sapphire Colour Sprays, I sprayed randomly around the page and then set aside to dry.
After it dried, I sprinkled water around the page to create a water droplet look – love it!
Once all dried again, I trimmed down to tag size. If you have a ‘tag-shaped’ die… go for it!


Using background stamps of my choice, and a permanent ink, I stamped over the tags to my liking.


To tone the background down a bit, I rubbed 'White Heavy Gesso' lightly over the surface, using a baby wipe.


To create the circle for the dream catchers, I used a large stitched circle stamp from my stash. If you don’t have one you can simply trace a circle using a craft marker.
I stamped some feathers onto the catcher, and around the page.
Next, using Stormy Weather  Colour Paste and a star stencil from D-Lish Scraps, I applied the paste over the tags.


To create a border, I ran the stalk of the Roadbase  Colour Spray loosely around the border. Before it dried, I sprayed it with water and left it to drain in the vertical position, as pictured.


Once I was happy with the effect, I dried it with a heat gun.
The tag was looking a bit dark at this point, so I added some white splatters. This also served to create a ‘starry night sky’ effect.


The combination of water and 'White Heavy Gesso', mixed on a stampers block, worked well to achieve this splattered look.
Finally, it was time to embellish – and complete the tags – with feathers!
This was absolute fun to create!
Here are some more close ups – take a look!


Thank you for stopping by!

Ciao, Amy