Showing posts with label Sapphire. Show all posts

Thursday, 21 February 2019

Family by Suzy Loudon

Hi everyone. I hope everyone is doing well. 
Today I have a layout to share from my birthday family dinner last year. Some very fond memories, especially as our son left for Europe for nearly a year shortly after.


To begin with I spread Heavy White Gesso around with my palette knife.


I then used Love Colour Spray. 
First dropping it around on the Gesso. 
Then giving it a slight spray with water.
I then grabbed some scrap paper & scrunched it up (I was too lazy to get up & find some plastic), Using this I dabbed the colour around.
I then dried it with my heat gun & added a few more drops of the Love Colour Spray to add pockets of deeper colour.


I added my photos, layering with different heights of cardboard underneath. I then spread Heavy White Gesso through a stencil.


Using the All The Way Stamp Set I embossed around the page with Singin the Blues  Colour Embossing Powder.


Using the White Gesso I painted all my chipboards


I then embossed them with Steel, Singin the Blues, Lovely Lilac, Blush & Envy  Colour Embossing Powders.


I sprayed some cheese cloth with Sapphire Colour Spray & dried it gently with my heat gun.


Again using my Sapphire Colour Spray I sprayed some on my craft mat. I added some water & painted my flower. Adding more water with each flower making the flowers lighter as I went.


I put all my elements together adding some lace, micro beads & art stones.
Here are some close ups.


Thanks for looking.
xxx Suzy


Friday, 1 June 2018

‘Mixed Media Tags’ by Amy


Hi there ColourBlast fans! I hope you all have been doing some creating. I wanted to share with you, a project based on using mixed media. 


I love making tags, as gifts, as you never know when they might come in handy as a handmade present for someone!


To begin I heavily sprayed water over an A4 sheet of water colour paper. While still, wet, using Sunset, Sunshine, Violet and Sapphire Colour Sprays, I sprayed various areas of the paper then dried it completely with a craft heat gun.


Then I randomly splattered water around the page: this creates a cool water droplet look that I love.


Once all dried again, I trimmed the paper to tag size – if you have a tag-shaped die – even better!


As an experiment, using the water and stencils of my choice, I sprayed the tags with the water, then heat-dried them. This did not quite work out as I had hoped – but you never know until you try!


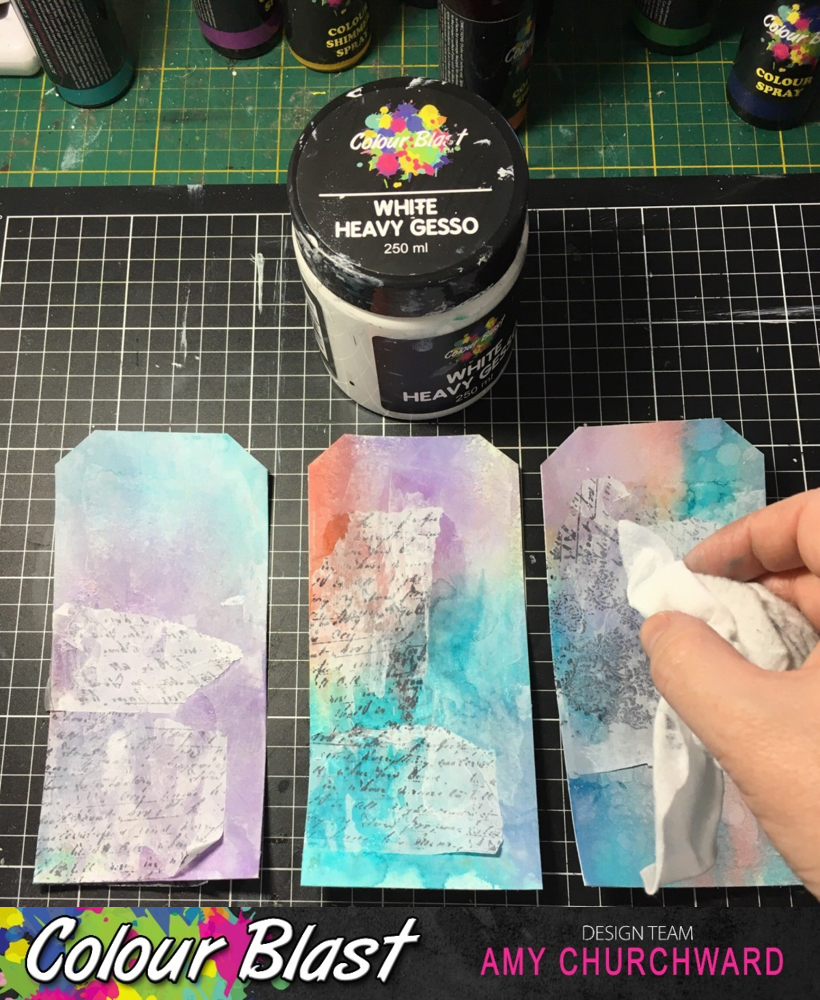
To continue with the mixed media theme, to give some texture, using gel medium, I adhered some plain tissue paper that I stamped with a permanent ink in my stash. To allow the tissue paper to blend in, I rubbed some 'White Heavy Gesso' with a baby wipe.


As pictured here, I stamped the tags using a permanent black ink and various stamps from my stash. To give more dimension to each of the tags, I used various stencils to apply Envy, Lovely Lilac, and Tangareen Dream Texture Paste. I then dried this with a craft gun.


To create an outline for each of the tags, I used the stalk of the Roadbase colour spray and ran it around the edges. 


Then, before the Roadbase outlines dried, I sprayed over the outlines with water and held the tag vertically, (not like in the picture, sorry!). This allowed the ink to run down the tag. I repeated this step for all the tags, and heat dried them.

Next, to brighten the tags, I lined them up and splattered some water mixed with 'White Heavy Gesso' over them – and set them aside, flat, to dry.


While they were drying, I started to browse through my stash of embellishments to choose some to compliment my prepared tags.
And here are the close-ups. 


It was great fun making these tags. I’m really looking forward to seeing your projects for this month’s challenge!


Please join in the ColourBlast Creative Corner!

Amy 😊


Friday, 18 May 2018

‘Dream Catcher Tags’ by Amy C


In this tutorial, I’ll show you how to make mixed media tags.
This demonstrates the use of several techniques. I love the transformation from plain white paper to an amazing piece of art!


First, as this project uses a lot of water and spray liquid, it is ideal to use either watercolour cardstock or to use a heavy-duty piece.
Using a spray bottle, I sprayed the paper with water completely. Using Rainforest, Sunset, Violet, and Sapphire Colour Sprays, I sprayed randomly around the page and then set aside to dry.
After it dried, I sprinkled water around the page to create a water droplet look – love it!
Once all dried again, I trimmed down to tag size. If you have a ‘tag-shaped’ die… go for it!


Using background stamps of my choice, and a permanent ink, I stamped over the tags to my liking.


To tone the background down a bit, I rubbed 'White Heavy Gesso' lightly over the surface, using a baby wipe.


To create the circle for the dream catchers, I used a large stitched circle stamp from my stash. If you don’t have one you can simply trace a circle using a craft marker.
I stamped some feathers onto the catcher, and around the page.
Next, using Stormy Weather  Colour Paste and a star stencil from D-Lish Scraps, I applied the paste over the tags.


To create a border, I ran the stalk of the Roadbase  Colour Spray loosely around the border. Before it dried, I sprayed it with water and left it to drain in the vertical position, as pictured.


Once I was happy with the effect, I dried it with a heat gun.
The tag was looking a bit dark at this point, so I added some white splatters. This also served to create a ‘starry night sky’ effect.


The combination of water and 'White Heavy Gesso', mixed on a stampers block, worked well to achieve this splattered look.
Finally, it was time to embellish – and complete the tags – with feathers!
This was absolute fun to create!
Here are some more close ups – take a look!


Thank you for stopping by!

Ciao, Amy