Showing posts with label Sunburnt. Show all posts

Sunday, 29 November 2020

Forever & Always byTracy Jackson

                                                                  Morning Bee Arty Fans

Today I'd like to share a messy way of making a card - but ohhh so satisfying!!


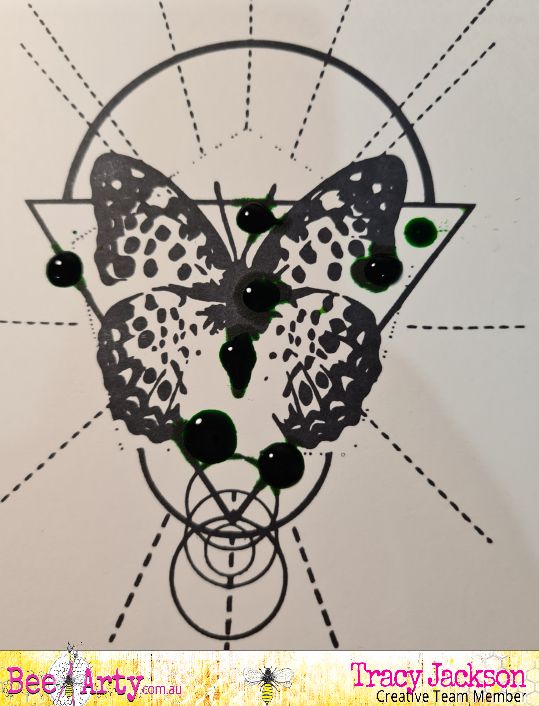
I didnt really have any idea at all when I started to stamp images for this project ...(seems to be my theme ;-) )
But I did know that I wanted to use this stamp and because I feel its a little busy for me, wanted to keep it simple!
Stamp set called New Dawn


And then because I havent played with my Colour Artist Inks from Bee Arty for a while - it was time to find them and dust them off

I placed random droplets of ink on image then blew them around page with a drinking straw


Messy - and finally forming an idea....


Yes involves scissors and fussy cutting


Fussy cut in 3 stages
Inks used are Sunburnt, Grass and Citrus
I found a background paper from Love & Grace Collection that matched (normally I would find paper first then colour to match... but hey, nothing wrong with shaking it up a bit!!)
And finally stuck it all together, 
Quick, Messy and Fun


Until next time... Happy crafting

Friday, 6 December 2019

A Beautiful Moment Captured by Michelle Henderson

Hi my (Bee) Arty friends!

I have an great new page for you today - I'm so in love with it!!


What do you think so far?

I started off with Colour Artist Inks in Sunburnt and Cranberry, both of which I thinned down with so much water as I only wanted a pale colour to match the colour of my cut file. I applied it on the diagonal using smooshing and drips initially, then a brush to draw it out a little. 


I grabbed my Colour Shimmer Powder in Navy and mixed it with water, and lightly brushed some towards the edges of where the cut file was going.


I had some left over, so I dragged a flower mask through the mix and stamped with it here and there. 

At this stage I felt it would be a little strong still, so I drybrushed some Heavy White Gesso very lightly over it with a fan brush. I loved how that worked!


The last part of my background was a thin coat of Blush Colour Paste through a stencil at 3 different points.


I added my cut file, photos and embellies then, all except the bow was Cocoa Vanilla Midnight collection. 

Here's the final page πŸ’•


Thanks for joining me today!


Friday, 11 October 2019

Picture Perfect by Michelle Henderson

Hi team!

I have a new page for you again today with the Inspired collection watercolours and Colour Artist Inks.


I started off with  a Paige Evans cut file in a starburst pattern that I wanted to hand stitch. I used the Inspired collection watercolours to do a wash of Sunshine over the sunbeams, then Mustard, Carrot and a touch of Scarlet on the sun itself. I also used Ultramarine on the bottom third of the page.


I decided it wasn't quite strong enough, so I highlighted the same areas with Citrus, Spice and Sunburnt Colour Artist Inks, plus Calypso on the sea.


I had a second cut file that I wanted to back, so I offset it, and then went back to my watercolours 😁


While everything was drying I stitched the background...time to add the photo and embellies and done!


I'm so happy with this one - I hope you like it too πŸ’–

Thanks for joining me here!


Thursday, 4 April 2019

My Girl by Suzy Loudon

Bright is not normally my thing. I'm not sure what got into me. Think it must be this never ending summer & heat. But none the less I am quite happy with it.


For this layout I used watercolour card. I cut up small squares of bubble wrap I had laying around. Dabbing each square straight into my artist inks I transferred the colour onto my card. The Artist Inks I used were Sunburnt, Cider, Citrus, Grass, Calypso & Berry. Berry wasn't a dark enough purple that I was after so I overlapped/mixed it with Calypso.


Once dry I randomly stamped using the Colour Blast Stardust Butterflies & Live Your Dreams sets.


By this stage it was getting late & I was lazy so I just dipped my white flowers into my Artist Ink bottles. I left them to drip dry overnight. I mixed Cobalt & Berry to make the darker purple & painted 2 flowers.


As I had a feeling they would be, the dipped flowers were very dark. So With Calypso, Grass & Sunburnt I sprayed a little water on my craft mat before adding the Ink. Then using a paintbrush to transfer the ink.


I kept it pretty simple when putting my layout together.
Here's some close-ups.


Thanks for looking.
xxxx Suzy


Wednesday, 27 February 2019

Abstract Floral painting by Sue Plumb


Hi everyone!
It's Sue Plumb here to share my latest design team project with you. Today I have something a bit different - an abstract painting I created using Colour Artist Inks

This painting came about one day when I was having a bad day. I felt like losing myself in something creative, but just wasn't sure what I wanted to do. As I was sitting and looking out the window, I was staring at some flowering bushes over the fence in my neighbours yard. That was enough inspiration to get me started, so I pulled out a sheet of watercolour paper to see what would come out.

The result was an abstract floral painting, inspired by the colours and shapes of my neighbours plants...


I took photos along the way to document my process so I could share it. These are the supplies I started with - a sheet of watercolour paper and a range of Colour Artist Inks in warm tones (Slipper, Cranberry, Sunburnt, Citrus, Cider, Barley, and Spice.)


I started by misting my paper lightly with a water spray bottle to make it a little wet, to help the inks to wick out as they hit the paper. 
I began with the lightest tone - Citrus as my base, and then built on it from there; adding some smaller areas of Cider over the top; then smaller again with Cranberry. I used a small round brush and a gentle dabbing motion to apply the ink to the page, allowing the paper to naturally draw the colour from the brush.


You can see in the close up below how the inks wick out with the use of the water (bleed / spread across the page) and then in the second shot below how they look once they had dried.


Once the base colours had dried, I again used my small round brush, but this time used a sweeping stroke to apply some of the pink Slipper ink to the page. As these are dye based inks, they will reactivate and blend when wet, so I added the strokes into the spaces around and between the other colours.


I then allowed the Slipper ink to dry completely before adding more detail. The next colour I used was Sunburnt - used to apply the narrower sweeping strokes over the Slipper ink and the clusters of small dots. I used Spice to apply the small, short strokes. 


Now it was time to add my "fence" to the bottom section of the page. I used Slipper for the base colour, then Sunburnt and Cider for the detail and highlights over the top.


With all the inks in place, I left the page to completely dry before colouring in the background. I wanted a soft tone so as not to draw away from the focus of the picture, so I used Stormy Weather Colour Shimmer Spray (a nice soft, shimmery grey) and simply dipped my small brush into the bottle and painted in the remaining blank area of the page. I took care not to overlap any of the inked areas so as not to muddy the colours.


Once the background was dry, it was time to add the final details. I used my Stabilo All pencils (black and white) to draw in the detail over the top.


I started with the black pencil, using it to trace the lines around and between the colours; following the naturally occurring lines formed by the inks. I also used the black pencil to colour in any remaining spots of white around the edges, between the flowers and also on the background.


To finish off, I added a few highlights with the white pencil.


(I was so happy with the result of this painting that I even framed it!)


And there you have it - a fun, simple project that you can try yourself with very few supplies. You don't need any particular artistic talent to be able to create a project like this, just play with your supplies and see what comes out.
Until next time, happy creating!  


Tuesday, 25 December 2018

December Story by Michelle Henderson

Merry Xmas everybody!
I hope everyone is having a totally magic day, and that Santa has been very good to you all πŸŽ…

Our poor little cat in this page - I had to scrap it though!


I started with some plain Bazzill Marshmallow cardstock, and I used a little Kaisercraft stencil along with White Heavy Gesso.


Once I had done that in a few places and it was dry, I thinned down some Colour Artist Inks in Lime, Grass, Sunburnt, and Cranberry. I brushed it on here and there randomly, without overlapping. It wouldn't have made a great colour if they had mixed.


I had some cute little chipboard Xmas trees, but I didn't have the embossing powders I wanted handy, so instead I stippled them with Colour Paste in Apple of My Eye, Envy and finally Bling.


Time to put everything together! I mostly used some Pinkfresh paper and ephemera I had from last year. 

Of course then I had to add a few gold splatters, so I used the Colour Shimmer Brush Marker; I also used it to colour just the edges of the wood veneers.

Some close ups for you - just look at those treesπŸ’“πŸŽ„


Now go put your feet up and enjoy the rest of your day - I'll see you in the New Year!