Showing posts with label Barley. Show all posts

Friday, 13 September 2019

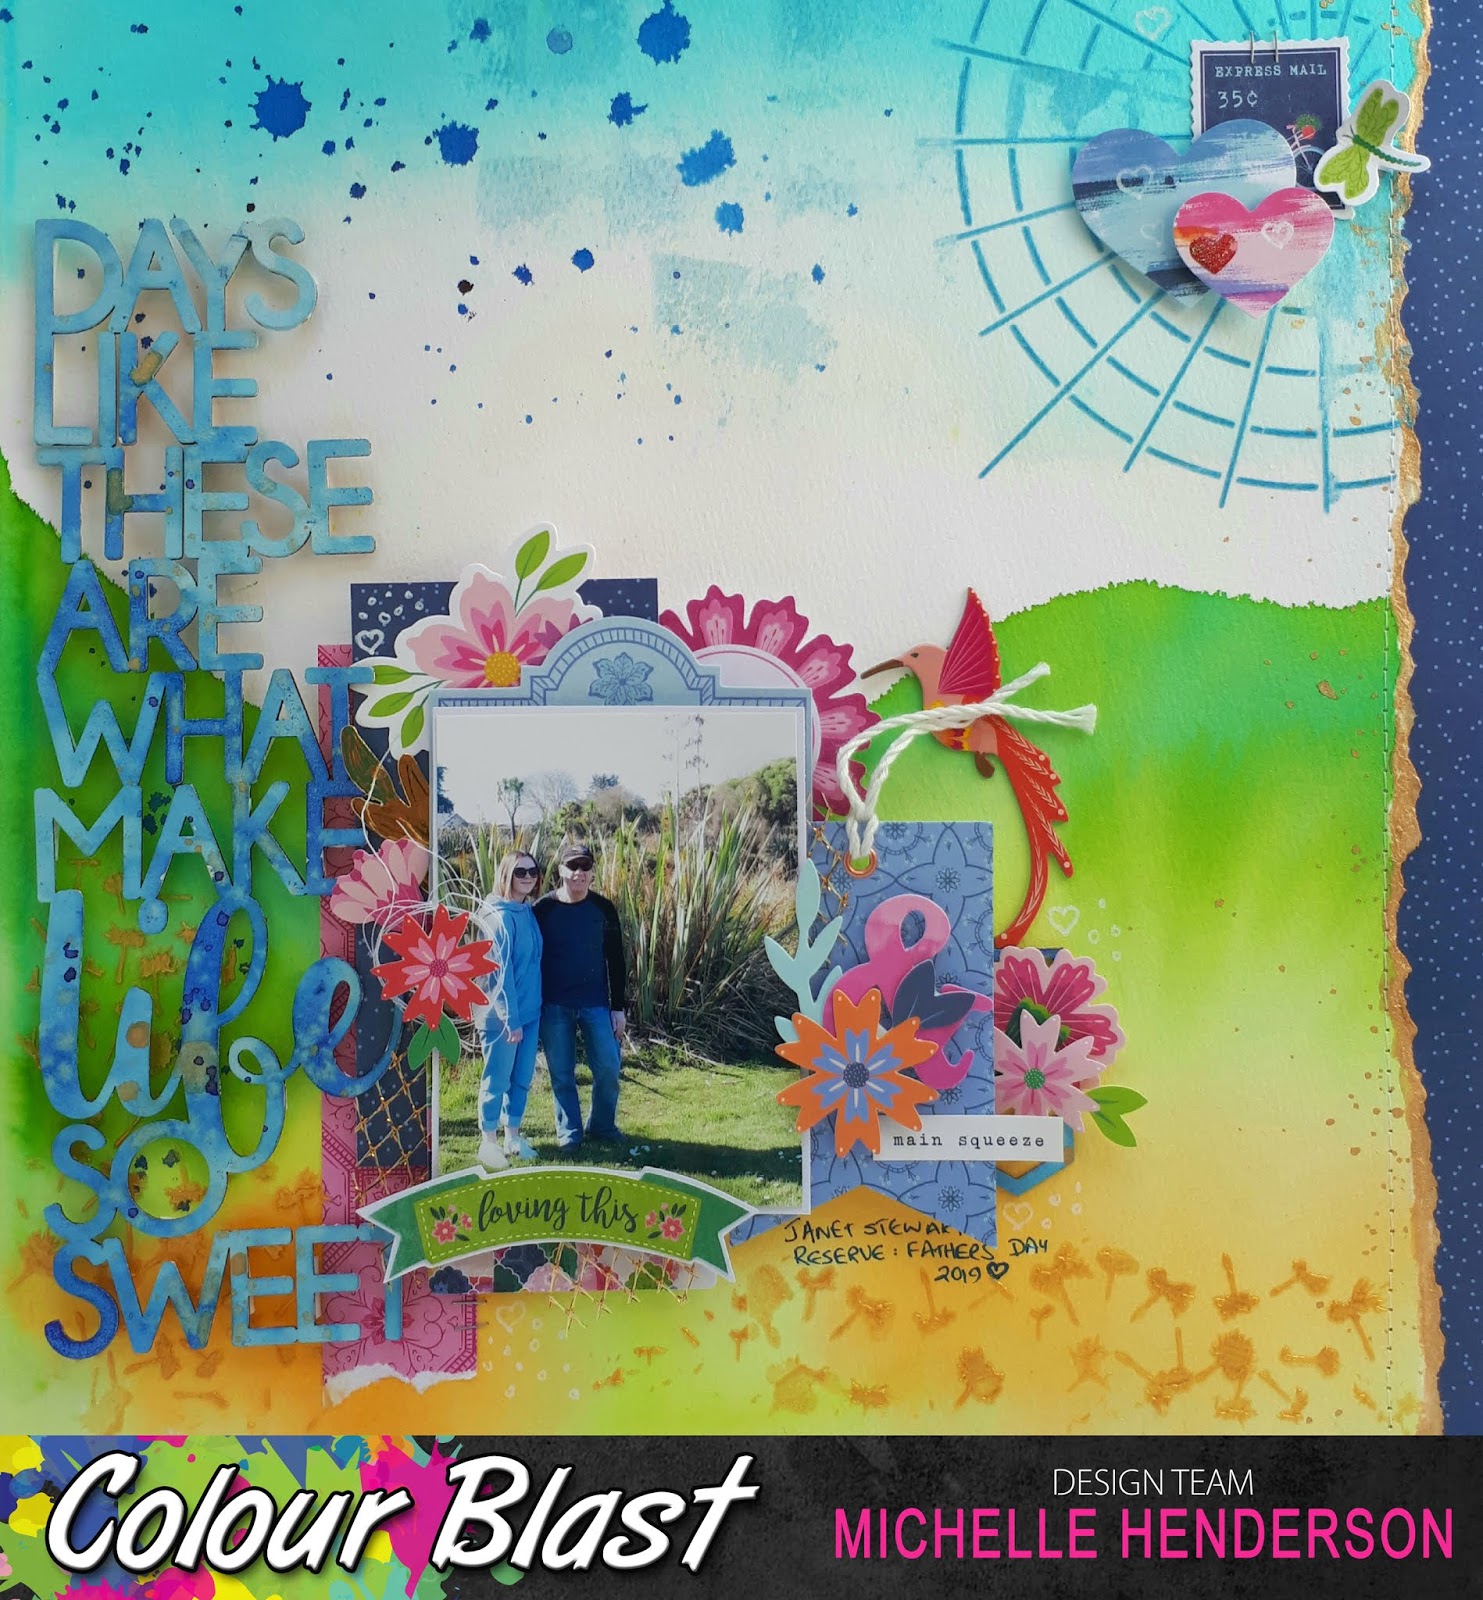
Days like these....by Michelle Henderson

Hello and happy Friday everyone! I'm at a retreat so busy working on my next projects as well as some things just for me 😀
I have a watercolour page today using a little bit of everything - here's s little hint...


  My background was done on watercolour paper, and I used the wet on wet technique with Colour Artist Inks in Lime, Mermaid, Grass, and Barley. By wet on wet, I mean I painted the edge if my hills with water only to start, then went over it with thinned colour so it would blend down the page.


I then did the same thing at the top of the page with Calypso Colour Artist Ink.


While that was drying, I prepped the chipboard title with Heavy White Gesso.


I mixed a little Colour Shimmer Dust in Duke up on my (very!) messy mat, and then swiped the title through it, patting it into the colour again where I needed it. This gave me the lovely mottled look I was going for.


I wasn't keen on the way the right edge looked, so I ripped it off and added some navy paper, after edging the rip with Light Gold from the Shimmery Gold Watercolour Pan set. I also splattered a little of it down this edge, and on the title. 

I used Colour Paste in Singin' the Blues and Bling through stencils, and also smudged a little in the sky.


I still had a little bit of the Duke left over, so I made some big splatters and drips using a water brush, in the sky.


I added my photo cluster and another small cluster, along with the title. I'm so pleased to have already made my Fathers day page!!!
Here's the finished page 💕
 

Thanks for joining us here!


Friday, 2 August 2019

Docs & Sox by Michelle Henderson

Happy Fri-yay again folks!


I've gone grungy this week, using the Graffiti Grunge collection.

I started with the Choose paper, and gave it a light coat of clear gesso, so that I could go to town with Colour Artist Inks using the packaging technique, a bit of brushing and lots of splattering. My first colour was Barley, and then Spice to deepen it.


When that was dry, I stamped randomly with one of the coordinating stamps from the same collection. 


Next I stencilled some Colour Paste in Just Blue, and Dusty Charcoal


When I was choosing layers for my photo cluster I decided to grunge some ripped corrugated card even further with Black Heavy Gesso


Time to add the cluster, and some fussy cutting  - that's it!


Hope you love it as much as I do - it's a definite sea change from my usual!


Wednesday, 27 February 2019

Abstract Floral painting by Sue Plumb


Hi everyone!
It's Sue Plumb here to share my latest design team project with you. Today I have something a bit different - an abstract painting I created using Colour Artist Inks

This painting came about one day when I was having a bad day. I felt like losing myself in something creative, but just wasn't sure what I wanted to do. As I was sitting and looking out the window, I was staring at some flowering bushes over the fence in my neighbours yard. That was enough inspiration to get me started, so I pulled out a sheet of watercolour paper to see what would come out.

The result was an abstract floral painting, inspired by the colours and shapes of my neighbours plants...


I took photos along the way to document my process so I could share it. These are the supplies I started with - a sheet of watercolour paper and a range of Colour Artist Inks in warm tones (Slipper, Cranberry, Sunburnt, Citrus, Cider, Barley, and Spice.)


I started by misting my paper lightly with a water spray bottle to make it a little wet, to help the inks to wick out as they hit the paper. 
I began with the lightest tone - Citrus as my base, and then built on it from there; adding some smaller areas of Cider over the top; then smaller again with Cranberry. I used a small round brush and a gentle dabbing motion to apply the ink to the page, allowing the paper to naturally draw the colour from the brush.


You can see in the close up below how the inks wick out with the use of the water (bleed / spread across the page) and then in the second shot below how they look once they had dried.


Once the base colours had dried, I again used my small round brush, but this time used a sweeping stroke to apply some of the pink Slipper ink to the page. As these are dye based inks, they will reactivate and blend when wet, so I added the strokes into the spaces around and between the other colours.


I then allowed the Slipper ink to dry completely before adding more detail. The next colour I used was Sunburnt - used to apply the narrower sweeping strokes over the Slipper ink and the clusters of small dots. I used Spice to apply the small, short strokes. 


Now it was time to add my "fence" to the bottom section of the page. I used Slipper for the base colour, then Sunburnt and Cider for the detail and highlights over the top.


With all the inks in place, I left the page to completely dry before colouring in the background. I wanted a soft tone so as not to draw away from the focus of the picture, so I used Stormy Weather Colour Shimmer Spray (a nice soft, shimmery grey) and simply dipped my small brush into the bottle and painted in the remaining blank area of the page. I took care not to overlap any of the inked areas so as not to muddy the colours.


Once the background was dry, it was time to add the final details. I used my Stabilo All pencils (black and white) to draw in the detail over the top.


I started with the black pencil, using it to trace the lines around and between the colours; following the naturally occurring lines formed by the inks. I also used the black pencil to colour in any remaining spots of white around the edges, between the flowers and also on the background.


To finish off, I added a few highlights with the white pencil.


(I was so happy with the result of this painting that I even framed it!)


And there you have it - a fun, simple project that you can try yourself with very few supplies. You don't need any particular artistic talent to be able to create a project like this, just play with your supplies and see what comes out.
Until next time, happy creating!  


Tuesday, 4 December 2018

Right Now by Kristy Abela

Hi friends, here's a new inspiration for you using Colour Blast Australia products. This photo was taken At Scenic World - Katoomba. We took all the boys on an adventure. Shortly after this it poured and we all got soaked!!
 Here are some closer looks...


 To create this layout I have a process by where I create my focal point first. For this one I found some papers and created a matt.


 I found some Fab Dusty Attic Chipboard from my new Design Team kit and added some crackle paste. While it was still wet I added Colour Artist Ink in Walnut to colour the paste, not to sit on top of it. I then added a touch of Art Alchemy wax to highlight the crackle.


 Using Colour Paste in Leather I used a stencil to create some embellishments. I deliberately over heated the paste to get a lovely texture on the moths. I also added some Colour Embossing Powder in Stormy Sky to the title. When I layed it out I decided that it was too dark and them put a layer of Sunshine on instead. The black base gave the Colour Embossing Powder a complete golden shimmer.


 Once I was comfortable with where my embellishments and focal point were going to go I marked out in pencil and removed them to work on my background. For this process I coloured some Colour Blast Heavy Gesso White with Colour Artist Ink, Barley and used my pallet knife to apply. Once I had enough I added Colour Artist Ink in Lime to the remaining mixture to vary the shade and add a another layer. Once this was dry I added some splatters with Colour Artist Ink - Walnut... Why not - It was still sitting there.

 At that point I realised I had a Grungy effect to the layout now and then added some stamping with Archival Ink to add to that feel. I stuck down the Picture and embellishments and then used my Colour Shimmer Brush Marker to add a bit of sparkle to my flowers.
Hope you enjoyed the process... Check into Colour Blast Creative Corner and see what the other girls are up too...  

Ciao for Now
Kristy Abela

Tuesday, 20 November 2018

In my Heart by Kristy Abela

I love these pic's of me and my Husband hamming it up for the camera at our Fiji wedding... He will always be 'In my heart'...
Anyway sentiment aside, I really wanted to have a play using the Colour Artist Inks and Colour Shimmer dusts to paint some pretty flowers. The rest of the project evolved from there.. 


I put the smallest amount into a palette and used a water brush to apply. I used a combination of Colour Artist Inks Grass, Cranberry, Sunset, Barley, Bordeaux, and Rust. I also used Colour Shimmer Dust Peacock and Duke. I created the purple quite by accident when I didn't wash out my blue properly...
I really got to play with pooling the colours as well as layering them.


Even if you don't have a project in mind its a really good way to get to know your product. Look at that Bouquet!!


I thought initially that I wanted to have a lot of negative space to showcase my flowers... 
Hmm, who was I kidding I don't do negative space!! 
So while this looked like it was going to showcase only the Colour Pastes in Envy, Singing the Blues and Lovely Lilac.. That didn't last long.


I used my Colour Spray in Violet hoping to get a vibrant background, however it paled with the use of my mister to create flow and also created some serious over spray on where I was hoping to attempt negative space... So in true Mixed Media Fashion I added another layer...
I grabbed my water mister and added moisture to the center of the page. I added Colour Spray in Caribbean and sprayed quite generously to create those awesome run lines... To cover up the over spray I brushed the Violet Colour Spray around the edges and created some fantastic watery effects... 


I sprayed a strip of Colour Spray in Road Base on my mat and dragged the edges of the layout through it. As I turned the page the colour ran into the project... I added some splatters in the same Road Base and then did the same with some Colour Blast Heavy Gesso White. A little bit of stamping with archival ink and the background was done. 


Here I added a layer of crackle paste and used my Colour Spray in Caribbean and my Colour Artist Ink in Cider to add some colour. I Painted some Chipboard with Colour Blast Heavy Gesso Black, distressed some Cheesecloth and then collaged the embellishments. Check out the close ups below...


Hope you enjoyed today's inspiration.  Make sure you pop up your Colour Play in out Facebook page Colour Blast Creative Corner
Thanks For looking!

Abela Artistry