Showing posts with label 12x12. Show all posts

Thursday, 17 December 2020

Mixed Media Layout- Soccer Star II Chrissi Mannix

Hello Lovelies
Chrissi here today with a mixed media layout.
It's been a while since I have done a layout, focusing on Art Journalling lately instead. 
I also decided to use something I havent used in a while aswell- Colour Paste.

I started by using the Road Base Colour Spray on my background. I used the All The Way Stamp Set with some black archival ink to add some interest to my background. 
To make my background really pop, I used the a4 That Way  Stencil and Fire Engine  Colour Paste. I love how this turnde out. The staars really pop from the road base colour spreay.

I have avideo of my process ig you would like to see the page come together.

Thanks for stopping by
Happy Scrapping
Chrissi
xxx


Friday, 6 December 2019

A Beautiful Moment Captured by Michelle Henderson

Hi my (Bee) Arty friends!

I have an great new page for you today - I'm so in love with it!!


What do you think so far?

I started off with Colour Artist Inks in Sunburnt and Cranberry, both of which I thinned down with so much water as I only wanted a pale colour to match the colour of my cut file. I applied it on the diagonal using smooshing and drips initially, then a brush to draw it out a little. 


I grabbed my Colour Shimmer Powder in Navy and mixed it with water, and lightly brushed some towards the edges of where the cut file was going.


I had some left over, so I dragged a flower mask through the mix and stamped with it here and there. 

At this stage I felt it would be a little strong still, so I drybrushed some Heavy White Gesso very lightly over it with a fan brush. I loved how that worked!


The last part of my background was a thin coat of Blush Colour Paste through a stencil at 3 different points.


I added my cut file, photos and embellies then, all except the bow was Cocoa Vanilla Midnight collection. 

Here's the final page 💕


Thanks for joining me today!


Friday, 11 October 2019

Picture Perfect by Michelle Henderson

Hi team!

I have a new page for you again today with the Inspired collection watercolours and Colour Artist Inks.


I started off with  a Paige Evans cut file in a starburst pattern that I wanted to hand stitch. I used the Inspired collection watercolours to do a wash of Sunshine over the sunbeams, then Mustard, Carrot and a touch of Scarlet on the sun itself. I also used Ultramarine on the bottom third of the page.


I decided it wasn't quite strong enough, so I highlighted the same areas with Citrus, Spice and Sunburnt Colour Artist Inks, plus Calypso on the sea.


I had a second cut file that I wanted to back, so I offset it, and then went back to my watercolours 😁


While everything was drying I stitched the background...time to add the photo and embellies and done!


I'm so happy with this one - I hope you like it too 💖

Thanks for joining me here!


Friday, 27 September 2019

Dog Gone Cute by Michelle Henderson

Hi my scrapping friends!

I have a new page for you today, here's a little sneak...


I started off with a wash of watercolours from the Inspired collection - I used Peach and Umber.


I was after a dark coppery red to stencil, so I mixed up some Colour Paste in Sienna, along with some Lollipop Colour Shimmer Dust. Perfect!


I grabbed my Colour Artist Ink in Walnut, and thinned it down to stamp with it.


 I added my photos along with some punched out circles from specialty papers and copper sheeting which has been in my stash since forever 😆 I also added some Tim Holtz dogs that I used the watercolours to colour.


I love how this came out 💓


Friday, 26 July 2019

Dishing the Dirt by Michelle Henderson

Hi folks!
I was so happy to get my hands on the new watercolour sets this week! 

I just took them for a light test drive this time 😀

To start, I used White Heavy Gesso through a stencil. I dried it off to puff it up a little. 


Then I used a nice soft brush and the watercolours Carrot, Fuchsia, Ultramarine and Grape to apply a thin coat over the areas that would come out from behind my photo and cut file. I did this a couple of times to build up depth of colour. I also spattered a little of each colour.


I put my cut file on then, and decided to splash some of the Light Gold from the Shimmery Gold Watercolour Pan set also. Love the variations in golds in this set!


I added my photo, some stitching and a title and Voila!


Such fun to try, you're going to see me using these heaps (although I'm sure my other faithfuls will still be showing up too!!)


Wednesday, 22 May 2019

Farewell from Sue Plumb


Hi everyone!
It's Sue Plumb here today with my final blog post for Colour Blast. Yes, after 2 and a half years on the Colour Blast team the time has come for me to say goodbye. I've worked with some amazing people over the last couple of years; and had lots of fun playing with the Colour Blast products (and will still continue to do so).

To wrap up my time, I wanted to share with you ten of my favourite scrapbook layouts (in no particular order) that I created for Colour Blast over the last couple of years.

"You Are My Happy" - July 2017

"Smile" - May 2018

"Together" - December 2018

"You Are the Best" - April 2017

"Happy Days" - October 2018

"Right Here" - January 2019

"Browser Brain" - June 2018

"Shine Bright" - November 2017

"This is Awesome" - June 2017

"Limited Edition" - March 2019

Finally, I would like to say take this opportunity to thank Tenisha; Kaye; Mel; and all the designers (past and present) I have had the pleasure of working alongside.
That's all from me, over and out! X


Wednesday, 8 May 2019

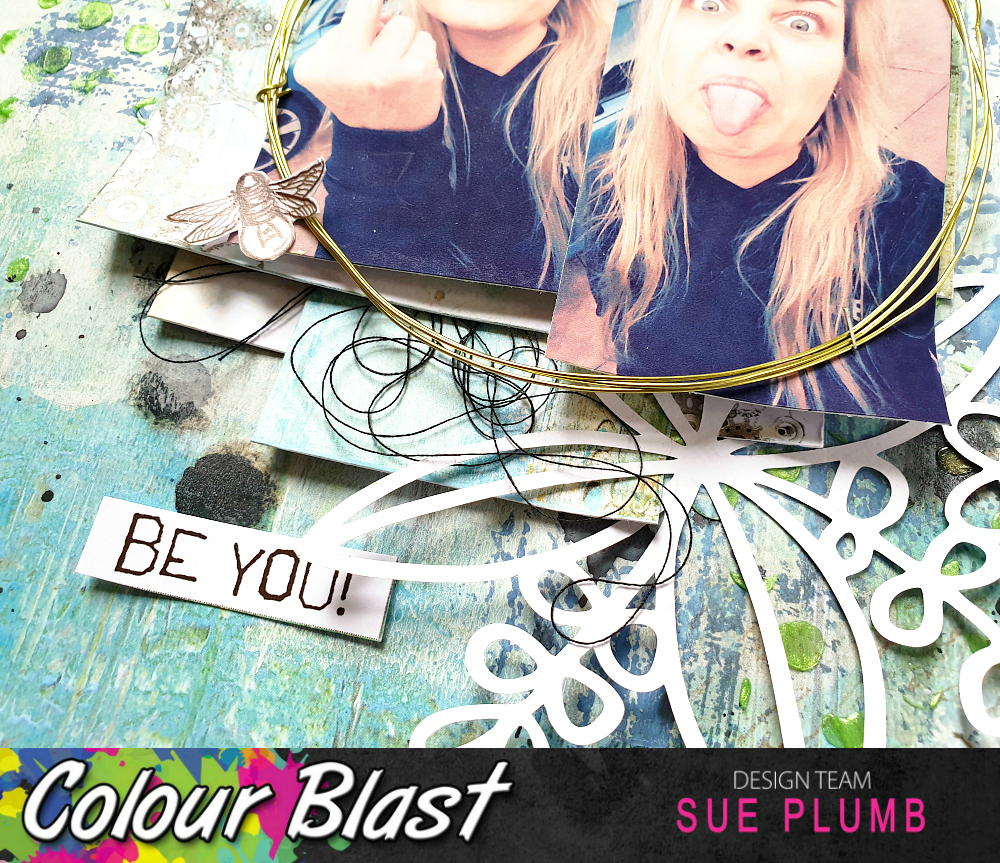
"Be You!" by Sue Plumb


Hi everyone!
It's Sue Plumb here with my latest design team project for you. Today I am sharing a mixed media scrapbook layout that I created using the 'Limited Edition' collection. The theme of this collection is all about being yourself so I thought I would document a couple of cheeky selfies (which pretty much sum me up. hehe)


Here's a look at the supplies I started with...


I began with the One of a Kind patterned paper from the 'Limited Edition' collection as my page background. The first step was to add some White Heavy Gesso to the area I decided was going to be the focal point of my page. I did this using a small brayer.


Whilst the gesso was drying, I gathered some pieces of the 'Stand Out' patterned paper and layered them together to form a mat for my photos. 


I then went back to my background sheet and added some stamping around the edge of the focal area using the Peony Dreams stamp set from the 'Spread Your Wings' collection and 'Faded Jeans' Distress Oxide.


Next, I wanted to add some subtle texture to the page. I used the 'That Way' stencil from the 'Going My Way' release with 'Apple of My Eye' Colour Paste; applying small amounts randomly around the page using a palette knife.


At this point I felt my layout needed some black to tie in with the black in my photos and also to provide a some contrast. I used 'Soot' Colour Artist Ink, and simply used the dropper from the bottle to drip some directly onto the page. I then set my page aside for a little while to dry. 


Once it was dry, I added the layered mat I had created earlier; bending up the edges of each of the pieces to give the stack more dimension, before sticking my photos on top.


I then took the floral cut files from Cut to You and tucked them in under the edges of my photos. I also created a circular frame using coloured wire, which I stapled on top of my photos.


With all of the main structure in place, it was simply a matter of adding some finishing touches. I added some messy black cotton thread, which I tucked in amongst my layers.


I fussy cut three small bees from the Glorious Tags paper and added those to the page.


I finished off my layout by adding three phrases cut from the Exception Word Sheet paper, placing two above my photos and one below.


That's all from me today, I hope I have inspired you to get messy too. Until next time, happy scrapping!