Friday, 10 May 2019

What a Babe by Michelle Henderson

Hi All - I'm back again, this time with a clean and pretty page - but still using some of my favourite Colour Blast products 😀

Here's a wee peek...


I started off with some white cardstock and my Colour Shimmer Dust in Sunflower, Candy, Passion and Cobalt. I wanted a pastel effect so I only put a little colour out, even then I ended up putting a lot of the Cobalt one back.


The photo on the left shows how much of the Candy I put out, and the one on the right how much I still had left when I finished. So concentrated!!


Using a soft flat brush I painted four large stripes.


For each of the stripes, I wanted a matching Colour Paste to stencil with. I chose Sunshine, Singin the Blues and Punch. I didn't have one to match exactly for the lavender, so I tinted some Rose Petal with a little Royalty which was perfect.

Using a stencil, I applied one colour at a time, waiting for the Colour Paste to air dry between each colour. That way I was able to match up the pattern each time.


It was hard to decide the rest of the design after that because I loved how it looked so much 😆

I chose a black and white photo because of all the colour already on the page. I used so many different collections from my stash to build layers and embellish!


I love how this one turned out, I hope you can take some inspiration from it too 😀


Wednesday, 8 May 2019

"Be You!" by Sue Plumb


Hi everyone!
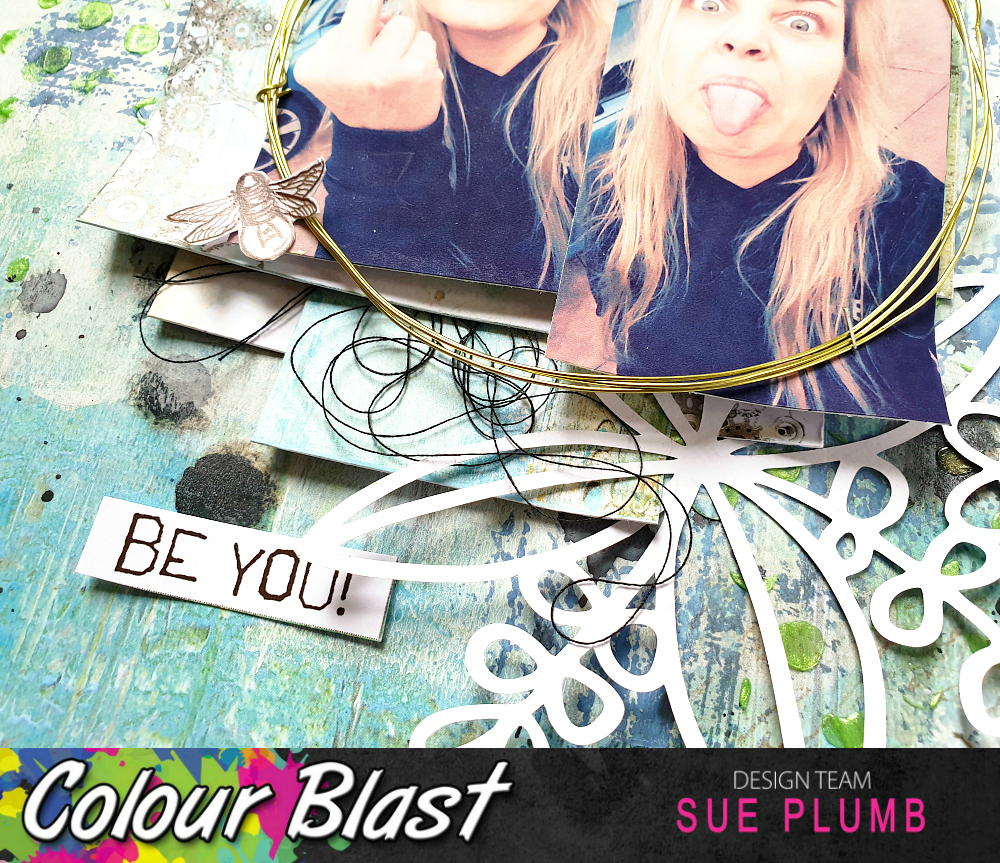
It's Sue Plumb here with my latest design team project for you. Today I am sharing a mixed media scrapbook layout that I created using the 'Limited Edition' collection. The theme of this collection is all about being yourself so I thought I would document a couple of cheeky selfies (which pretty much sum me up. hehe)


Here's a look at the supplies I started with...


I began with the One of a Kind patterned paper from the 'Limited Edition' collection as my page background. The first step was to add some White Heavy Gesso to the area I decided was going to be the focal point of my page. I did this using a small brayer.


Whilst the gesso was drying, I gathered some pieces of the 'Stand Out' patterned paper and layered them together to form a mat for my photos. 


I then went back to my background sheet and added some stamping around the edge of the focal area using the Peony Dreams stamp set from the 'Spread Your Wings' collection and 'Faded Jeans' Distress Oxide.


Next, I wanted to add some subtle texture to the page. I used the 'That Way' stencil from the 'Going My Way' release with 'Apple of My Eye' Colour Paste; applying small amounts randomly around the page using a palette knife.


At this point I felt my layout needed some black to tie in with the black in my photos and also to provide a some contrast. I used 'Soot' Colour Artist Ink, and simply used the dropper from the bottle to drip some directly onto the page. I then set my page aside for a little while to dry. 


Once it was dry, I added the layered mat I had created earlier; bending up the edges of each of the pieces to give the stack more dimension, before sticking my photos on top.


I then took the floral cut files from Cut to You and tucked them in under the edges of my photos. I also created a circular frame using coloured wire, which I stapled on top of my photos.


With all of the main structure in place, it was simply a matter of adding some finishing touches. I added some messy black cotton thread, which I tucked in amongst my layers.


I fussy cut three small bees from the Glorious Tags paper and added those to the page.


I finished off my layout by adding three phrases cut from the Exception Word Sheet paper, placing two above my photos and one below.


That's all from me today, I hope I have inspired you to get messy too. Until next time, happy scrapping! 

Monday, 6 May 2019

Trinket Tin By Suzanne Franin


Hey Everyone Suzanne here

My project for the Colour Blast Blog is a little Trinket Tin, good to keep earrings or jewellery in when you take it off at the end of the night

All the products I used you can find here as well as a list of suppliers on the Colour Blast Website 


I used 1 layer of the Colour Blast Heavy White Gesso with a sponge - I like the texture it gives 
Sometimes I like use a brush for a different texture depending on what I'm doing over the top of it

I love this Colour Paste Bling it's so bright and shiny and looks great through this stencil
Colour Artist Inks Lollipop (I had an oops the other day and didn't close the lid properly so luckily I always have muslin on hand to mop any spills LOL) It was perfect for the pop of colour this project needed
Colour Shimmer Dust Peacock I added a bit of the powder to my board then added as much water as I wanted the colour to be - darker or lighter
I thought would go well with the Colour Lollipop Artist Ink and the Colour Paste Bling for the face
Dorland's Wax Medium I used over the top of the face to add something extra it gives it a sheen different to the shine that the shimmer dust does


Colour Artist Inks Peacock I used to paint the tin - the plain white gesso looked a bit boring but unfortunately we lost the shimmer of the Colour Paste Bling

Graffiti Grunge Collection Linked in Die I cut it out in acetate so it's a bit hard to see (I did have to put it through the die a few times)

Make sure to check out the whole blog for the rest of the Design Teams awesome creations and the rest of the going ons x

Thank you for visiting and I hope you come back soon x


Friday, 3 May 2019

Butterflies by Michelle Henderson

Hi folks, I'm back with another page showcasing a couple of techniques with embossing powder 😊

I also used the first Michelle Grant collection released in January - "Spread your Wings", which I managed to get my hands on.

I started stamping with one of the stamps in the kit, plus an old Kaisercraft background stamp, using my Versamark pad. I then embossed it with Colour Embossing Powder in Deep Water, and then added a little more stamping which I embossed with Envy.

I then used a butterfly stencil to spread some Heavy White Gesso, and before it dried, I sprinkled the Envy Colour Embossing powder on top.


When I heated it, the gesso bubbled up from underneath at the same time as the powder turned, giving this amazing texture.


I then stippled some Versamark down the central part of each butterfly, and used Colour Embossing Powder in Bling to emphasise them. I also stitched through the middle of them.

Time to add my die cut butterflies, then I also used the diecut frame from the kit, and 2 of the cut apart tags as layers before putting it altogether with my embellies.


The final touch was a few sequins and then gold splatters from my Bling Colour Shimmer Cube.


I love the final page 💓

Thanks for joining me!

Thursday, 2 May 2019

Journey by Suzy Loudon

Hi everyone. Today I have a layout using the Colour Blast Graffiti Grunge Collection. Such a great collection so get your hands on it quick.


To begin my layout I tore the edges of my paper. I used "Fierce" from the Graffiti Grunge Collection -February Release. I then stuck it down onto black card.


I cut up the "Choose"  paper from the Graffiti Grunge Collection & then inked the edges. I didn't end up using all the pieces.


Using the Direct Links Die I cut it out with chipboard before embossing it with Dusty Charcoal Colour Embossing Powder. I later cut off the left chains & arrow as they would be covered by my photo & used it elsewhere on the page.


Using the Linked In Die I cut it out with chipboard before embossing with Steel  Colour Embossing Powder. I cut the big piece into various pieces later when assembling my page.


I had some barbed wire chipboard which I embossed with Stormy Weather then whilst still not completely set I lightly sprinkled with Singin' The Blues Colour Embossing Powder.


My chipboard title I double embossed with Just Blue  Embossing Powder. Before it was set I stamped it with a stamp. I rubbed some Dorland's Wax onto the stamp first so the embossing powder wouldn't stick to it.


I had assembled my page but wasn't happy. I felt it needed a bit more colour. So I used Just Blue Colour Paste using a section of the Time Magic Stencil from the Limited Edition Collection.


After assembling everything I covered my photo & using watered down Heavy Black Gesso I splattered around my page.


Here's a few close ups.


If you haven't already gotten your hands on this wonderful collection check it out at your local shops or online. Or a better way to not miss out on future collections is to sign up for the monthly Kit Club Membership.

Thanks for looking.
xxx Suzy