Showing posts with label three six five. Show all posts

Sunday, 7 November 2021

Go For It with Belinda Spencer

 Hello Arty Bees!!


It's Belinda here today to share my latest layout for Bee Arty inspired by the November Mood Board.


Here's a peek at the mood board for November:
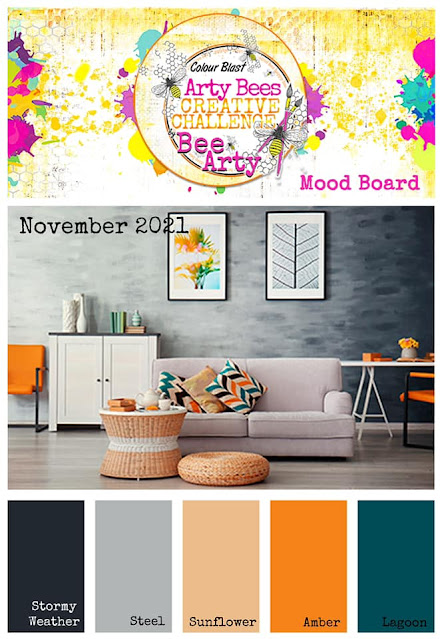

I started my layout by cropping a piece of Graffiti Grunge patterned paper and mounting it onto a sheet of the 350gsm White Cardstock. I then spritzed a little Sunset Colour Spray in three places and then placed a piece of plastic over the top to spread out the ink.


I repeated this process using Lagoon Colour Spray.


And for a third time adding Road Base Colour Spray. I then flicked all three colours over the page and dried with a heat gun.


I added some stencilling using the Three Six Five A5 Stencil Three Six Five and the Black Heavy Gesso. I stamped some stars over the page too using the Going My Way Clear Stamps and Ranger Jet Black Archival Ink.


I used the Graffiti Grunge Linked In Metal Die to cut two pieces from extra white cardstock and stapled them onto the page.


I added a paper stack on top of the die cuts using some patterned papers from both the Graffiti Grunge and Fearless, Brave And Free collections. I added my photo on top.


Next I used some Ranger Archival Inks to stamp some more stars using the Going My Way Clear Stamp set again. I fussy cut the stars and added to the layout along with all remaining elements.


I cut the quotes from the Graffiti Grunge Be Yourself Word Sheet and added them to the layout using 3D foam.


Thanks so much for stopping by the blog today. I hope you find some time to play along with the November challenge too.

Cheers
Belinda


Monday, 7 December 2020

"Happiness" by Anita Enright

 Welcome Back Everyone

 For my share today I thought I would share with you another layout that I completed using the Fearless Brave and Free, Three Six Five and Arty Farty collections along with Artist Inks, Shimmer sprays, Shimmer Dusts and Embossing Powders.

For my page I used the MUSE patterned paper from the Arty Farty collection designed by the super talented Michelle Grant. Using the Arches A5 stencil and some matching distress inks I applied colour through the stencil to the patterned paper.  I added some 'splats' to the page using a blue shimmer spray. From one of the collection I used a white Hexagon die cut and after making a mix of Duke Shimmer Dust and water, coloured the white die cut.  

 I created a colourful piece of smooth white cardstock using Artist Inks in Lime, Marine, Mermaid and Calypso.

I then used this piece of cardstock and die cut the FRAME metal die from the Fearless Brave and Free collection and also the  GEO DIRECTION metal die from the Three Six Five collection designed by the amazing Tania Froud. 

The GEO DIRECTION die cut was cut in half and applied to the back of the mounted photo, as was the hexagon die cut that was coloured earlier.  The FRAME die cut was glued on top of the photo.


Wording on the page came from the FREE word sheet from the Fearless Brave and Free range designed by mega designer Fiona Paltridge.

I heat embossed the happiness chipboard word with Apple of My Eye Embossing Powder.

 
Before layering all the pieces down I grabbed some washie tape in matching colours and designs and applied where the photo was being applied.
 
To finish the page I used a Charms Creation tab, yellow twine and different enamel dots, arrows and triangles.

 
Thanks for stopping by.
 
I hope you find some crafting time to create your next memory.
 
 
Take care 
Anita
xx


Monday, 20 July 2020

'Bloom with grace' by Amy C.

Hi everyone, 

Amy here with you today. I have a scrapbook page to share with you using lots of amazing products from Bee Arty - take a look!


To start, I took a sheet of the 'Twenty Twenty' 12" x 12" scrapbooking paper from the 365 collection. 

This sheet will be the border.

In order to save paper, I cut out a 10" x 10" square as pictured, to leave just the border.


Next I trimmed a sheet of heavy 12" x 12" heavy white cardstock to 10 ¾" x 10 ¾" so it overlapped the border.

This square was now my working space for my background.


Next, I splattered some some Colour Artist ink in 'Bordeaux' mixed with water onto a messy mat and placed my page face down over it and gently rubbed the back of the paper to allow the the ink to spread over the white cardstock. I then heat-dried it with my heat gun.


I repeated this step with the Colour Artist inks in 'Oasis' and 'Citrus' but I did not apply as much ink for these colours as I wanted the beautiful 'Bordeaux' to dominate here. 


With a paint brush, I added some splatters over the background using the remnants of the ink.


Once I was happy with background I set it aside to dry and set to work on the layers behind my photo. Apart from medical gauze for texture, I trimmed down papers using both the 'Silence' paper from the Untangle Collection and 'Direction' from the 365 Collection, as well as some more of the 'Twenty Twenty' paper.  

I then placed them behind the photo with a torn paper doily and adhered them down to my page.


With the 'Direction' paper from the 365 collection, I die-cut it with the 'Beaded' metal die. 


To add a bit of bling to this gorgeous cut shape, I applied some of the Colour Blast Shimmer pen in 'Clear' then adhered the shape slightly over the bottom corner of the photo.

To complete this page, I included some thread, flowers, sequins and the title from my stash.

Take a look at these close ups...


Here are the products I used from the store:

Colour Artist Ink in 'Bordeaux', 'Oasis', 'Citrus'
Papers: 
365 Collection 'Direction', 'Twenty Twenty
Untangle range 'Silence'
Metal Die 'Beaded'
Shimmer Pen in 'Clear'

Other Products:
Heavy white cardstock
Messy mat
Water
Paint brush
Plastic wrap
Thread
Sequins
Medical gauze
Title
 (Anything goes when it comes to embellishing!)

Thank you for looking and I hope this might inspire you to try some of these techniques.

Amy ðŸ˜Š


Monday, 6 July 2020

Inspirational Mixed Media Cards by Amy C.

Hi everyone!

My turn up on the blog today with some mixed media cards using the inspirational Three Six Five paper collection pack designed by Tanya Froud


I used various papers from the 365 collection for the backgrounds, the sentiments and the butterflies!

I used some Black Heavy Gesso with the 'On Point' A6 stencil over the patterned paper as well as being stamped with the 'Life Is Tough' clear stamp set over various parts. 

To add a bit of dazzle, I applied some of the gorgeous Colour Blast 'Bling' Colour Paste through the 'That Way' A4 stencil over the background.

After I fussy cut the butterfiles from the 365 Collection I coloured them with Colour Spray in 'Grape' and 'Carribean'.

The sentiments for the cards were trimmed from the 'Untangle' range.

I also included thread and enamel dots from my stash.

Here are some close ups!


Products used.
Colour Paste - Bling
Colour Spray - Grape, Carribean
Clear Stamps - Life is Tough
Stencils - That Way - A4, On Point A6

I hope you have been inspired - happy crafting!

Amy


Thursday, 25 June 2020

Be Bold- By Tanya Froud

Hi Guys Tanya Here!
Today I am sharing a scrapbook page with you,
Products used are...
-Artist Inks (Slipper and Soot)
-Color Paste (Stormy Weather)
-Three Six Five papers
-Untangle Flower Die
-Flower Power
-Imprinted A5 stencil
- Making your Mark stamp

I wanted a striking simple color scheme for this layout, choosing a hot pink and black color scheme. The Color paste I had were no quite the right color so I added a few drops of Soot ink to the stormy weather paste, and mixed fully, and made black color paste.

I then dragged this through the Imprinted stencil and let dry.
Once dry I then smooshed some Artist inks onto the page, by dripping the ink onto the packaging then pressing it down to the page.
I then dried it fully.
Next I stamped randomly with some texture stamps, "Making your Mark"

Then it was time to add photos embellishments and fussy cut some bits from the Untangle cut apart.

Thanks for stopping by!


Monday, 8 June 2020

'Fly High' by Amy C

Hi everyone! Welcome to June. Today I am sharing a simple 12 x 12 page using Bee Arty goodies. 

I have a photo captured of our youngest Samuel back in the days when he was having swimming lessons.


1) I started by adding splatters to the 12 x 12 sheet of white cardstock. I used Colour Blast Black Heavy Gesso mixed with water and set aside to dry.


2) Next I mounted the 6 x 4 landscape photo onto some white cardstock slightly larger than the photo so I could hand draw a black border with a black pen.


3) Then I (a) trimmed down a piece of the 'Twenty-Twenty' patterned paper from Tanya Froud's 'three six five' collection - to 4.5" (width) x 12" (height).


and (b) trimmed down a strip of 1" x 12" of the 'Direction' patterned paper.I adhered this strip vertically under the 'Twenty Twenty' paper as pictured - with 0.5" exposed.

I then stuck the combined papers down to the left hand side of the splattered white cardstock. 


4) Next I took a sheet of the 'New Year' patterned paper and - as pictured - cut out the full backing square from the bottom right hand side. 


Then I adhered the mounted photo onto this square and stuck it down to the page. I placed it partly over the patterned paper and the remainder over the white cardstock. 


5) For the subheadings, I cut out some words from the 'Resolutions' word sheet and placed around my photo. 


For the main title I heat embossed chipboard by Kinder Kreations with the vibrant 'Just Blue' embossing powder and pasted it underneath my photo with some craft glue. 


6) Finally, to add colour to the background, I splattered it lightly with 'Deep Water', 'Saffron' and 'Lagoon' Colour Sprays and then added some embellishments from my stash to finish the page. 

Here are some close ups:


Products used.
'Twenty Twenty' paper
'Direction' paper
'New Year' paper
'Resolutions' word sheet 

Colour Blast - Black Heavy Gesso
'Just Blue' embossing powder
'Deep Water', 'Saffron' and 'Lagoon' Colour Sprays

Thank you for stopping by - until next time, ciao! Amy ðŸ˜Š