Showing posts with label Going My Way. Show all posts

Sunday, 22 August 2021

Shine Bright with Belinda Spencer

 Hello Bee Arty fans!!


It's Belinda with you today to share my latest layout for Bee Arty featuring the awesome NEW Electric Dreams Mini Collection.


I just love the vibrant colours in the paper collection as well as all of the funky fluro mixed media products.

For this layout, I first mixed up some Fluro Yellow Mica Powder with distilled water in a mini mister. I used one of the fabulous craft powder spoons to scoop some of the mica powder into the mini mister, added the water and then shook it up until all of the powder was incorporated. Next I spritzed it liberally over my page.


Once the layout was dry, I then added some stencilling using the Grungy Splat A5 Stencil and the Fluro Orange, Pink and Yellow Colour Pastes.


I added some stamping using the Going My Way Clear Stamp Set and Jet Black Archival Ink. I added a photo stack using some of the patterned papers from the collection under my photo.


I fussy cut some of the plus signs from a sheet of patterned paper in the collection and added those to the layout too.
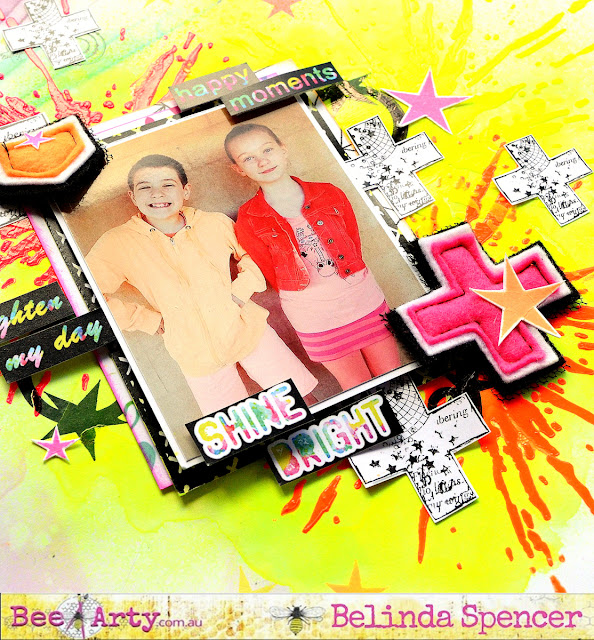

I stamped some stars on the layout using star stamps from the same stamp set and Hero Arts Neon Inks.


I also stamped some of the stars onto extra 350gsm White Cardstock, fussy cut and added to the layout along with a couple of Charm's Creations Fluro embellishments.


Finally I added some quotes cut from the patterned paper.


Thanks for stopping by the blog today. I hope you are loving all of the fabulous fluro products as much as I am.

Cheers
Belinda


Sunday, 12 April 2020

Little Man ll Chrissi Mannix


 Hello Lovelies.
Chrissi here today, sharing with you, my inspiration for this months Monochromatic Challenge.
Every month there is a new challenge over on the Bee Arty Facebook Page, and this months challenge is a monochromatic theme.

Yo make my layout, I started with some Colour Blast Colour Spray in Caribbean. Using a large mop paint brush, I applied the spray strait from the bottle onto my page. I had first spritzed my page with water to give me that wet on wet flow. Then to move the ink around, I spritzed with more water.

After making sure this was dry, I then add some texture to my page by using the Enough Stencil. For this I used the darker Sapphire Colour Spray. It gave me a great tone on tone look. I had a small area of over spray that bothered me, but I managed to cover that, by using the left over ink on the stencil as a stamp, and stamping the stencil to my page- same stencil, different look.

I was really loving this backroug but I wanted to addmore to it, so I decided to do some stamping. Using a distress oxide ink and the Going my Way Stamp Set I added these cute star clusters.

Finding the layers around my photo a little too plain, I decided to add some grungy spots using the edge of the arrow stamp to add some interest.

To finish off the page, I doodled around some of the stars with a black pen and also gave my page a doodled border. I always love those little touches to finish a layout. Then I added my title and a touch of journalling.


I hope you have enjoyed seeing how this layout came together.
Don't forget to check back and see what the other DT girls are up to.
Happy Scrapping
Chrissi xxx


Wednesday, 10 April 2019

"Limited Edition" by Sue Plumb


Hi everyone!
Sue Plumb here today to share my latest design team project with you. Today I am sharing a mixed media layout that I created with the April release "Limited Edition" collection; as well as Colour Paste; Colour Shimmer Dust; and a Colour Shimmer Brush Marker. I even used some Colour Embossing Powder, AND dragged out my Big Shot to use the 'Going My Way' die. 

Here is my layout featuring a photo of my daughter and one of her best friends, which is aptly titled "Limited Edition" (just like the collection)...


I've got a really detailed step by step process for you today, so you can follow along at home and create your own version of this page. Here's a look at what I stated with (if you don't have everything the same, just substitute in something similar).


I began with the Individual paper as my page base; then took the Stand Out cut apart paper, and cut it into all the individual pieces. I followed the design on the background paper which featured distressed / torn edges printed at the top and bottom, and created actual tears in both places, securing the edges with small staples. I took one of the cut apart pieces and used it to back both of the tears to add some pops of blue.


Next, I added some stamping to my background using the 'Peony Dreams' stamp set from the January "Spread Your Wings" collection and 'Faded Jeans' Distress Oxide. (You will note I stamped randomly with sections of the stamp - I did not use the entire stamp image as whole.)


After the stamping, it was time to create some texture. I started with 'Bling' Colour Paste and a stencil from Flutterby Designs that featured a circular style design, so I could continue the circular theme from the background paper. After I added a few circles, I then wiped off the excess paste from my palette knife randomly around the page before drying it off with a heat gun.


I then went in with another stencil, this time a scripted design from The Crafters Workshop, and 'Singin' the Blues' Colour Paste. I chose this design so I could add more blue colour, as well as texture to the page, without any real structure. (And yes, you can totally layer one Colour Paste over another, as long as the first one is dry!)


At this point my background looked like this (you can see how I was working with the "rule of threes" which helps bring balance to your page)...


After the paste had dried, it was time to turn to paper again. I used pieces of the Stand Out cut apart paper I had cut earlier, as well as a larger piece of the Uniqueness paper to create a layered mat for my photo to sit on. I also fussy cut the quote from the Stand Out paper and adhered it along the bottom edge of the page.


I then took the 'Going My Way' die (from the 'Going My Way' collection) and another piece of the Uniqueness paper and cut it using my Big Shot. I then added some extra colour to it using 'Duke' Colour Shimmer Dust that I mixed with water and applied with a small brush.


Whilst that was drying, I turned my attention to the chipboard pieces I had chosen for my page, which were a mixture of circular style designs such as cogs and clocks; and a few stars as well. I stamped the pieces with embossing ink; then applied 'Steel' Colour Embossing Powder over the top; before tapping off the excess and using a heat gun to set it. (This is my favourite colour of embossing powder, as it makes the chipboard pieces look like chrome!)


With chipboard pieces ready, it was then time to start embellishing the page. I cut my die cut piece in half and added the two pieces on either side of my photo mat, as well as some frayed gauze on top of the paper layers. I then adhered my chipboard pieces, tucking some in under the edges of my photo mat, and following along the diagonal design of the page. 
With the embellishments in place, I then added my photo, using some scrap cardboard underneath to pop it up a bit.


For my page title, I fussy cut the limited edition plaque from the Exception Word Sheet and added a little extra colour using the 'Duke' Colour Shimmer Dust I had mixed earlier. I also used the brush to add small amounts of blue around the focal area of my page.


I then adhered my title piece onto the chipboard frame I had embossed earlier and tucked it into the layers above my photo.


With my page nearing completion, I took a Silver Colour Shimmer Brush Marker, and added a little extra definition and shimmer to some of the cogs and clocks printed on the page.


To finish off my page I added a scattering of pale blue Cocoa Vanilla Studio sequins.


The circular shape of the sequins helps bring the repeating circular theme of the whole page together and adds an extra layer of texture and interest. 


I hope this detailed insight into my process will help you create your own version of this layout. I love being able to inspire others to create, so make sure you share with me if you do! You can post your creations in the Colour Blast Creative Corner group on Facebook, or tag me @sue.plumb on Instagram.


Until next time, happy scrapping!