Showing posts with label Colour Embossing Powder.. Show all posts

Friday, 2 July 2021

Beautiful #GLENELG by Charmane Koch

 Happy Friday Everyone!

Don't know about you guys, but TGIF! It's the last day of term here for SA and it has been an EXTRA EXTRA long dramatic week! Let alone it being everyone drained, tired & totally ready for a well deserved break, we've had the "are we in lockdown, or are we not in lockdown?" What the hell is going on???

Can't imagine the rest of the country it is a totally mental health brain drain! I think we all need to just all have a holiday at home and GET CREATIVE!!!???

The problem is I am always in limbo! And working in Aged Care, it's very unlikely that I will actually go into lockdown being an "Essential Worker" BUT I have been FULLY VACCINATED! Yay! I am one in 1 and half million to be 100% vaccinated! Not preaching, but I have done everything in my power to not spread it! I just want LIFE to get back to as NORMAL AS POSSIBLE - for ALL OF US!

ANYWAY, I may have had a couple of wines {it's Thursday almost Friday ;)} I want to share one of my ALL TIME FAVE stencil from BEE ARTY - Interwoven... I am sure I will be using this many times over as I just love the design of it!

In the sneak above I have used a technique that I shared at the Bee Arty Retreat - using Snow White Colour Paste and then sprinkling Embossing powder over the top and heating with a heat gun - however I have used 3 different Embossing powders... very carefully sprinkling so they don't fully mix together...


The sneak above is my original "practise run" where I have just used one of the Embossing Powders - Just Blue, then after Heat gunning, I have sprayed a bit of Bling Mica Powder and water using a paintbrush.


This was also my Embossing Die Cuts stage... so Embossed circular Die Cuts using Blush Embossing Powder... love this effect so much! Messy but fun!


The background paper I used was the "Confidence" Fearless, Brave & Free - which matched perfectly with my photos...


I used White 350gsm Cardstock to back the photos I used, but coloured with Royalty Mica Powder, soaking up the leftover colour with the Muslin.

The colours I really love! So VIBRANT! Hope you like too & hope I've inspired you to play!

Thanks for popping by!


XO Charm

Thursday, 4 October 2018

Your Smile... by Suzy Loudon

A big Hello to all. Today I share a layout using Colour Sprays, Paste & Embossing Powder...oh & Gesso.
Keep reading to find out how my layout came together.


To begin my layout I spread Heavy White Gesso  where I wanted to add colour.


Using my Lagoon Colour Spray, I added small amounts onto the gesso using a dropper. Then a spray with water before using my heat gun to dry, moving the colour around as I dried pooling the colour. This made some areas deeper. I did this until all the gesso was covered.


I spread  Dusty Charcoal Colour Paste through a stencil.


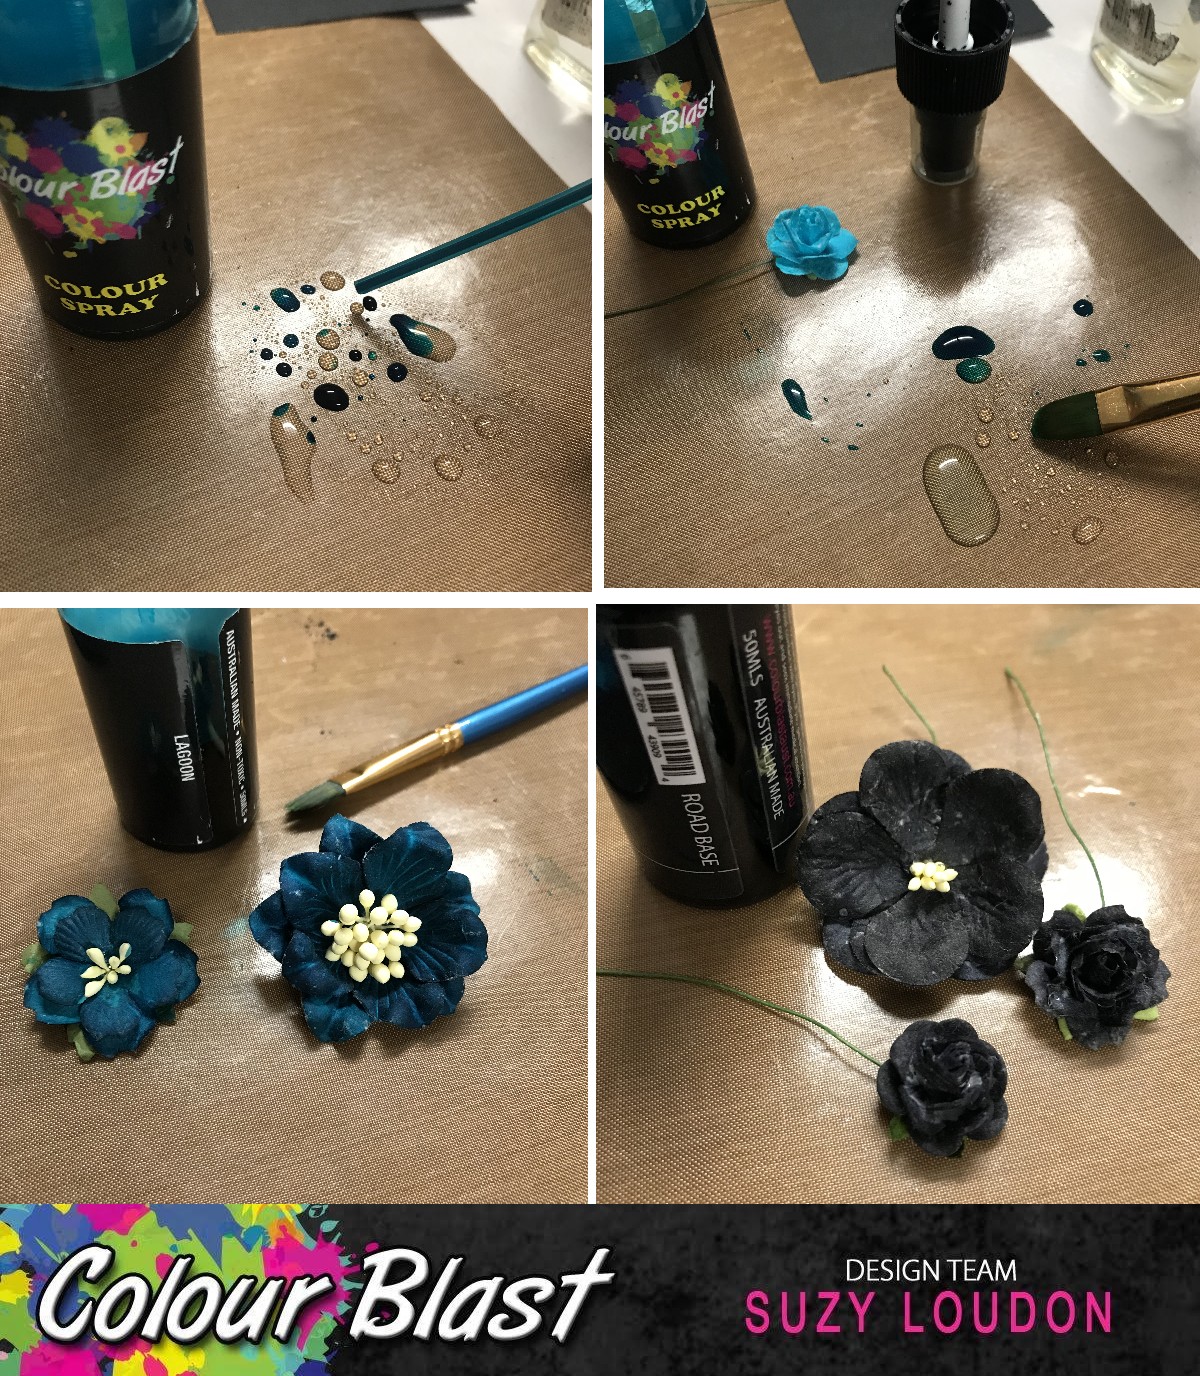
It was time to colour my white flowers. Using my Lagoon Colour Spray I put a small amount onto my messy mat then added water. Using my paint brush I dabbed the colour onto the flowers letting them absorb the colour. With each flower I added a little more water making them lighter as I went. I forgot to take a photo of all the flowers, but all of them are using Lagoon only...from no water to lots of water.
Lastly I used Roadbase Colour Spray for some black flowers.


After raising my photos with some backing cardboard I covered them before splattering some watered down Heavy White Gesso around my layout.


I painted my chipboard title with Heavy White Gesso before embossing it with Snow White  Colour Embossing Powder.


I painted my chipboard with Heavy White Gesso before spraying it with Rainforest Colour Spray.


I put all my elements together adding some lace, art stones & frame.
Here's a few close ups of my finished layout.


Thanks for stopping by.
xxx Suzy


Thursday, 20 September 2018

Sweetiepie by Suzy Loudon

Hi everyone. Its been a while since I've played with my Shimmer Sprays, so I thought it was time to dust them off & this is what I came up with.


To begin my layout I started by spreading Snow White Colour Paste through a stencil. It's very hard to capture in a photo...sorry.


Next I unscrewed to tops off my Colour Shimmer Sprays. Using Blush, Singin the Blues, Rose Petal & Apple of my Eye I dabbed in my paint brushes & then splattered the shimmer around my page. I find tapping my paintbrush with my palette knife works best. 


While I had my Colour Shimmer Sprays out I sprayed some white flowers.


I watered down some Singin the Blues, Apple of my Eye & Blush Colour Paste.I mixed it to a smooth consistency then painted over a stamped tag image.


 I then painted some chipboard with Heavy White Gesso.


The border chipboard I embossed with Steel Colour  Embossing Powder. The title with Blush Colour  Embossing Powder. The flourishes I embossed with Apple of my Eye Colour  Embossing Powder (sorry...forgot to take a pic).


I painted this little chipboard heavily with Heavy White Gesso then sprinkled it with glitter.


I put all my elements together adding some paper butterflies, some cheesecloth & leaves. 


I then painted some shimmer onto my butterflies & the white flowers with my Clear Shimmer Marker.


And with that I was finished.
I've tried to capture the shimmer with the close ups but it's really hard. Hope these show some of the beauty of the shimmer sprays.


Thanks for looking.
xxx Suzy


Thursday, 22 February 2018

Friendship by Suzy Loudon

Hello crafty friends. Thanks for popping back. Today I have another layout to share.


To begin my layout I dropped some Rust Artist Ink on my craft mat. I gave it a good squirt with water. Then using my scrunched up piece of cling wrap I ran it through the ink.


 Using my cling wrap I stamped my page,


I did the same thing using Walnut Artist Ink building up the layers.


Once again I used this technique using Soot Artist Ink.


Here is a picture of another layout using the same technique. However I used much more ink and it was  more solid coverage.


I prepped my photo by backing it with box cardboard before matting it on black card. Then again backing it with box cardboard giving it lots of height.


Using my finger I rubbed Leather Colour Paste around the edges of my page.


I then spread Heavy White Gesso through a stencil.


I then moved onto my embellishments. I used Leather embossing Powder on some chipboard that I later cut up.


To colour my white flowers I dropped some Walnut Artist Ink onto my craft mat. I sprayed water onto the mat as well. Using my paintbrush I ran it through the water then mixed it with a small amount of Artist Ink. Painting my flower with a light coloured coat first. Then I mixed the water with more Artist Ink making a deeper shade. Dabbing this onto the outside edges of my flower, the darker shade was drawn down the petals. Repeating this with more ink maker yet a darker shade. 


These are my finished flowers.


After the Gesso was dry I did some random stamping with black ink. (It wasn't as dark as I would've liked...time to re-ink my pad I think)


Using my Rust Artist Ink I painted some hessian leaves.


I painted my chipboard with Heavy White Gesso.


It was time to assemble. I added some micro beads, glass beads, some more flowers  & some jute ribbon along with my prepared bits. 


To finish off I covered my photo and gave the page a splash with some watered down Heavy Black Gesso. And I was done.


Here's a few close ups...


Thanks for stopping by for a look.
xxx Suzy