Monday, 15 November 2021

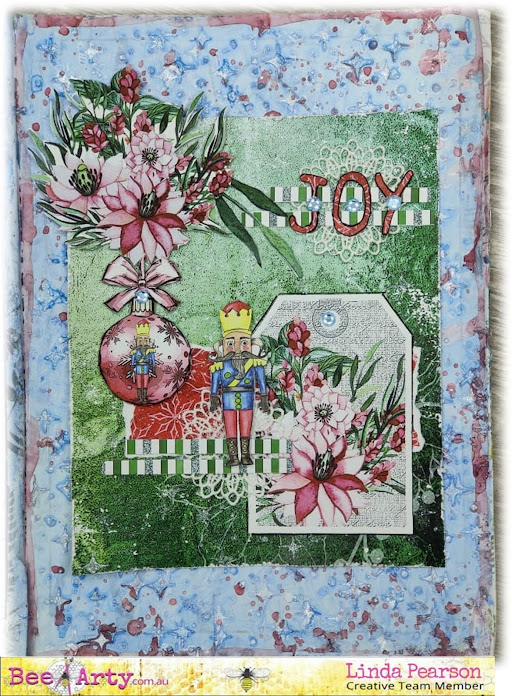
BringJoy to your world by Linda Pearson


Bee Arty Products used for this project include:

Nutcracker Sweet Mini Collection Paper Pack designed by Sue Smyth

- Cover sheet with cut apart 

-  Nutcracker Tags

-  Bauble Frame 

Colour paste – Snow

Starry Night A6 stencil Grateful Heart designed by Michelle Grant Designs

Colour Spray  – Bubblegum and Sapphire

Alphabet metal die – designed by Tanya Froud for the three six five collection

Gesso – Bee Arty heavy primer 250ml White 

Cotton Lace Doileys (own stash)

5 Rhinestones (own stash)

Water spray bottle

Silicone Catalyst tool

Art Journal 


Steps for creating this simple page layout created and adhered to a prepared journal page


  1. Prepare the journal page with 2 coats of Gesso, dry off.  
  2. Cover the page with Starry Night A6 stencil and Colour paste – Snow thickly, dry off.  Repeat this process adding more stars across the page, allow to dry completely.
  3. Spritz the journal page with water then spray the Sapphire Colour Spray, allow the colour to move, drip over the page  Dry off.
  4. Flick drops of Colour Spray  – Bubblegum ink over the journal page.  Set aside to dry while completing next steps.
  5. Cut the Nutcracker Sweet Bauble sheet down to approx 16cm x 19cm (or to suit the size of your art journal).
  6. Rough up the edges of the card with scissors.
  7.  Nutcracker Sweet - cut apart sheet, select some images to fussy cut, e.g. nutcracker, large posy of flowers, bauble, off-cuts of border strips.
  8. Fussy cut one of the Nutcracker Tags from the Nutcracker Sweet  collection.
  9. Tear an offcut from another of the card paper (red design).
  10. Run the Alphabet metal die letters J O Y through the machine using the offcut of red card paper.
  11. Assemble the elements onto the card (see image below for composition).  Adhere all the elements to the page with adhesive.  The bauble, posy of flowers and Nutcracker soldier were mounted with tape to stand off the page.
  12. Adhere the Rhinestones; 1 to bauble, 1 to Tag and 1 added to the centre of each letter.
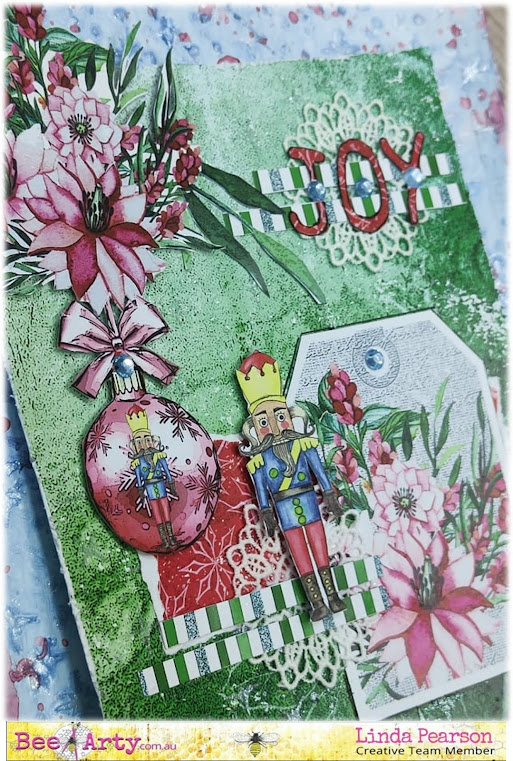

I hope you enjoy creating with this cute mini collection as much as I did ... the ideas are limitless as to what you can do with this amazing Christmas collection.



Bye for now ... Linda 
linda@yourcreativepalette.com.au

Sunday, 14 November 2021

Spend Your Life Laughing - With Bee Arty!

 Hi Bee Arty Lovelies!

It's Karyn here and today I have a scrapbook page to share with you made using the Electric Dreams collection from Bee Arty. I love how bright and vibrant the colours in this collection are, and they go perfectly with the new Neon mica powders!
 
 
I started with a sheet of heavyweight 350gsm white cardstock. I used a painting with plastic technique to apply yellow neon, pink neon and orange neon Mica Powders across the page under where my photo would be placed and along the left edge. Then I splattered each of these neon Mica Powders across the page.
 
 
Next I used the Distance Stencil with orange neon Mica Powder  mixed with heavy gloss gel. This stencil is one of my favs.

 
Lastly I added some stamping using black ink and the Making tracks stamp set 
 
 
Here is my completed page.  

 
 I've cut paper strips and word elements from the Electric Dreams paper pack. I've also added some diecuts using the Geo Direction metal die and 250gsm white cardstock.
 
 
 I drew around the edge of my page using a thin black Life Of Colour pen. Lastly I added some neon sequins, enamel shapes and a Charms Creations chevron embellishment.


Thanks so much for stopping by

Crafty Hugs xx


Saturday, 13 November 2021

Grateful Heart collection, by Amanda Hartmann

 Hello Colour Blast fans!

Armed with the amazing paper pack from the Grateful Heart collection, I go busy recently creating a couple of layouts. The peaches and blues of this range are beautiful and there are plenty of opportunities to do fussy cutting!

Page 1


I created lots of layers of papers and fussy cut elements, with some stickers and florals, to create this special page about my friend Moira.


I assembled the page with different patterned papers in the Grateful Heart - Paper Collection Pack, including some layered mounting behind the photo. By using the "Together" paper, I already had a line of detail running down the right side of the page. I fussy cut florals from the second sheet of "Together" paper and some from the "Family" paper. I was able to layer these down the page - with some muslin, flowers and other details.

To finish the page, I mixed some Colour Mica powder with water to splatter on the page. I chose the rich cooper tones of Sienna for this.


Page 2


 I again cracked out the  Grateful Heart - Paper Collection Pack, for this second page of my hubby and I. Again I used more fussy cut florals and even included a lace bunting cut from the "Collection-Bonus" paper. I did include a layer of white in this layout, using the ever awesome Bee Arty White Cardstock

To finish the page, I mixed some Colour Mica powder with water to splatter on the page. I chose the tones of Peach Nectar for this. As well as splattering, I also painted some of the floral and leaf elements.


Thanks for joining me today so I could share these pages with you.

They are special pages to me and sentiments and colours of "Grateful Heart" felt perfect for the emotion I wanted to convey. Perhaps you haven't seen this range but you have the perfect photos just waiting to be scrapped! Get yours in store today.

Thanks again,
Amanda


Thursday, 11 November 2021

NUTCRACKER CHOCOLATE BOX by Judy Cullen

 Hi Bee Arty Lovers,

I was immediately drawn to this gorgeous Nutcracker paper collection designed by Sue Smyth and decided "off the page" was the way to best share this collection with you. I started by making a gorgeous chocolate box which can be used after you have eaten all the yummy chocolates as a Christmas lantern by just adding a battery operated tea light. With the left over papers I made some cute placemats and table place cards. So firstly lets get started on this chocolate box.

Constructing the Walls
  • Cut 2 pieces of cardstock 8 inches by 8 inches.
  • Place in your scorer and score them at 1/2 inch and 5 inches 
  • Turn them on their side and score 5 inches from the top (this will be the bottom of the box).
  • Label the sections A to F as shown.
  • Draw a line across the top 1 1/2 inches down.
  • Mark the centre of pieces B and E at the top with a pencil.
  • Draw a line from  this centre point to the pencil line as shown to create the roof line.


  • Cut out the hatched area as shown and snip up the vertical scored lines on the bottom to the bottom to the horizontal scored line. 
  • Glue the 2 piece together by placing A over F.


Decorating the Walls
  • I found it easier to decorate this before forming it into a box.
  • Choose your background papercut to fit and glue onto sections E,F,Band C as shown. (you could do the triangles at the top of E and B in different paper). Note: Ink all your edges and fussy cut pieces.
  • Pencil a door 1 3/4 inch high by 1 1/4 inches wide and cut out top, bottom and one side making sure you leave one side attached for the hinge. NOTE: cut the bottom slightly above the score line.
  • Glue a small piece of plastic/film/ vellum over the door hole from the inside. This is where the light will shine through from your candle. (also to stop your chockies from falling out). If you don't want to do this you could just make a fake door.
  • Now fussy cut and decorate till you are happy. I've done lots of layers, used foam tape to give some dimension and  added some sneaky bits (can you see the cat and dog?). I've also wrapped some pieces around the corners.
  • I've matched the door to the roof, both inside and out then added a small brad for the door handle.  NOTE: Leave the little green awning until later.
Constructing the Box
  • Glue the sides together with the narrow strip on the inside..
  • Tuck the side bottoms in first, add some glue to the bottom of them and fold the back bottom over them. Then glue the front bottom to the base. Cut a piece of cardstock to  4 1/2 inches by 3 inches and glue it to the inside of the bottom of the box.


Constructing the Roof
  • Cut a piece of card stock 7 inches by 4 inches then with a pencil draw a line 1/2 inch around the edge.
  • Choose you paper for the roof and cut to fit just inside the above piece of cardstock.
  • Score both piece down the middle.
  • Fussy cut the half lollipops from the front page of the paper leaving an additional 1/2 inch on the top so you can fold this over the roof. You can also use this as a pattern if you want to use a different piece of paper for you roof decoration.  Score as shown.


  • Glue this to the top of your roof cardstock then glue your chosen paper over the top.
  • Cut this trim in the centre at the roof so it can bend.
  • Turn your roof over so you are now looking at the inside where you have the lines drawn.
  • Cut 2 pieces of cardstock  6 inches by 1inch and score down the middle. Snip this in the centre as shown so it can fold with the roof. Glue these along the front and back lines on the roof inside.
  • Cut 2 pieces of card stock 4 inches by 1 inch and score down the middle. Mark 1/2 inch at each end of bottom as shown and cut out.
  • Glue these inside the side lines and attach the side bits to the front and back pieces. Note: This all needs to fit inside your box so do some tests as some small adjustment may be needed.


Completion
  • Add some decorations to your roof top and an additional awning if you wish and then fill it with Chocolates. Yum! 
Placemats
  • Create your project on an A4  landscape size piece of paper.
  • When complete take it to Office Works and ask them to enlarge it to A3 and laminate.
  • Note: I have cut around the photo of the girls.


Place Cards
  • Make your own place cards for Christmas with those little left over  bits. I love the way the tin soldier is sitting down on the job.!
  •    Cut a piece of cardstock approx 4 inches square, score in the middle and decorate.


Thanks for watching and a Merry Christmas to all. 
Cheers Judy


Sunday, 7 November 2021

Blah Blah Blah by Tracey Campbell

 Hello Bee Arty people, it's Tracey Campbell here today to share my latest creation using the newest collection Chit Chat, designed by Tanya Frond. A fun and funky range with pretty pinks, greens and purples with black grungy accents perfect for males and females.

I've used it to great a layout about how when Bronte was smaller she loved chatting on the phone to her Dad or Grammy.... doesn't happen much anymore. Teenagers!! 

To start this layout I used the XOXO Stencil and spread some clear gesso on to white cardstock . I placed some Os and hearts in rows across the base.

Once dry apply lines of Artist Inks in Slipper and Mermaid across the page, with a thick paint brush.The clear gesso will resist the Artist Ink

Use a paint brush to flick some watered down white gesso across the base. Then repeat with the Mermaid Artist Ink and splatter fine splotches over the base. 

Cut three strips of paper from the She patterned paper, roughly the width of 3.5 cm. Tear off the ends and tear them in half so that you have 6 paper strips. Adhere them across the base, use both sides of the pattern paper.

Using the Road Base Colour Spray flick some liquid over the top of the base.


Using some black Stazon use the rectangular piller stamp form the Scrabble stamp set and press it across the base, over lapping the Artist Ink and She pattern paper. 


Cut 4 rectangles from the She and Chat patterned papers, just slightly larger than a 4x6 inch photo. Distress the edges and angle mat them around the photo. Adhere tot he base, slightly off center, see the final layout for the position.


Fussy cut the two spike speech bubbles from the Speak patterned paper. As I knew I wanted three spiky speech bubbles I drew another one on white cardstock with a black Sharpie pen and then cut it out.


Adhere the spiky speech bubbles around the top right hand corner of the photo. Use the Scrabble piece letters from the Scrabble stamp set and use black Stazon to stamp a title onto one of the speech bubbles. Fussy cut the words Blah, Blah, Blah from the Love Letter title pattern paper and adhere them to the other two speech bubbles.


Use the metal die to cut out a pink and teal female person from the Peeps metal die set and adhere them to the bottom right hand corner. Finish off the page by stamping some heats from the Scrabble stamp set.

Well I hope that you have enjoyed my layout that I have created today with the Chit Chat collection, it is really a versatile range.

Hugs
Tracey


Go For It with Belinda Spencer

 Hello Arty Bees!!


It's Belinda here today to share my latest layout for Bee Arty inspired by the November Mood Board.


Here's a peek at the mood board for November:


I started my layout by cropping a piece of Graffiti Grunge patterned paper and mounting it onto a sheet of the 350gsm White Cardstock. I then spritzed a little Sunset Colour Spray in three places and then placed a piece of plastic over the top to spread out the ink.


I repeated this process using Lagoon Colour Spray.


And for a third time adding Road Base Colour Spray. I then flicked all three colours over the page and dried with a heat gun.


I added some stencilling using the Three Six Five A5 Stencil Three Six Five and the Black Heavy Gesso. I stamped some stars over the page too using the Going My Way Clear Stamps and Ranger Jet Black Archival Ink.


I used the Graffiti Grunge Linked In Metal Die to cut two pieces from extra white cardstock and stapled them onto the page.


I added a paper stack on top of the die cuts using some patterned papers from both the Graffiti Grunge and Fearless, Brave And Free collections. I added my photo on top.


Next I used some Ranger Archival Inks to stamp some more stars using the Going My Way Clear Stamp set again. I fussy cut the stars and added to the layout along with all remaining elements.


I cut the quotes from the Graffiti Grunge Be Yourself Word Sheet and added them to the layout using 3D foam.


Thanks so much for stopping by the blog today. I hope you find some time to play along with the November challenge too.

Cheers
Belinda