Showing posts with label colourblast colour paste. Show all posts

Monday, 15 November 2021

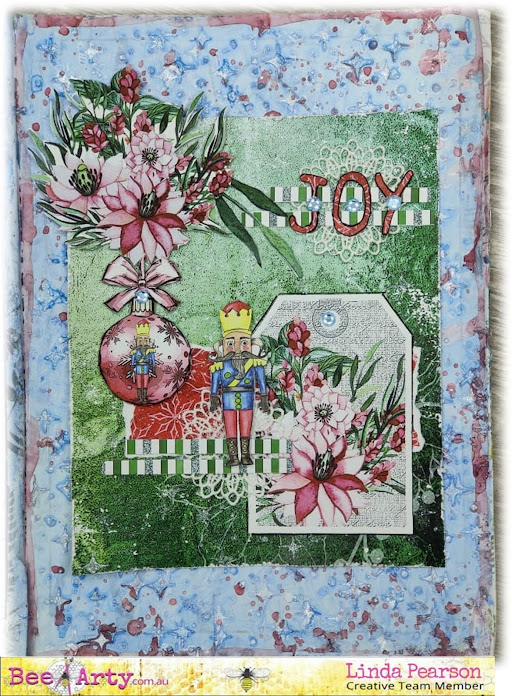
BringJoy to your world by Linda Pearson


Bee Arty Products used for this project include:

Nutcracker Sweet Mini Collection Paper Pack designed by Sue Smyth

- Cover sheet with cut apart 

-  Nutcracker Tags

-  Bauble Frame 

Colour paste – Snow

Starry Night A6 stencil Grateful Heart designed by Michelle Grant Designs

Colour Spray  – Bubblegum and Sapphire

Alphabet metal die – designed by Tanya Froud for the three six five collection

Gesso – Bee Arty heavy primer 250ml White 

Cotton Lace Doileys (own stash)

5 Rhinestones (own stash)

Water spray bottle

Silicone Catalyst tool

Art Journal 


Steps for creating this simple page layout created and adhered to a prepared journal page


  1. Prepare the journal page with 2 coats of Gesso, dry off.  
  2. Cover the page with Starry Night A6 stencil and Colour paste – Snow thickly, dry off.  Repeat this process adding more stars across the page, allow to dry completely.
  3. Spritz the journal page with water then spray the Sapphire Colour Spray, allow the colour to move, drip over the page  Dry off.
  4. Flick drops of Colour Spray  – Bubblegum ink over the journal page.  Set aside to dry while completing next steps.
  5. Cut the Nutcracker Sweet Bauble sheet down to approx 16cm x 19cm (or to suit the size of your art journal).
  6. Rough up the edges of the card with scissors.
  7.  Nutcracker Sweet - cut apart sheet, select some images to fussy cut, e.g. nutcracker, large posy of flowers, bauble, off-cuts of border strips.
  8. Fussy cut one of the Nutcracker Tags from the Nutcracker Sweet  collection.
  9. Tear an offcut from another of the card paper (red design).
  10. Run the Alphabet metal die letters J O Y through the machine using the offcut of red card paper.
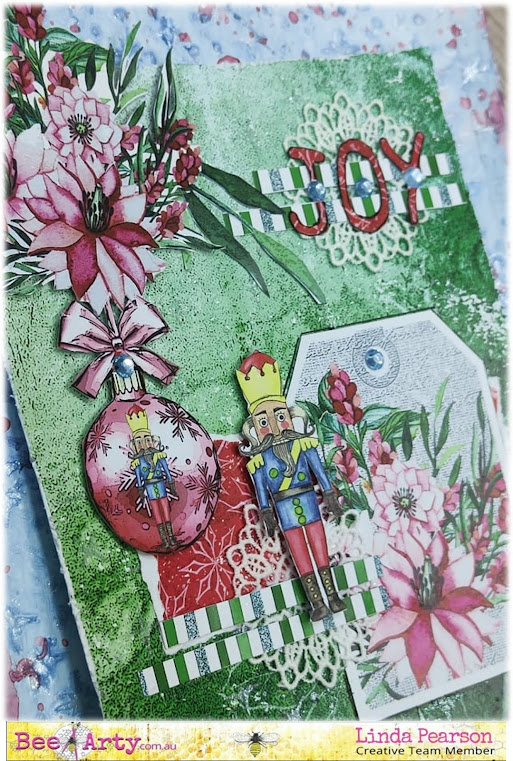
  11. Assemble the elements onto the card (see image below for composition).  Adhere all the elements to the page with adhesive.  The bauble, posy of flowers and Nutcracker soldier were mounted with tape to stand off the page.
  12. Adhere the Rhinestones; 1 to bauble, 1 to Tag and 1 added to the centre of each letter.

I hope you enjoy creating with this cute mini collection as much as I did ... the ideas are limitless as to what you can do with this amazing Christmas collection.



Bye for now ... Linda 
linda@yourcreativepalette.com.au

Monday, 26 April 2021

FOREVER OM! by Linda Pearson


The delightful ‘Forever My Always’ collection by Fiona Paltridge is a wonderful compliment to this golden buddha focal point.  A cornacopia of FMA scrapbook papers, stencils, Colourblast pastes dies, and gold leaf embellishments along with my fav Buddha stencil make this a stunning layout or mixed media page for your journal.

Bee Arty products used in this project:

Texture Paste + sand or Fiber paste
Payne's grey heavy acrylic paint (blue/black)
Gold leaf and sizing adhesive
Gold foil card and an extra sheet of White Cardstock 350gsm coloured with Paynes grey acrylic paint (dry off) for die cutting shapes.
Palette knife (metal and silicone)
Paint palette


Fussy cut the flower sprays from the Always 30x30cm scrapbooking paper and the Forever 30x30cm scrapbooking paper.   Keep the Always offcut paper to be used as your under paper for the project.


Adhere the Always off cut paper to the White Cardstock 350gsm base.  Dry off.


Using the Bling Colour paste add a small amount of Sienna Colour paste to the Bling … mix up an apricot/mushroom pink to match the paper colour way.  


Spread the paste randomly over the cut out area continuing over the design randomly.


Apply thin coat of gold leaf sizing adhesive over several areas of the  paper, allow to dry off to a tacky finish.   Place the gold leaf over the tacky areas brush away excess leaf.


Mix a good amount texture paste with some sand (this helps to add grainy texture .. good substitute if you don’t have Fiber paste). 

Add Payne's grey acrylic paint to the mix.  Apply through the Buddha 1 – A4 mask and stencil carefully but thickly. 

Try to leave some ridges in the paste to provide depth.  Allow to dry thoroughly.


Mix more of the Apricot/Mushroom coloured Colour paste (bling and Sienna). Apply the Humps A6 stencil over several areas of the page (white areas). 


Apply thin coat of gold leaf sizing adhesive over one side of the Buddha, allow to dry off to a tacky finish.   Place and pat down the gold leaf over the tacky areas brush away excess leaf.


Cut several Diamond – metal die shapes from the gold foil card. 

Cut lots of My Flower – metal die flowers from the gold foil card and from the painted cardstock. 


Arrange the die-cut pieces around the paper focusing around the bottom of the Buddhas and edges of the page.  Adhere the cut pieces to the page.  Rub some gold paint around the shapes; Buddhas, leaves and other shapes.

I hope you are inspired to engage with this amazing floral collection but most importantly, enjoy the process. 


Bye for now! … from Linda

linda@yourcreativepalette.com.au


Tuesday, 26 January 2021

Tip In Flourishes

 Good morning Bee Arters! 

Hope you are enjoying your Australia Day holiday ... why not celebrate by creating a journal page by supporting a proud Aussie based company https://beearty.com.au/ 

In this Blog entry I have added a tip in lace flourish to the page.  Enjoy the process and have some fun. 


List of materials used in this project


The finished product of this journal page is A4 size, I used a piece of White Cardstock 350gsm 10 pack - 12"x12".  I made a crease at the A4 measurement to create a 'tip in' fold using a boning tool.


Firstly, mask off the crease line to keep the 'tip in' clear of base coat paint on main page.  Apply small blocks of colour over the A4 background using your finger in 'figure 8' fashion.  Add each colour in turn leaving the yellow and magenta last.  You may wish to dry off in between to eliminate muddying of colours.
N.B.  I did not gesso this paper in this instance, but you could if you prefer too.


Be sure to cover the whole of this A4 section of paper.  Completely dry off.


Using the 
Boxed in stencil A5choose one of the background colours (not the pop colours e.g. yellow, magenta),  add a little white beside, blend using the silicone sponge then apply randomly over the stencil (don't have to use whole stencil).  Dry off.


Continue this process in same colour over the entire surface of the page.  Dry off.


Select another colour from your palette 
(not the pop colours e.g. yellow, magenta), again apply the focal stencil Flux A6 stencil randomly over the page, apply stencil in different directions. Dry off.


Remove the masking tape from the 'tip in' section.  In this project I opted to hand draw a similar 'flourish' design using the stencil as a guide only (see below).  If you are an accomplished craft knife user feel free to use the 
Flux A6 stencil to draw a pattern over the white area for your design.


I drew this design on a spare piece of card and adjusted until I was happy with the design then transferred this over to the 'tip in' page.


Before cutting out the shapes I marked in the areas to be cut out with a X to ensure I removed the correct sections.
N.B.  please use caution when using craft knives always place the non dominant hand well away (behind the cutting area) and always turn the page to make curves do not twist your arm.


After cutting apply more masking tape along the coloured background area along crease.


Select a 'pop' colour, Magenta, colour the cutout sections, may require two coats on both sides of the 'tip in'. Dry off and remove tape.


Mix 
Colour paste - Rose Petal with texture paste apply through Flux A6 stencil over the stenciled surface, allow to dry.


Add some intensity and dimension over the focal stenciled area using 
Colour Spray - Bubblegum.  Cover the page with power towel so the page is protected from over spray of ink.


Add some paint spatters in light yellow colour to add contrast and to soften the page and including both sides of the 'tip in' flourish also.


Add highlights to the pink flourishes using 
Life of colour pens - yellow around all of the stencilled areas.


On the underside of the 'tip in' highlight the cutout design shapes with the yellow pen.


On the upper side of the 'tip in' I chose to use a dashed line to highlight the cutout shapes.


In this project I also drew around the tip in cutouts, in yellow pen, onto the back page to create bubbles for the stamped sentiments.
Add small word / sentiment stamps that fit in the size of the cut out shapes.  In this project I included; Heartfelt clear stampLive your art clear stamp setKind heart clear stamp set with archival ink.


I hope you have enjoyed this fun project and you are inspired to create your own.  


Thank you and see you next time for more creating fun!


linda@yourcreativepalette.com.au