Showing posts with label destination anywhere. Show all posts

Saturday, 22 January 2022

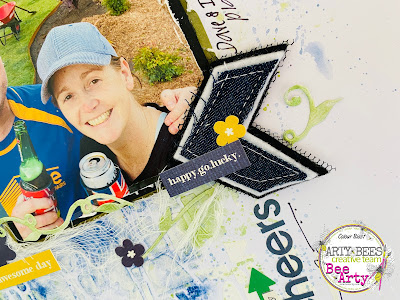
"Cheers", by Amanda Hartmann

 Hello again!

A quick an easy page today....

Here is what you need:

Stencil the brick pattern from the Pavement - A4 Stencil down the page using some light white modeling paste.

Add a few sprinkles of Mica Powder in Just Blue to some plastic packaging and spray with water. Smoosh the colour onto the page. You don't need much!

Next do the same with the green Apple of my Eye.

Use a brush to push colour where you want it and to add splatters.

I finished with some doodling, stickers, muslin, a Charms Creation, and the title. I also diecut a vine with DeVine - Metal Die and painted it green with Apple of my Eye Mica Powder to add into the cluster under the photo.

EASY AS!


Thanks for looking,
Amanda


Thursday, 20 January 2022

Travel 2 Escape by Charmane Koch


Hello Everyone! 

Today I am sharing with you a layout I created based on the Kraft Plus Challenge for January - using Kraft and something to do with Travel... so I thought Destination Anywhere Collection would be perfect!

It's a layout I also scraplifted of my gorgeous friend and fellow Bee Arty Creative Team Member  Amanda Hartmann!


I made a video! 


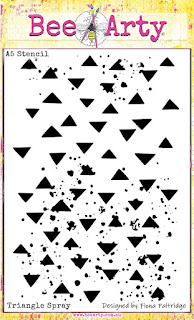
I started off with the Kraft Cardstock background where I had stencilled where I had stencilled on the Triangle Spray using some modelling paste.  I have then used the fabulous Bling Colour Paste scraping it through the AWESOME Capture Stencil.


I have also used the Happy Stamp, stamping "Happy Little Moments" & "Today is a perfect day"

Also I have cut out the Grungy Film Strip die, using the Destination Anywhere Journey Scrapbooking Paper. A piece of the same paper I have used as the backing for the photo.


The Road Trip Words Die "travel & escape" were perfect for my title, so I cut them out using Black Cardstock so that it would stand out.

I was going to use torn strips of cardboard along the top and the bottom of my layout but I decided to use strips of the "Let's Go" Scrapbooking paper.

I've cut out the tags from the Destination Anywhere kit, and inked the edges and added my journalling...


And some closeups over the layering...


I got out my Bling Mica Powder just to add a bit of gold here and there over the page....


And here is the end result! I really love how it has turned out so rich & golden! 


Anyway, I hope I've inspired you to get out your Destination Anywhere papers & dies & stencils, and maybe even your Bling Colour Paste... or if you don't have any of these things YOU NEED THEM! So get shopping!


Take Care, Stay Safe XO Charm

Wednesday, 22 September 2021

'Take a trip journey to travel' by Sandi Spink


 I love revisiting my favourite trips and memories, that why I enjoy photography and making art journals.

Using 'Destination Anywhere' designed by Queenie T, I created my own handmade journal to keep some of my memories of my Swiss holiday and I'd like to share with you how I made it.

Products used from the Destination Anywhere kit: 

12"x12" pages .

Phrases and words from phrase page

Die Cuts: Transport

Stencils: Drippy-A6, .

Wooden, paper and material embellishments.

ColourBlast/BeeArty products: 

White heavy gesso

Colour Artist ink- Rust

Stencils: Pavement

Step1,2 & 3

  • I selected a range of pages and ripped or cut them into different sizes and a edges. 

  • Folding them provided me with a booklet style journal. 

  • I cut out a plane using the Diecut template 'Transport', some words, tags and phrases.


Step 4 & 5:

  • To add texture I applied white gesso over different section of the pages with the 3 different stencils.

Step 6 & 7:

  • To add another effect I used the front of the stencil before the gesso dried and placed it onto a page and used a wet one to rub it over the stencil which left a shadow effect.  On another page I placed gesso over the spotted section and then smeared gesso over it with my soft sponge brush.

Step 8:

  • I also smeared some onto a plain page and when dry dropped small amounts of artist ink 'rust' and wiped it with the same soft sponge brush. 

  • A few other ink colours were dropped from a height to produce large splats.

Step 9:

  • After completing the base additions to the pages I built up the layers with the smaller sections of papers, phrases, natural material elements and photos. The journal was completed by staking the pages together and tying a piece of natural string around the folded sections twice and tying off.


Some closeups:


Thanks for joining me and I hope I inspired you to check out this amazing kit and the products at beearty.com.au . You can find more inspiration and links on BeeArty's facebook page https://www.facebook.com/BeeArtyHive


Thursday, 13 May 2021

Arrival - Art Journalling With Karyn Schultz!

 Hi Bee Arty Lovelies!

It's Karyn here and today I have an art journal page to share with you made using the Destination Anywhere collection from Bee Arty

 
I created this page in my DWM Multi Media Journal on a Calico page. I painted clear gesso over the calico first (to stop the ink from going through the page). Then I painted Rust and Walnut Colour Artist ink across the page using a painting with plastic technique.
 
 
 Next I used the Capture Stencil with Leather Colour Paste.
 
 
 Then I added stamping using the Watermark stamp set and Rust and Walnut Colour Artist ink . I used a paintbrust to paint the ink onto the stamp, then stamped it on the page. 
 
 
 Here is my finished page. The image is a picture I found online and printed out on photo paper. Under the picture I added elements cut from the Arrival paper from the Destination Anywhere paper collection. I've also added a Grungy Filmstrip die cut on 350gsm white cardstock and painted with Rust Colour Artist ink. The page title was cut from the Parcel paper.
 
 
 Here are some close-ups of the page. I love how it turned out, It's one of my fav art journalling pages!


Thanks so much for stopping by

Crafty Hugs xx


Thursday, 6 May 2021

Cards - With Karyn Schultz!

   Hi Bee Arty Lovelies!

It's Karyn here and today I have two cards to share with you made using the Destination Anywhere collection from Bee Arty. I love this collection, it is perfect for masculine projects and family layouts!
 
  
 I started by creating 2 diecuts, using heavyweight 350gsm white cardstock, of the Grungy Filmstrip frame die for the front of my cards.

I then painted Rust Colour Artist Ink on one frame and Walnut Colour Artist ink on the other. I painted with a brush to give a mottled effect using a more concentrated ink in places and more watered down in other places.


Here are my finished cards.
 
 
 Here is a close up of the first card "Keep Calm and Travel On". My card base measured 10.5cm x 14.8cm and was created from Kraft cardstock. I matted 10cm x 14.3cm Journey paper (reverse side) from the Destination Anywhere collection. I then added the frame diecut painted in Rust ink. I die cut 2 of the planes using the Transport metal dies (in white cardstock) and painted a Rust Artist ink coloured stripe along the side to coordinate with the card colours and to tone down the stark white. I cut one of the planes in half and adhered them to the card as shown. I cut the card title from the Parcel paper and around the title I added a strip offcut from a Grungy Filmstrip diecut (these negative strips are as fun to use as the positive cuts). Lastly I added some hessian trim and black sewing thread.

 
The next card is called "Sightseeing". Once again the card base measured 10.5cm x 14.8cm and was created from Kraft cardstock. I matted 10cm x 14.3cm Journey paper (reverse side) from the Destination Anywhere collection. I then added the frame diecut painted in Walnut ink. I die cut 1 of the Combi-Van's using the Transport metal dies (in white cardstock) and painted an Olive Grove Mica Powder stripe along the side. I adhered it to the card as shown and attached 2 vintage brads to the wheels. I cut the card title from the Parcel paper and adhered it over some hessian trim, a chipboard offcut, and black sewing thread. 


Thanks so much for stopping by

Crafty Hugs xx


Saturday, 17 April 2021

Destination Anywhere Sneak Peek III - With Karyn Schultz!

  Hi Bee Arty Lovelies!

It's Karyn here and today I have a final Sneak Peek of one of my creations that will feature in the upcoming  Bee Arty "Destination Anywhere" kit. This sneak is from a scrapbook page titled "Fall In Love With Moments".
 

 Destination Anywhere has a vintage/masculine colour palette with versatile elements, and is designed by the talented Quennie Yeung. You will love this collection - the stamps, stencils and dies are not to be missed! You can subscribe to the kit here. Kits come with a paper pack, stencils, metal dies, stamp sets, embellishments and full colour kit instructions.
 

Thanks so much for stopping by

Crafty Hugs xx


Monday, 12 April 2021

Life's Snapshots!

Welcome Bee Arters!  

Today's project provides a 'shapshot' of the upcoming collection Destination Anywhere by Queenie Y.  The Destination collection to be released mid April can be pre-ordered through the Bee Arty Kit Club - click on the link to subscribe.

This journal page uses some cardstock and stencils from the range to create a metaphoric relationship between the photographic process and life's challenges.


 Materials required

  • Art journal book (I have glued the cardstock page into my art journal book, but you could easily use the cardstock as a photo layout)
  • Adhesive or matt medium
  • water soluble pencil in a dark brown colour
  • palette knife
  • Colour paste – leather, sienna and bling
  • Destination Anywhere Collection collection by Queenie Y.
    • A6 Traces Stencil
    • A5 Capture Stencil
    • A4 Pavement Stencil
    • Journey cardstock (from collection)
    • Notes (from collection - small section cut out)


I cut the cardstock to fit into my art journal book (A4) but you could use the whole sheet as part of a photo layout just as easily.  Adhered into journal using craft glue or matt medium.


Using the spotted part of the Destination Anywhere Collection - Pavement stencil, apply a liberal amount of Colour paste - sienna over the cardstock.  


Using the A5 capture stencil from the Destination Anywhere Collection, apply a liberal amounts of  Colour paste - sienna through part of the stencil, dry off.  Then apply more Colour paste - bling over the other part of camera stencil to blend the pastes through.


Apply Colour paste - bling liberally through the A6 Traces stencil Destination Anywhere Collection, over several places on the top and bottom of the page.

Use a dark brown (water soluble pencil) to outline the camera, the border of the page and around the Traces stencil.  Spray the pencil with a little water to allow the pencil to move and drip around the page.  Dry off.

Finally, add some Colour paste - sienna around the edge of the page with your finger.  Dry off.

Add a photo or sentiment to a cut off section from the Notes cardstock Destination Anywhere Collection.  Again I added Colour paste - sienna around the edge of the cut out section with your finger.  Dry off.  Use tape to adhere the cut out to the main page.


Thank you for stopping by and I hope you are encouraged to pre-order this amazing collection from Bee Arty Kit Club.

Enjoy!


Linda Pearson
linda@yourcreativepalette.com.au