Thursday, 16 December 2021

Cacti are bloomin created by Tracey Thorne

 If you haven't heard the new paper range Whispering Woods is ready for purchase and has been created by Sue Smyth. I've been lucky to get my hands on the range and there is a lot of variety in the papers with lots of scope for varying projects to be created. 


I have created 'Cacti are bloomin' to show the versatility of the papers and the cut outs in conjunction with the stamps. The Colour artist dye ink & Colour shimmer dust I have used complimented the 12x12 layout nicely.

I started with a base of 250gsm white cardstock and to this I have added Colour Artist Ink in Bordeaux and with a wet brush have mixed a little water to it. I have then used the kiss technique whereby I have picked up ink from a base and kissed the paper leaving a little of the colour on my white cardstock. I have added a little more colour & shimmer to the page by mixing up some of the Colour Shimmer Dust in Lollipop with water and then used the same technique to apply this to the page.

I cut the centre section out of a sheet of Whispering Woods 12x12 Forest Floor and placed this to one side for later use when backing the photos. I have then cut down the white cardstock quarter of an inch off all sides. I have then used a soft yellow ink to blend the edges of the page before adhering the printed cardstock border to the white page.

With the remainder of the Forest floor printed paper I created a photo mat.  I have cut them 2mm wider than my photograph. Before adhering to the photo mat I have inked the edges of my photo in black. I have chosen the little flower border stamp in the Whispering Woods Leafy Borders stamp set to create a border around the outer edge of the page. I have worked out placement of photos and added some texture to the page by using Texture paste and the Whispering Woods Sweet Flower stencil - this adds a lovely soft look to the page whilst still adding texture.


I have layered up one of  the photos using cardboard so it has height over the other photo which helps with depth on the page and adds a visual interest. Using the 12x12 Whispering Woods Woodland tags paper I have cut 2 tags and placed them under my photos. I have also cut out two of the magnolias and 3 butterflies from the Whispering Woods extra's sheet - similarly you could use the 12x12 Imagery printed paper. These were placed at opposite corners and the butterflies were scattered on the page. I have also cut out the mushroom elves and used them on the bottom right of the photo. I have accentuated the base by adding a little black water colour pencil for shading.


I have stamped out the corner flower stamp spray from the Whispering Woods Celebrate Nature stamp set. I did this using Archival black ink on tissue. This was then applied to the page using matte medium. I have then coloured the leaves of the tissue stamped images using Colour Mica powder in Envy. I added a little water to this prior to applying with a small paint brush.   A few final touches were a little black thread under the photo and adding the titles with a few of the fonts I have in my scrap supplies.


This is the final product. The Whispering Woods range has a lot of offer and is extremely versatile with the stamps and papers working so well together in a range of applications. I love how the papers tell a story on the page.


Have a fabulous week of creation

If you like this layout you can pop on over to the Facebook page and check out my mini movie of putting this together.

Tracey


Sunday, 12 December 2021

Whispering Woods Sneak Peek I - With Karyn Schultz!

 Hi Bee Arty Lovelies!

It's Karyn here and today I have a Sneak Peek of one of my creations that will feature in the new Bee Arty Whispering Woods kit. The sneaks are from a scrapbook page titled "Happiness Is". 


 Whispering Woods has whimsical/rustic designs & colour palate with versatile elements, and is designed by the talented Sue Smyth. You will love this collection - the stamps, stencils and dies are not to be missed! You can subscribe to the kit here. Kits come with a paper pack, stencils, metal dies, stamp sets, embellishments and full colour kit instructions.


Thanks so much for stopping by

Crafty Hugs xx


Monday, 6 December 2021

Spread your wings! by Linda Pearson


Hi Bee Arters .... On the blog today I am so pleased to be presenting a journal/scrapbook page using the newly released Whispering Woods paper collection designed by Sue Smyth.


Fairy Magic - Metal Die

Forest Favourites metal die

Fairy Wings A5 stencil

Forest Whisper A4 stencil

Leafy Borders clear stamp set

Celebrate Nature clear stamp set

Imagery 12x12” scrapbooking paper

Magnolia 12x12” scrapbooking paper

Fairy Dell 12x12” scrapbooking paper

White Cardstock 350gsm

x-press it double sided tape 6mm

Craft Powder Spoon

Mica powder

Muslin cloth

Sequins

Heavy matt medium


Whispering Woods paper collection designed by Sue Smyth.


Use the Fairy Dell 12x12” scrapbooking paper as background. 

Leafy Borders clear stamp set Stamp the leaf and flowers border stamps across the top of the background paper.  Apply texture paste mixed with Mica powder – Forest through the branches in the Forest Whisper A4 stencil, allow to dry.

Add lavender paint splatters over the background page.

Cover an White Cardstock A4 with leaf stamp from Celebrate Nature clear stamp set.  Spray the stamped cardstock using Forest Mica powder with water, allow to dry.  Fussy cut the stamped images.


Fussy cut the flowers from the Magnolia 12x12” scrapbooking paper and adhere the cut shapes around the top of the page along with the coloured leaf shapes.


    Cut a length of muslin cloth, distress the edges of the cloth to loosen the threads.  Adhere the muslin on three corners with matt medium. 

Run the Forest Favourites metal die through the die cut machine using the Imagery 12x12” scrapbooking paper (3-4 cuts)

Adhere (spot glue) the grass die cut shapes along the bottom of the page, arrange the gnomes, snail and mushrooms and adhere these between the grass. 


Mix Rosewood Mica powder into texture paste, apply paste through the Fairy Wings A5 stencil onto White Cardstock A4 .  While still wet dust over the stencilled image with more Rosewood Mica powder (like you were adding embossing powder, then tap off excess onto paper).  Fussy cut the textured wings from the card (1 piece).


Run the Fairy Magic - Metal Die through die-cut machine using silver foil card for wings (3) and the fairy using lavender foil card.  Assemble the fairies using x-press it double sided tape 6mm.


Fussy cut several bugs (beetles and butterflies), mushrooms, gnomes snail etc from the Imagery 12x12” scrapbooking paper.

Adhere the beetles and butterflies around the page and onto the muslin. 


Adhere sequins around the page.  Add some to the fairies also.


Add the sentiment in black pen, highlight the words in lavender pen also.


I hope this project has inspired you to take advantage of this beautiful new collection and I look forward to seeing what you are able to create using this collection.

Until next time ... happy creating1


Project created by Linda Pearson 

linda@yourcreativepalette.com.au


Sunday, 5 December 2021

Us by Belinda Spencer

 Hi Arty Bees!

It's Belinda here with you today to share my take on the fabulous December Sketch Challenge featuring the Grateful Heart collection.


Here's a peek at the sketch:


I cropped a sheet of patterned paper and mounted onto the 350gsm white cardstock for extra sturdiness. I then sprinkled some Midnight Colour Shimmer Dust over the central area and activated by spritzing water on it.


I love the variation in colour from the Shimmer Dust!


I turned the sketch on its side like this:


And here is my completed layout:


I fussy cut lots of images from the Grateful Heart collection and had fun layering them together for the little clusters. I fussy cut some leaves from the patterned paper using the Autumn Trio Metal Die.


How cute are the little bird images?!


The transparency butterfly was from my stash.


THAT quote couldn't be more appropriate for our 'annus horribilus' last year with Covid and my son's cancer diagnosis and battle.


Here's what I used:


Thanks so much for stopping by the blog today. I do hope you can play along with the challenge this month.

Cheers
Belinda


Thursday, 2 December 2021

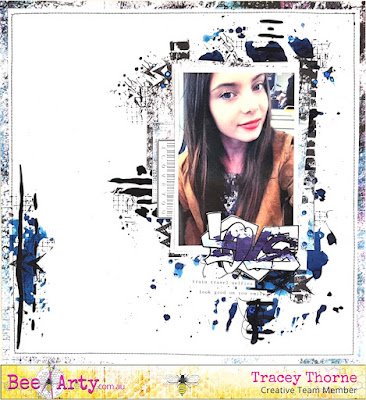
Love created by Tracey Thorne
Hello Creative friends

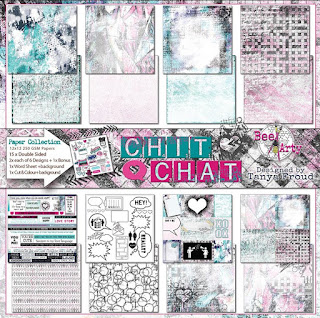
I had a play with the Chit Chat range and came up with this single photo 12x12 layout to share with you today. If you love the look of this you can get all the products individually or by buying the kit. I had fun incorporating a few of the elements from the range but focussing in on the blues as I took this from the shirt in the photograph. By leaving out the reds and pinks it helps leave my photo the focal point because of my daughters red lipstick.

These are the products I have used to put this page together. 

 Chit Chat My Heart printed cardstock - I have used this as an under border. Cut the center out of your cardstock to use on your page and the photo stack.

Chit Chat Collection printed cardstock embellishment pieces  - Love and barcode

250gsm premium cardstock - I have approximately half a cm off all the way around. 

Chit Chat stamp - Happy, Scrabble

Chit Chat stencil - OXOXO, Linear

Colour Artist Dye Ink - Soot, Marine

Texture paste

Diamontes

Foam tape & Glue

I have taken a video of the process if you were wanting to make something similar with your Chit Chat kit you can watch it on the Facebook site below.

https://www.facebook.com/tiddlypeep/videos/492249975368600

Don't forget to sign up for the kit if you are loving all these elements or if you prefer grab the individual items that are available in the shop as it is a very versatile range.

Here are a few photo close ups of the page


The completed layout 

until next time - get creative and have fun getting messy

tracey