Showing posts with label devotion stencil. Show all posts

Saturday, 6 March 2021

When in Doubt by Tracey Campbell

Hello Bee Arty Fans, it is my turn on the blog today and I am excited to share my latest layout with you where I use bits and pieces of various Bee Arty collections to create a 12x12 page. I must admit I love to mix and match collections from Bee Arty as they all seem to go so well together and it uses up my stash.
    First up I grabbed the Heavy White Gesso and the Devotion stencil to create a background on white card stock. I spread the Heavy White Gesso through the stencil that was positioned on a cardstock like a diamond. 

After the Gesso was dry I used a pipette  to drop splats of Royalty Colour Shimmer Spray over the floral image. I made sure that I only dropped the splats down the right and along the bottom of the cardstock. 
While the Royalty Colour Shimmer Spray was still wet I used a piece of plastic to spread the splatters out wider. This is done by simply placing the plastics over the wet splats and spreading it with your fingers. 
Next I added contracting splats of Colour with the pipette and by flicking the straw from the top of the spray across the page. For the contrast in colour I used Rose Petal Colour Shimmer Spray and Sapphire Colour Spray. 


Fussy cut 7 small and medium circles from the Collection paper in the Fearless, Brave and Free Collection.


Using the String Wreath and Seeker metal dies cut one image from some white card stock. Make a shaker box from the String Wreath die cut. This is done by cutting a insert of the vellum and adhering it to the center of the String Wreath. Place thin 3 Dimensional Tape around the inner edge of the String Wreath and fill with glitter and small sprinkle shapes. Adhere a backing of white cardstock


Using a paint brush paint the Seeker die cut with the Sapphire Colour Spray and the Royalty Colour Shimmer Spray. Allow the colours to blend together  to create a water paint look. 


Build the background using the product strips from Arty Farty, Trendsetter and Fearless Brave & Free collections to build up a crosshatch in the bottom right hand corner of the cardstock. Adhere the shaker box to the page with some white glue.


With 3 Dimensional tape adhere the photo to the background and stick the Seeker die cut along the bottom of the photo. 
Finish off the layout with some large gems and a title from the Trendsetter Sparkle Paper

Well I hope I have inspired you to use a mix and match of collections and to not just discard those cut off product strips, save them for a quick and easy layout. 

Thanks for stopping by.

Hugs
Tracey


Saturday, 20 February 2021

Super, Fabulous, Awesome, Amazing by Tracey Campbell

Hi Bee Arty fans. Tracey Campbell here today with a colourful rainbow Creative Team share highlighting the magical Shimmer Dusts. I'm going to let you in on a little secret of mine..... the Shimmer Dusts are my all time favourite Colour Blast by Bee Arty Product ever!!! Yes ever. I mean where else can a little dust sprinkled onto a project create such vibrant shimmery colours and as an extra bonus.... a tiny pot last such a long time.  

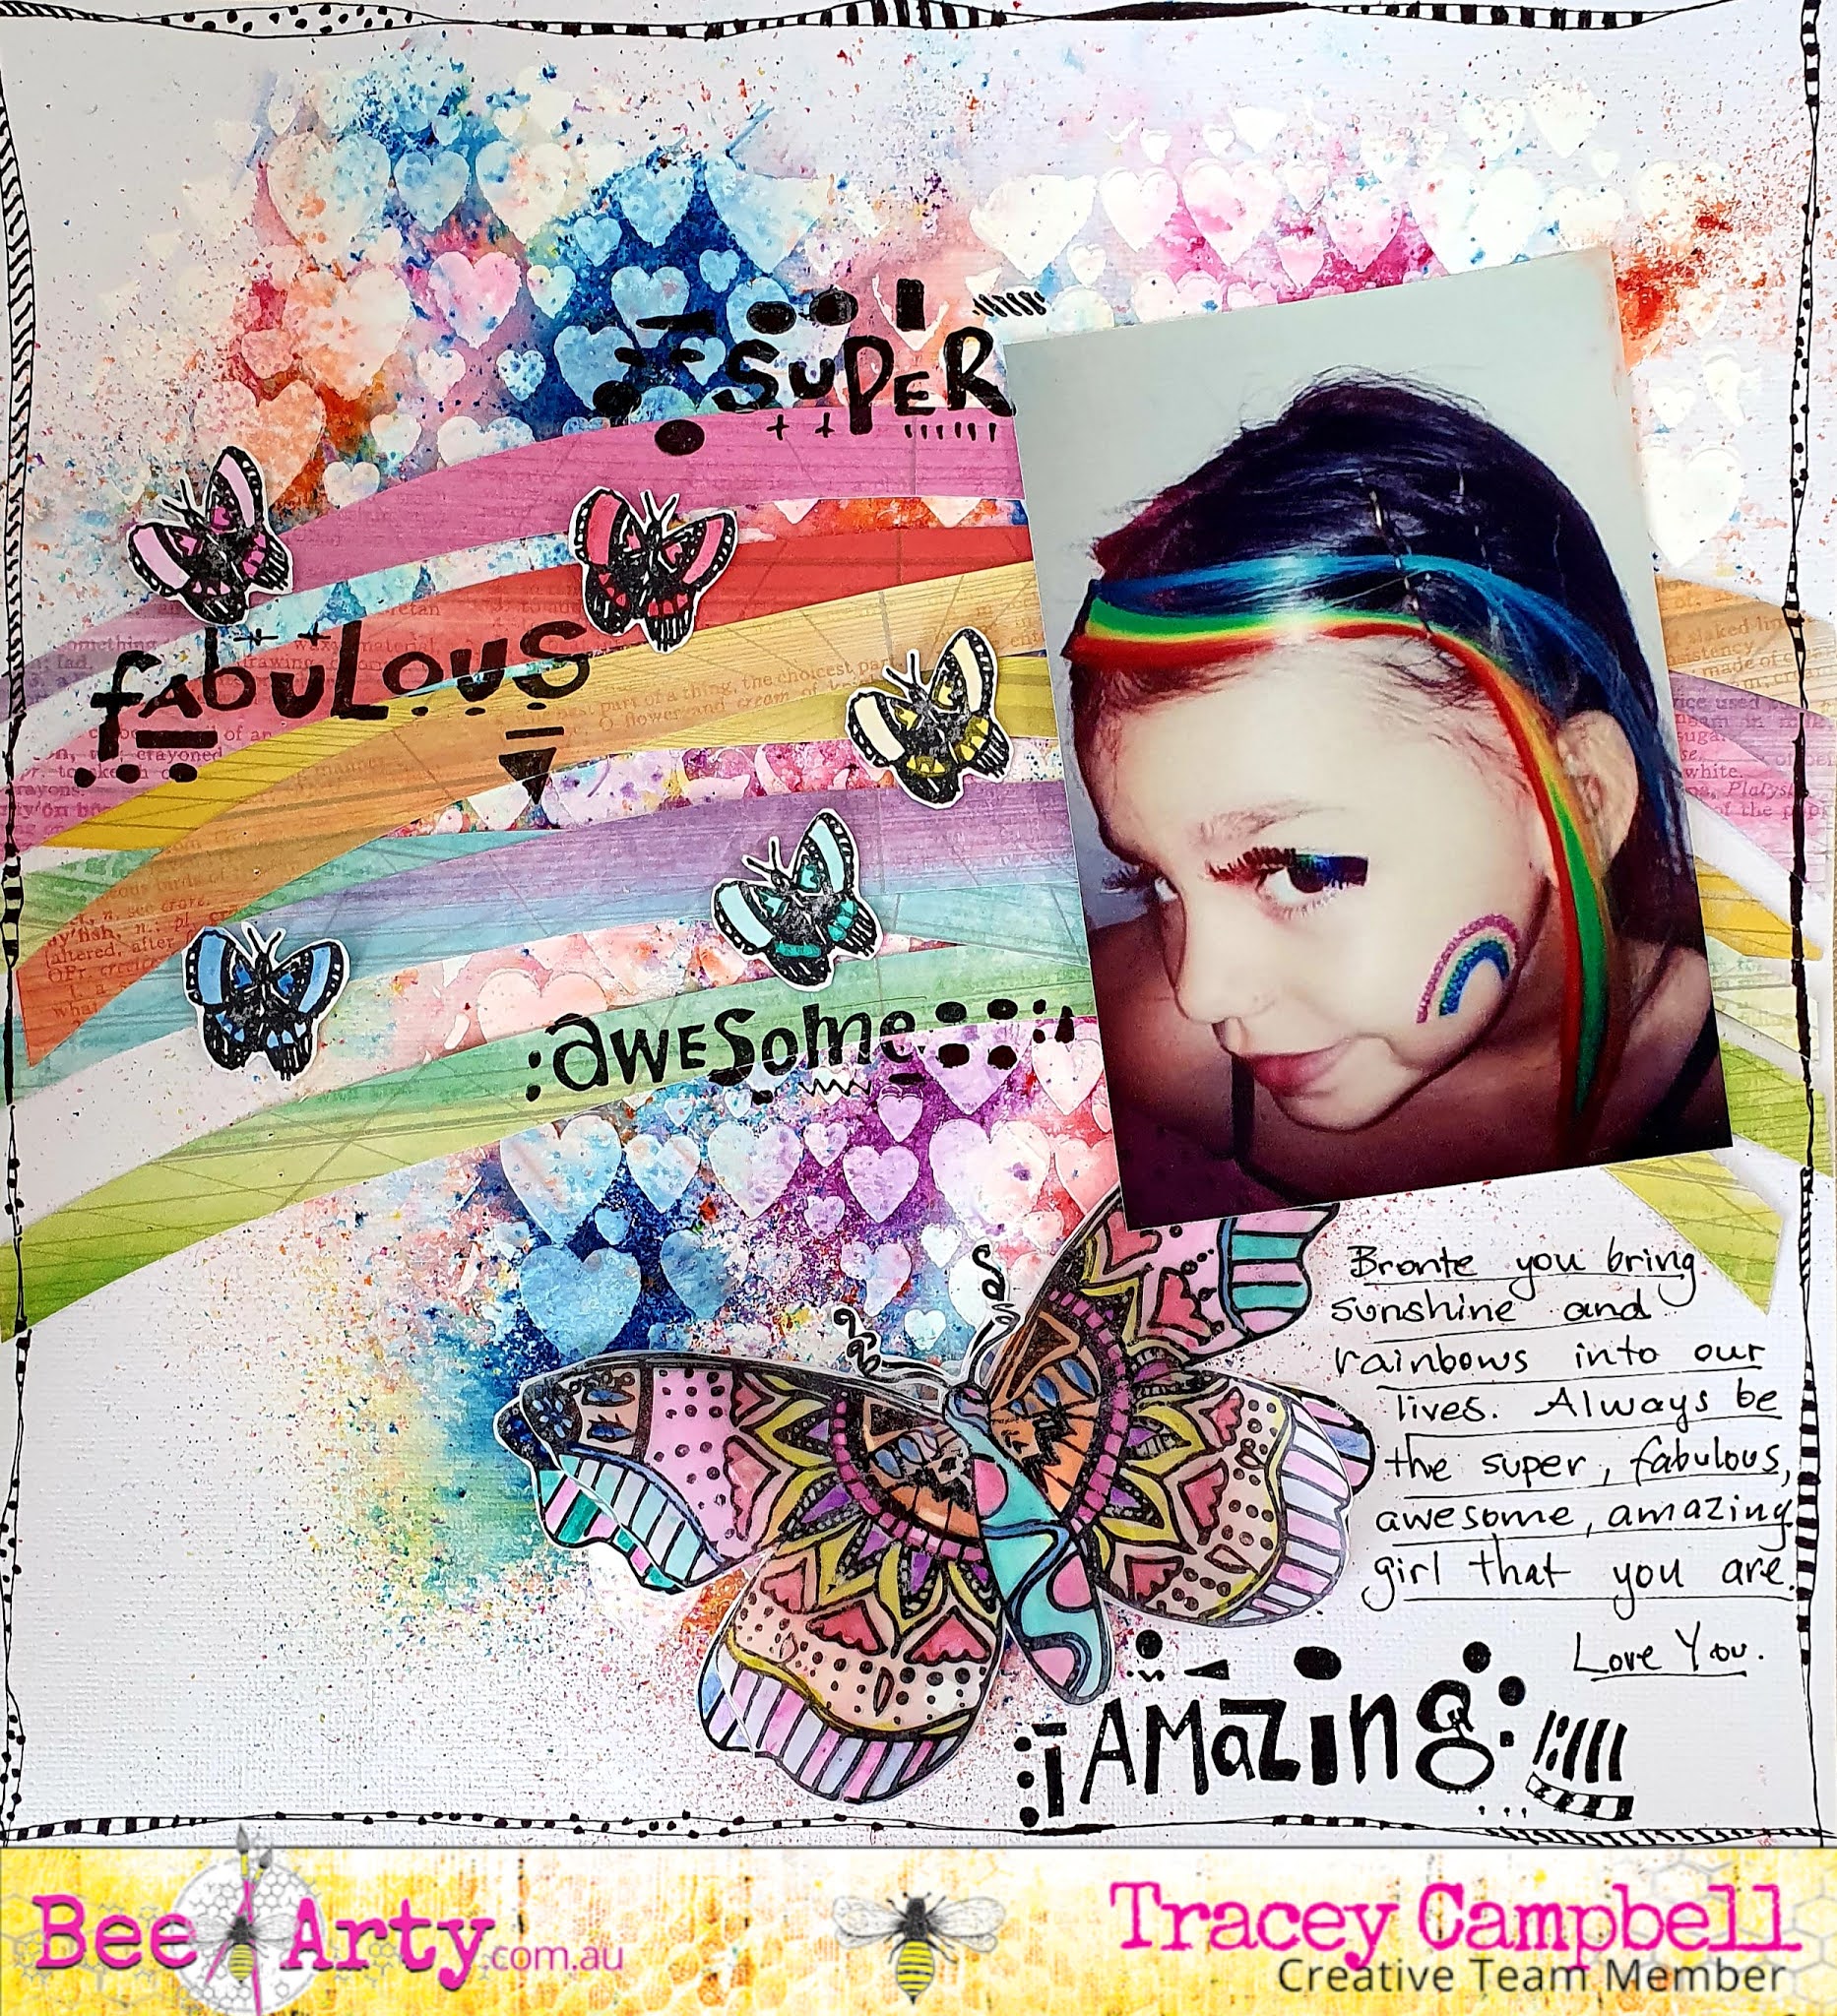
My layout today is of my oldest Daughter when they had a"Circus" theme at school and had to go in dress-ups. Bronte being Bronte just couldn't go as a clown, she had to be something different a "Rainbow Acrobat".   

Here is a list of all the products that I have used to:

Bee Arty Products:

Stamps: Cool Words set, Serendipity, the butterfly from City Lights.

Paper: Artist from the Arty Farty collection

Colour Shimmer Dust: Sunflower, Duke, Amber, Lollipop, Candy, Peacock and Passion

Heavy White Gesso

Stencil: Devotion

Inspired Collection Pan Watercolour set


Other materials:

White cardstock

Black Stazon ink

Black marker pen

3 Dimensional tape

Glue

Velum 

Scissors 

Lead pencil

Paint pallet Knife 

To create by back ground I started by using the Devotion stencil with some Heavy White Gesso, I  used a Paint Pallet knife to spread the gesso through the hearts pattern of the stencil and onto a 12x12 sheet of cardstock.
In the photo below you can see how I spread the gesso through the stencil in a thick "T" shape. Put aside to dry.
While the gesso was drying I cut some arches, roughly 1 cm in thickness from the Artist pattern paper in the Arty Farty collection
Making sure that the arches stretched across the whole patterned paper and at least one of each colour.
Using some Stazon black ink stamp the Serendipity butterfly onto some white cardstock and then repeat and stamp the image onto some vellum. Next stamp five small butterflies from the City Lights stamp set.
Using the Inspired Collection Pan Watercolour set and a water paint brush paint all five small and the two large butterflies. TIP: Only use a small amount of water on the vellum butterfly and it will curl and buckle if too much water is applied. 
Once the Heavy White Gesso is dry lightly sprinkle the Colour Shimmer Dust over the hearts. I have used seven different colours, Sunflower, Duke, Amber, Lollipop, Candy, Peacock and Passion. I actually sprinkled all seven colours onto the page making sure not to over lap them too much as I didn't want it turning into a "hot mess" nor mix colours too much. Then I sprinkled a little water onto the background and activate the Colour Shimmer Dust. 
I must admit, watching the colours magically appear and move together is one of the reason I love this product. It makes my heart happy. 
Before the water dried I took a roll of paper towel and rolled it over the top of the activated Colour Shimmer Dust. TIP: Not sure why this works but it does - rolling the paper towel stops the colours from running or smudging together, if you place a piece of paper towel over the top of the Activated Colour Spray it smudges!  
Here is the background. I love the rainbow patches of bright colour and how the hearts show through. 
Now I put it all together by layering the arches across the page, roughly in the centre of the page but more towards the top to create a rainbow. I used white glue to adhere them to the page. Adhere the velum stamped butterfly image to the white cardstock butterfly to create a double butterfly. The photo was next, I placed it on the right side of the layout and tucked the large butterfly underneath the bottom left hand corner. 
Lastly pop the smaller butterflies across the rainbow as if they are randomly flying in all directions. 
Here you can see the position of the elements as they come together.
Next I used Stazon black ink to stamp the words form the Cool Words stamp set across the page.
Here you can see where I have positioned the words; Super, Fabulous, Awesome and Amazing on the page.
To finish off I doodled a funky boarder around the edge of the cardstock and did a bit of journaling with a black marker. 
I really love how fun this was to create and how bright and funky it turned out. 
I hope I have inspired you to try using a few different Colour Shimmer Dust colours at the same time. It can be a bit scary giving it a go but the result is awesome. 

Hugs
Tracey


Tuesday, 15 December 2020

Castle Dark - With Karyn Schultz!

  Hi Bee Arty Lovelies!

It's Karyn here and today I have 3 projects to share with you made using lots of amazing products from Bee Arty. In particular with the new Castle Dark mini paper Collection designed by the talented Sue Smyth.
 
 
 For this first scrapbook page I created a background on heavy duty 350gsm white cardstock.  I started by doing some stencilling using the Devotion Stencil and Olive Grove Mica Powder mixed with texture paste. 
 
 
Once this had dried I painted and splattered Olive Grove Mica Powder mixed with water. 


 Here are some close ups of my finished page. All papers and images are from the Castle Dark mini paper Collection. I love these fussy cut flowers - aren't they so pretty. I've used the soft feminine images and patterns from the collection to create this page.


 For the next page I've chosen mainly the red images from the Castle Dark collection. These red flowers reminded me of Christmas so I created a Christmas themed page.
 
 
    I created a background once again on heavy duty 350gsm white cardstock.  I started by doing some stencilling using the Dusk Stencil and Watermelon Mica Powder mixed with texture paste. Once this had dried I painted and splattered Watermelon Mica Powder mixed with water.


 Here are some close-ups. I've used a white paper doilie to soften the background. Once again all papers and images are from the Castle Dark mini paper collection. 


  My third and final project for today is 2 art journal pages.
 
  
I started by painting and splattering Olive Grove Mica Powder mixed with water across both pages. Then I added some stencilling using the Cathedral Stencil and Olive Grove Mica Powder mixed with texture paste. 

  
 Next I added stamping using the Vamp stamp set.
 

Here is the first of my finished art journal pages. All papers and images are from the Castle Dark mini paper Collection. I finished the page with some splatters of Dusty Charcoal Mica Powder mixed with water.


Here is the last of my finished art journal pages. Once again all papers and images are from the Castle Dark mini paper Collection and I finished the page with some splatters of Dusty Charcoal Mica Powder mixed with water.


Thanks so much for stopping by

Crafty Hugs xx


Monday, 4 May 2020

'Get in the Picture!' by Amy C

Hi everyone, Amy here with you today. 

I have a scrapbook page to share with you made using lots of amazing products from Bee Arty.

This month's challenge was the inspiration for my page - 'Get in the Picture'.

Take a look at the challenge...


...and this is my take on it...


To start, I took a sheet of 12 x 12 heavy white cardstock. Using a grey lead pencil, I drew a square - this was going to be my working space for the background.


Next I used a brayer to apply some Black Heavy Gesso. As pictured, I applied the paint inside my square. 
The black Gesso here primed my page in preparation for the wet mediums to be applied next.


With some White Heavy Gesso I went over the black lightly with the paint brayer.


To add texture to my page I used the Devotion A4 Stencil and applied some white modelling paste from my stash with a spatula.


It was important to ensure the Gesso was dry and then carefully move the stencil around the page so as to get a consistent floral arrangement over the black and white background.

Next I added colour to the flowers with some gorgeous Colour Artist Inks. With the Lime I painted all the leaves and then painted the flowers with Slipper and Oasis


Once the background was complete and dried again it was time to prepare some of the embellishments for this page.

To add colour over the white doily I dipped my medical gauze into a small droplet of Oasis mixed with some water and set aside to dry.


For the layers behind my photo I made some tags as pictured using the papers from the 'Three Six Five' Paper Collection and then adhered my photo down over the doily, coloured medical gauze and the prepared tags. 

Finally, I set to work on my title: 

1) I coloured a strip of heavy white cardstock with Colour Spray in 'Saffron'and allowed to dry.


2) I stamped it with the Colour Blast 'Textiles' Clear Stamp Set.


3) I used the Three Six Five 'Alphas' Metal Die Set to cut the letters out as pictured and them adhered them to the page.


After I adhered my die-cut title the page I added some embellishments from my stash, including a Charms Creations star with flowers.

Take a look at these close ups.


I hope you have been inspired  - happy crafting!

Amy ðŸ˜Š