Saturday 30 January 2021

Follow your heart, by Amanda Hartmann

 Hello Bee Arty fans!

I finally had time to play with the January mood board! It was beautiful - what a great range of colours to play with!

And using my collection of Colour Mica Powders I was able to create my own mixed media background and matching embellishments, to coordinate with the colours on the mood board perfectly.

And here is the mood board...


Here are the Bee Arty products I used to create the page:

Colour Mica Powders : in Watermelon, Blush, Peach Nectar and Sunshine
* Stencils: Encircled (currently out of stock!) and Triangle Spray
*Dies: leaf from Flowers die set, Bird talk and Diamond


Before I show you the final page, let me show you some of my steps.


1. Use a light white modelling paste, I stenciled the circle/lines design (Encircled stencil) to some white cardstock.


2. Once the first lot of stenciling was completely dry, I did another layer of the design on the page.


3. I mixed some Colour Mica Powder in Blush, with some water and started painting over the circle/line designs on the page. I used a very wet brush to have a light watery effect.


4. Needing additional colour, I then added and mixed more Colour Mica Powder, this time in Peach Nectar. I add this watery colour to the page also.


5. I repeatedly came in with a clean wet brush on the colour. This helped soften the edges of the colour and keep it watery and light.


6. I mopped up the left over colour from the messy mat with a white Charms Creations chevron. White embellishments are so easy to colour with Colour Mica Powders. And you don't waste a drop of colour!


7. I mixed some Colour Mica Powder, in Watermelon with some Gel medium. I used this paste through the Triangles Spray stencil.


8. I also mixed some Colour Mica Powder, in Watermelon with some gesso to create a paint. I used this to paint some buttons. They were not the exact right colour, so I painted them so they matched perfectly.


9. To bring in some yellow, I mixed some Colour Mica Powder in Sunshine. I used less water for this, so the colour was brighter and the consistency was thicker. I used it to splatter yellow to the page.


10. I also used it to paint the title.


11. And with a bit more water, I coloured another white Charms Creations chevron.


12. My chosen background paper was a dark olive green. I used some spare paper to make some die cuts to use to finish the page.


13. With all my components cut and dried, I started to assemble my page. I layered the different elements and included some machine stitching. I finished with some flowers.


In these next photos, you will see the final page and how the different elements came together.


Here you can see the stencil work and those beautiful big yellow Mica powder splatters!


You can also see how I used machine stitching around the photo, but also outside the photo over the diamond die cut.


Here you can see how I layered the die cuts, with the other embellishments.


There is still time to get your January page in! Load your entries to our FB group here.

Thanks for looking today! 

Amanda


Friday 29 January 2021

Cafe Bang Bang! by Charmane Koch

Hey Guys! Happy Friday! Thank goodness it's the end of the week! It feels like a long one, even though it has been a short one with a day off on Tuesday! And yay for those of you that had the Monday off too! Reality has truly hit with school going back on Wednesday as well!

I am really excited to be back with Colour Blast again & very excited to be working with Paige & amazing team who has done such an amazing job taking over from Tenisha! I have continuously loved Colour Blast, but needed to take a break as a CT Member as life was way too hectic - but now I feel it has calmed down a bit, and I can finally have some ME time - and play with the many awesome Mixed Media goodies and amazing collections that keep on coming each and every month! I hope that I can inspire you to create your own projects too!

Anyway... let's do my first share - with the gorgeous Bohemian Bliss collection the lovely Sue Smyth has designed - what can I say but WOW! It is so MY style!


I started off with covering one of the fab 350gsm White Cardstock with Colour Blast White Heavy Gesso & dried it with my Heat Gun.

I decided that I wanted to create my own background, and also wanted to use 4 photos of a recent visit to a Cafe on Hindley Street in Adelaide - I am loving using more photos on my layouts and thought this was the perfect page to create. I backed my photos using a Bohemian Bliss Paper.

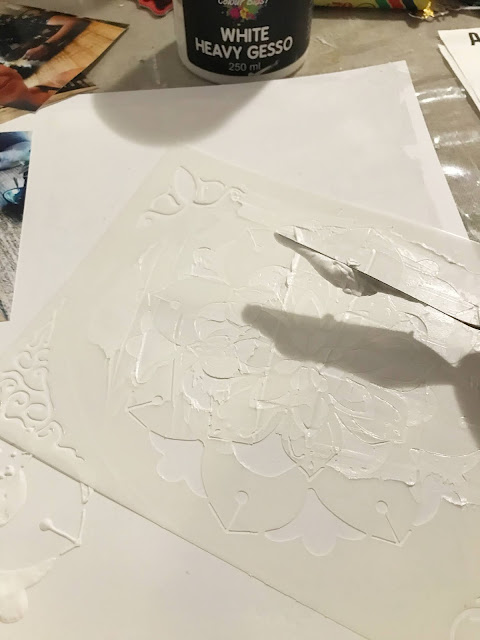
I have then smeared some Modelling Paste over the Bohemian Bliss Kaleidoscope Stencil positioning in 3 different spots on my White Cardstock. I have also used one of the corner stencil patterns at the top left and bottom right of the page. I have then used the Heat Gun to dry.


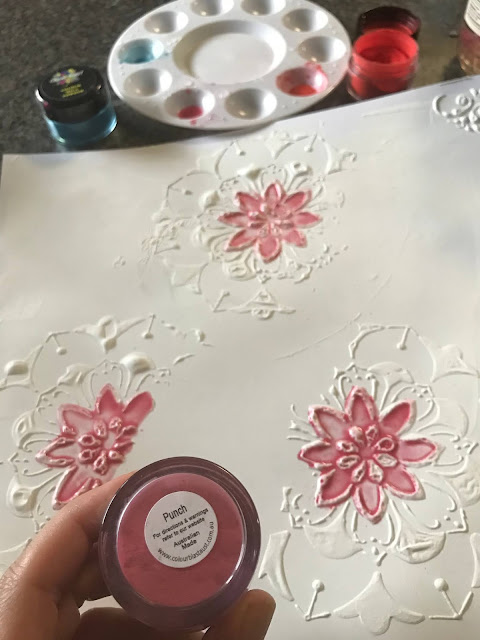
Using 3 different Mica Powders mixed with water in a paint palette, I have coloured the "Mandala" flower pattern, starting with "Punch" for the centre flower, then "Watermelon" and lastly "Just Blue" for the outer flower. I used Watermelon for the Corner patterns as well. I added water to lighten the colour, and added more Mica Powder where I wanted to darken.


Once the Mica Powder had dried, I have doodled a little around the edge with a black pen to highlight.

I have also trimmed about half a centimetre around the edge of the White Cardstock, so then I could back the layout with another Bohemian Bliss paper that matches perfectly with the colours I have used.

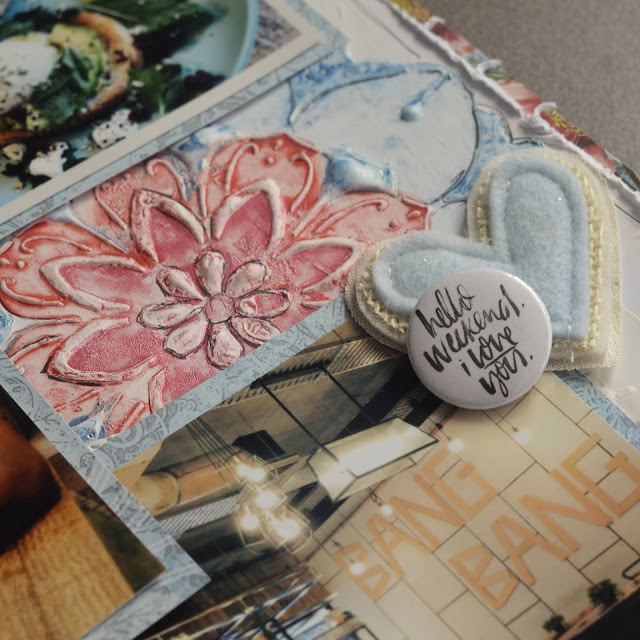
I finished the layout off with the title, journalling and outlined the border in black pen. I've also added Charms Creations Hearts & a flair to finish off.


I hope that I have inspired you to get out the modelling paste, Mica Powders & stencils to create your own background paper! So much fun!


See you again very soon! Thanks for popping by!
XO Charmane


Thursday 28 January 2021

Family Love

 Hi everyone, Great to see so many people doing the most amazing creating. Today I'm here to inspire you to go back and find some of your left overs and even thou this has lots of fussy cutting it is a quick and simple layout to do.


 I used the papers from 'Grateful Heart' kit by Michelle to create this page.

The products included:

- Pages from 'Grateful Heart kit': Blessed (Words1), 'Love' (Side A), ' Faith' (Side B), 'Gathers' (Side A), Black Cardstock 'Together'(Side B edge)

-Colour Shimmer Dust: 'Lush', 'Amber', 'Sunflower', 'Peacock', 'Paris', 'Candy'


Firstly I cut out the flowers, leaves, bird, heart and phrase that I need to layer under the photos are chosen to use. I chose 3 that showcased our beautiful grandies and some of the special moments we cherished. 

I layered a piece of torn white wood 'Faith' paper and the edge of the 'Together' patterned paper over the top of the black 12"x12" cardstock which is in the kit and attached them together with double sided tape.

I use my phone to take photos of different placements of the flowers etc and review the photos to chose my favourite layout. Doing this then provides me with a copy of the final placement to refer back to when I glue it all down finally. I added some torn cardboard under the bird area to lift the bird up to give the page more dimension and with the photo of the boys using the binoculars it worked really well.


Using the colours of Amber, Paris, Sunflower, Candy, Peacock and Lush Colour Shimmer Dust I placed a very small amount into individual sections of the palette and added water to make a watercolour to paint my fussy cut elements. Several layers of colour painted on top of each other in different areas gives more depth to the page. 


For a deeper colour I placed a small amount 'Lush' powder onto my work mat and dipped my wet brush onto the powder and transferred it onto the sections I wanted dark.


I also added some paint along the patterned paper above the title phrase to bring in another colour element to connect the edge with the rest of the painted area. 


Here are some close ups for you to check out.


Thanks for joining me and I hope I inspired you to check out this amazing kit and others at beearty.com.au . You can find more inspiration and links on BeeArty's facebook page https://www.facebook.com/BeeArtyHive

Wednesday 27 January 2021

Grateful Heart Shaker Card by Julie Schinkel

Hi everyone! I'm on the Bee Arty blog today sharing a quick and easy shaker card created with the "Grateful Heart" collection.  Here is the completed card plus a quick tutorial showing how it was created.


 To create this card, cut a piece of white cardstock down to 5"x5" square. Cut the dark spotted quarter from the Heart 12x12 paper and trim down to 5.75"x5.75" square. This will leave a 1/4 inch border on the base of the card.

Next die cut six of the "wreath" from white cardstock using the String Leaves Die Set. Adhere five pieces together to build up dimension. Put the sixth die cut aside for later.


Die cut another wreath from a scrap piece copy paper and trim off the excess so that you're left with just the circle frame. This will ensure your acetate is the right size. Adhere to a piece of acetate and trim down.


Cut out the doily on the left side from the Gathers 12x12 paper. Colour the flower with pencils or alcohol markers of your choice. I've used colours to match the collection but you can use any colour combination for this project. I've added another flower doily in the photo below to show the difference when coloured. Adhere to the layered wreath frame with strong glue. When dry add in sequins/glitter of your choice, adhere the acetate layer then the sixth wreath die cut and adhere the embellishment to the centre of the card base.
 

 Cut out the banner from the Bonus Sheet, colour with the same pens/pencils to match the flower. Stamp a sentiment and adhere with foam tape to complete the card.


Bee Arty Products Used:
Other Products Used:
Alcohol Markers/Pens/Pencils to colour
Sequins/Glitter
Acetate
Sentiment Stamp (to fit the banner)
Black Archival Ink
Strong Liquid Glue
Foam Tape

I hope you have enjoyed this tutorial. Thanks for stopping by.
Until next time, happy crafting!
Julie xx
 

Tuesday 26 January 2021

Tip In Flourishes

 Good morning Bee Arters! 

Hope you are enjoying your Australia Day holiday ... why not celebrate by creating a journal page by supporting a proud Aussie based company https://beearty.com.au/ 

In this Blog entry I have added a tip in lace flourish to the page.  Enjoy the process and have some fun. 


List of materials used in this project


The finished product of this journal page is A4 size, I used a piece of White Cardstock 350gsm 10 pack - 12"x12".  I made a crease at the A4 measurement to create a 'tip in' fold using a boning tool.


Firstly, mask off the crease line to keep the 'tip in' clear of base coat paint on main page.  Apply small blocks of colour over the A4 background using your finger in 'figure 8' fashion.  Add each colour in turn leaving the yellow and magenta last.  You may wish to dry off in between to eliminate muddying of colours.
N.B.  I did not gesso this paper in this instance, but you could if you prefer too.


Be sure to cover the whole of this A4 section of paper.  Completely dry off.


Using the 
Boxed in stencil A5choose one of the background colours (not the pop colours e.g. yellow, magenta),  add a little white beside, blend using the silicone sponge then apply randomly over the stencil (don't have to use whole stencil).  Dry off.


Continue this process in same colour over the entire surface of the page.  Dry off.


Select another colour from your palette 
(not the pop colours e.g. yellow, magenta), again apply the focal stencil Flux A6 stencil randomly over the page, apply stencil in different directions. Dry off.


Remove the masking tape from the 'tip in' section.  In this project I opted to hand draw a similar 'flourish' design using the stencil as a guide only (see below).  If you are an accomplished craft knife user feel free to use the 
Flux A6 stencil to draw a pattern over the white area for your design.


I drew this design on a spare piece of card and adjusted until I was happy with the design then transferred this over to the 'tip in' page.


Before cutting out the shapes I marked in the areas to be cut out with a X to ensure I removed the correct sections.
N.B.  please use caution when using craft knives always place the non dominant hand well away (behind the cutting area) and always turn the page to make curves do not twist your arm.


After cutting apply more masking tape along the coloured background area along crease.


Select a 'pop' colour, Magenta, colour the cutout sections, may require two coats on both sides of the 'tip in'. Dry off and remove tape.


Mix 
Colour paste - Rose Petal with texture paste apply through Flux A6 stencil over the stenciled surface, allow to dry.


Add some intensity and dimension over the focal stenciled area using 
Colour Spray - Bubblegum.  Cover the page with power towel so the page is protected from over spray of ink.


Add some paint spatters in light yellow colour to add contrast and to soften the page and including both sides of the 'tip in' flourish also.


Add highlights to the pink flourishes using 
Life of colour pens - yellow around all of the stencilled areas.


On the underside of the 'tip in' highlight the cutout design shapes with the yellow pen.


On the upper side of the 'tip in' I chose to use a dashed line to highlight the cutout shapes.


In this project I also drew around the tip in cutouts, in yellow pen, onto the back page to create bubbles for the stamped sentiments.
Add small word / sentiment stamps that fit in the size of the cut out shapes.  In this project I included; Heartfelt clear stampLive your art clear stamp setKind heart clear stamp set with archival ink.


I hope you have enjoyed this fun project and you are inspired to create your own.  


Thank you and see you next time for more creating fun!


linda@yourcreativepalette.com.au