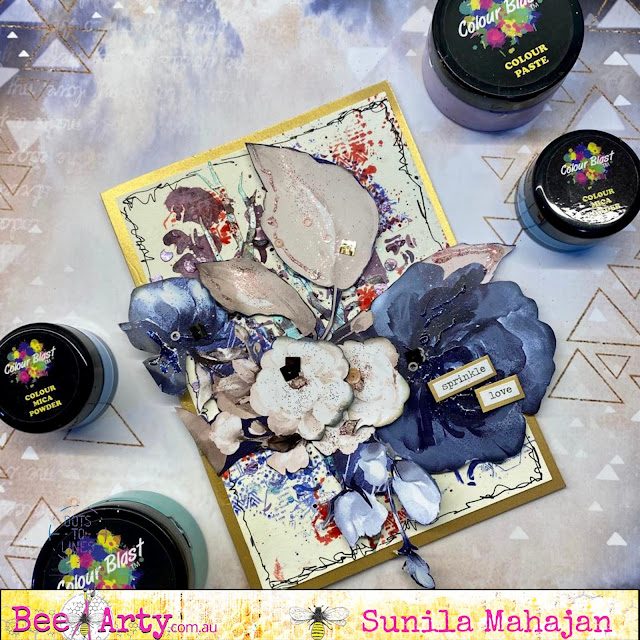
Monday 31 January 2022

Kindness is Key by Linda Pearson


Welcome everyone to the blog.  Today I am pleased to share with you the process for creating a journal page using a range of Bee Arty products including; stamps, stencils, dies on Bee Arty Limited Edition scrapbook paper, a collection designed by Michelle Grant, Colourblast Shimmer Dusts, embossing powder and metal embellishment detailing.


Bee Arty Products used:

Darice 6 well paint palette

x-press it double sided tape 6mm

Craft Powder Spoon

Versamark Stamp pad translucent

Embossing powder – Steel (mix some bling embossing powder with Steel)

Shimmer dustPassion, Peacock, Fern and Tan

Pipettes

Mini Mister bottles

Time Flies clear stamp set

Time flies metal plates stamp

Limited Edition clear stamp set

Limited Edition scrapbook paper collection designed by Michelle Grant

Alphabet metal die

White Cardstock – Bee Arty – 250gsm A4  x 2 sheets


Metal embellishments (own stash)

Adhesive

Mounting Tape

Golden Fiber Paste

Palette knife


Firstly, as I work in an A4 Journal I cut down the Limited Edition scrapbook paper collection  paper to suit A4 dimensions but you could easily work on the whole 12”x12” scrapbooking paper as a photo layout with a few modifications to the composition of the elements.
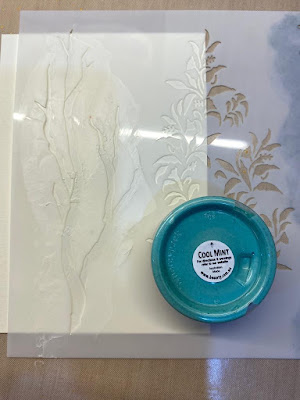
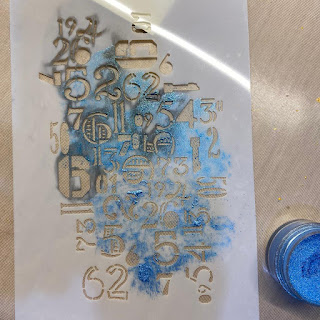
Using the  apply the Golden Fiber Paste through the stencil liberally.  Allow to dry thoroughtly.

(Note: Texture or modelling paste can be used, for gritty textured effect add some clean white sand to the texture paste mix.)
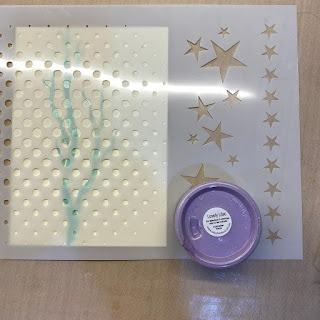
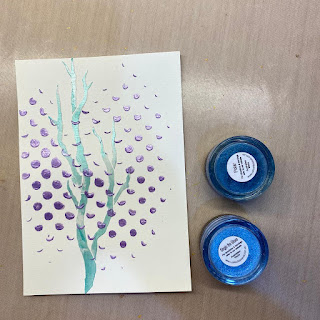
 

In a Darice 6 well paint palette  add a small separate quantities of Shimmer dust colours – Passion, Peacock and Fern using a Craft Powder Spoon.  Add some water using a Pipettes then stir very carefully until mixed.  Using a paint brush dribble each of the mixes in turn over the textured area, dry off thoroughly after applying each colour.  Repeat this step until satisfied with depth of colours.
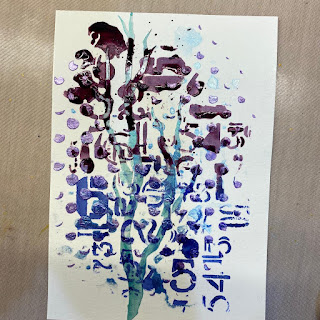


Stamp the Time flies metal plates stamp, the bird and the eye/clock hands stamp (no image supplied here) from the Time Flies clear stamp set and the chain from the Limited Edition clear stamp set stamps onto a piece of White Cardstock – Bee Arty – 250gsm A4 using the Versamark Stamp pad translucent .  Sprinkle the embossing powders mix Embossing powder – Steel (mix some bling embossing powder with Steel), then with a heat tool until the powder changes and sets.

Next using the shimmer dust mixes from before, carefully fill in the embossed shapes with  a small paint brush.

Fussy cut all of these elements when dry.

On a second sheet of White Cardstock – Bee Arty – 250gsm A4 colour the card slightly bigger than the stamped metal plate to create a matt for behind using Shimmer dust colours – Tan/ Fern (strong mix). 


When dry adhere the matt to the metal plate element.


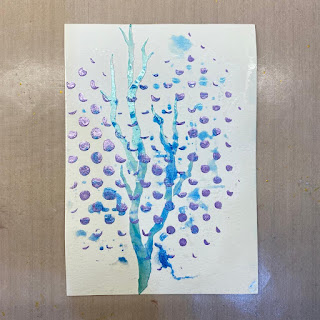
On a separate sheet White Cardstock – Bee Arty – 250gsm A4 mix up Shimmer dust colour – Tan in a Mini Mister bottles spray liberally over the cardstock, spray with extra water to spread if necessary.     I had run the cardstock through the printer previously to add the sentiment (see below). Dry off.

The sentiment I used in this project:

TREAT EVERYONE WITH POLITENESS AND KINDNESS, NOT BECAUSE THEY ARE NICE, BUT BECAUSE …

Using a small paint brush add some splattering of Fern and Tan Shimmer dust liberally all over the cardstock, allow to dry.  Cut out the sentiment from he top of card.

Run the remaining splattered cardstock through the Die cut machine using the Alphabet metal die with the letters  -   Y O U   A R E.  These words lead on from the sentiment adhered to the top of the page.
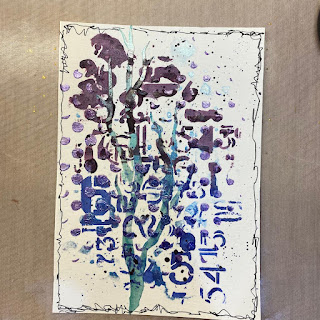
                

Detailing adhere:

-        the letters -  Y O U  A R E   to the bottom of the metal plate card

-        the eye/clock hands element to the top right of the metal plate card, add a metal shape over the eye, then mount the bird over the top of the metal embellishment.

-        Adhere the chains to the left hand side of the page in an almost cross shape to connect the all the elements on the page.  Before gluing the horizontal cross section thread a metal key to link the meaning of the sentiment to the page.

-        Adhere the sentiment card, mounted to the top of the page. 

-        Add other metal embellishments to the clock and a small cog onto the bird.

-        Add detailing with a permanent pen around the stencilled shapes to highlight detail.

-        Add a distressed border to the page.


Thank you for stopping by and hope you have been inspired to create your own journal page or photo layout using these amazing products.


Cheers for now and happy creating from Linda 
linda@yourcreativepalette.com.au


Sunday 30 January 2022

Beautiful Mistake by Tracey Campbell

 Hello lovely people, Tracey Campbell here again today to share my creation with you. Have you ever had an idea in your head and when you go it execute it, it doesn't work out how you planned and turns into a red hot mess??

Well that was me today - I wanted to create a layout with a Mandala on it using the Entangled patterned paper from the Find Paradise Collection but it didn't go as planned.


I ended up with this!!! But from mistakes beautiful things can be created, so stick with me and I will show you have my mess turned out to be a beautiful mistake.


I started by mixing some clear Gesso with some Colour Mica Powders in Sage, Polar, Peach Nectar, Lemon Zest and Wisteria to create coloured Gesso. Now this was my mistake, the clear Gesso was too runny, I should have used the Colour Blast Heavy White Gesso instead. 


Using a silicon paint palette I spread the coloured Gesso through the Boho Mandala stencil on to the Entangled pattern paper. 


I used all five colours to create a nice pattern to the mandala. Tip: when doing a large amount or fussy stencilling use a bit of washi tape to hold your paper and stencil in place.


When I lifted the stencil off the paper, I discovered that the Gesso was too runny and had bleed under the stencil creating this mess. I was really disappointed with it and was going to give up and throw the sheet of Entangled out, so I started my clean up.


I flipped the stencil over and pressed it down with a scrap of cardboard to get off the excess Gesso. When I took the stencil off the paper again I discovered a soft imprint of the Mandala, on both the Entangled paper and the scrap of cardstock, giving me an idea.


I grabbed some white cardstock and place the Boho Mandala stencil between them and ran my palm over the backside of the cardstock. I now had two soft images of the Mandala, which I thought were lovely and my mind was running away. I scrapped my original idea to do a layout with a Mandala and instead decided to create a dream catcher.


I continued to use the stencil as a stamp and created a few more images. I did have to load more Gesso onto the stencil to get a few more images. Once they were dry I fussy cut them out.


And stuck them together to create a Mandala, actually had enough images to create two.


Next I used sequins and gems to decorate.


To turn the mandala into a dream catcher I painted the feathers on the Free Vibe pattern paper from the Bohemian Bliss Collection with Colour Shimmer Cubes. If you don't have the Shimmer Cubes you can make use the Colour Shimmer Spray to paint them. I picked five colours that matched the Colour Mica Powders that I made the coloured Gesso from: Sunshine, Apple of My Eye, Punch, Singin the Blues and Lovely Lilac.


Once dry fussy cut them out.


I then glued some gold sequin string to the back of the feather and the Mandala.


Here is how it turned out, such a fun and pretty Dream Catcher - my beautiful mistake


A few photos of the details in close ups below.


I am still thinking about using this on a layout and now that I have a spare Mandala I just might, so pop back into the blog in a few weeks to see what I come up with.

Hugs
Tracey


Saturday 29 January 2022

Mixed Media Card by Sunila Mahajan

 Hello lovelies,

Sunila, here and I'm sharing with you all a mixed media layered card today. I show you how I created my background with all the layers in a few steps.

Before we begin, here's a look at the card:


Steps to creating the background:

Step 1- I started with a white 5"x7" water colour paper. I added texture using colour paste and a stencil.


Step 2: I added another colour through a different stencil.


Step3: I sprinkled mica powders on a stencil, misted them with water and took a reverse print on my base. 


Step 4: Using the same stencil, but now placing it on my base I sponged shimmer dust mixed with water. 


Step 5: I added some black doodling along the border. 


Step 6: I used a stamp with the shimmer dust colours and added that as a final step to my background. I then layered some fussy cut elements, sprinkled glitter and completed my card with a sentiment.


Supplies used:

Colour blast Colour paste- Cool Mint, Lovely Lilac

Bee Arty Stencils- Distance, That Way, Party Lights

Bee Arty Mica Powders- Singin the Blues, Polar

Bee Arty Shimmer Dust- Duke, Velvet, Candy

Bee Arty Stamps- Geo grunge

Paper collection- Forever My Always


I hope you've enjoyed today's tutorial and project! Hugs! 

Thursday 27 January 2022

1st Swim created by Tracey Thorne

 Welcome back to the blog and with my share for you today I have worked with more of the Chit Chat range. I love getting the kit and using it up - all the little bits and pieces that are left over from other layouts are easy to add in to make more great pages of memories.

I have used a base of 350gsm white cardstock and to this I have added the Chit Chat A4 stencil Linear and made a mix of Colourblast Marine Dye ink and water. I have generously painted this over the stencil not worrying too much about it bleeding through as this will help add more colour to the page. I have also added a little of the blue to the left of the page as this is where the photo will go and needed it to balance through I have then allowed this to dry.


I have used the Chit Chat  A5 stencil OXOXO with black ink and a blending tool. I added two rows of the crosses down the page. I have then mixed a little Colour Mica Powder in Envy & Colour Shimmer dust in Peacock with a little Modelling paste to use through the Chit Chat A6 stencil Marked. I have used this in varying places on the layout trying to follow the lines of the A4 stencil markings.


I have mounted my photo on black cardstock and added a little foam tape to the back to help lift this off the page a little. I have used the Chit Chat stamp Happy and chosen the words and the grunge heart to add a little black and help blend the photo into the background. 


I have cut the elements from a few of the different pages to help bring this layout together. 
Chit Chat Collection - i love you typed element added to the photo
 Chit Chat Speak - little heart elements and larger xoxo heart
 Chit Chat Hello - you and me card and the blue & green card for layering under the photo
 Chit chat Alpha - a strip of paper to cut into tags. 


After adhering all elements I have added some older Thickers to create the title. I have also drawn a black border approximately half a cm from the outer edge. I hope you love my take on using this  versatile paper range.


Have a great creative week