Saturday 27 August 2022

Sunshine Altered Hoop by Sunila Mahajan

 Hello Bee Arty Lovelies,

Hope you're all doing well! Sunila here, and today I'm sharing a pictorial on altering an embroidery hoop. 

I enjoy  mixed media because it opens up plenty of opportunities to play with. Layers, elements, textures all come together beautifully in a single piece. The altered hoop makes for a great home decor piece as well as a gift for someone special.  

Here's a look at the hoop:


Let's begin creating it!


Step 1- I've chosen the Bee The Sunshine Collection for my Hoop. Fussy cut elements, pick out papers for the base and to die cut some elements. Paint the rim of the hoop with Bling Colour Paste. 


Step 2- Die cut elements for the hoop. The round frame makes for a great shaker element. Die cut it several times, adhere together for a thicker layer. Cut a circle on a transparent sheet and white cardstock to back it up for the shaker. I've used a piece from the collection with the quote to back my shaker. 


Step 3: On the base paper, stencil with colour pastes. 


Step 4: Add black stamping on the dried stenciled base.


Step 5- Adhere the hoop onto the base paper. Stamp on the rim of the hoop.


Step 6-  Glue the fussy cut elements, the die cut pieces and the focal shaker element to complete the composition. 


Hope you enjoyed this creation!

Hugs,

Sunila


Supplies used:

Bee The Sunshine Collection

Colour Paste- Bling, Rosewood

Stencil- Stardust

Stamp- Memories

Die- String Leaves


Friday 26 August 2022

Special Moments created by Tracey Thorne

 Hello crafters I am hoping you have a little of your Bee the Sunshine printed papers left so you can put together this quick and easy page. 

I have started on a base of the 350gsm white cardstock - lovely and firm - perfect for mixed media. I mixed a little Colour Shimmer Dust in Tan and applied this to plastic which I then transferred to the white cardstock. I've allowed this to dry and then used white modelling paste through the Honeycomb Spray stencil. I have used my heat tool to set this and once dry outlined the honeycomb with a black pen to help give definition as I felt it was blending in with the white of the page. 


I have mounted the photograph on Bee the Sunshine Painted Honeycomb cardstock using foam tape under the photo to give dimension. Once placement was worked out I used the Find Your Way stamp and stamped at the top and bottom of the photo using black ink. I had some tag offcuts in Kraft cardstock that I added across the page before adding some black tissue paper. The photo stack was then added.


To embellish this page I have kept it simple by using the cut sheet Bee the Sunshine Sunny Days and Honey. Both of these offered beautiful blooms in colour and black & white that I have utilised on the page, as well as the cut phrases, one of which I have used as the title.


Further embellishments were added using Uniquely Creative Glass domes, stitching around the border and Glossy accents to create smaller domes on the page.


I hope this has sparked your creativity to put together a few quick and easy pages for your albums this weekend.


Until next time - have a fantastic weekend


Tuesday 23 August 2022

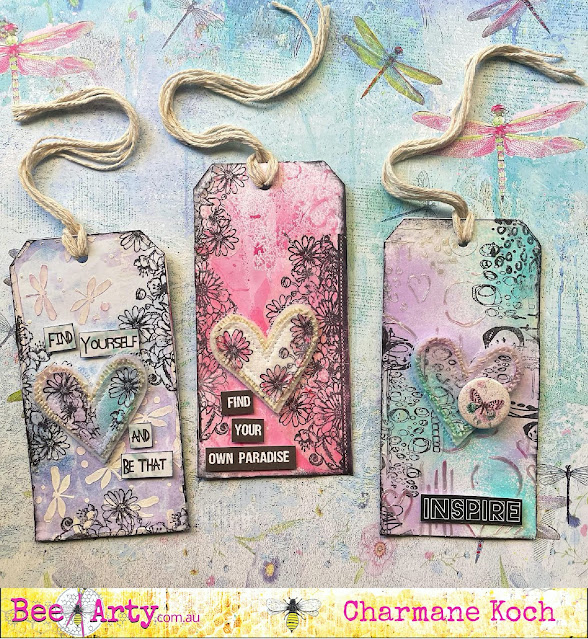
"Find Yourself" Tags by Charmane Koch


I had so much fun creating these tags! I used a mix of stamping on tissue paper, stencilling with modelling paste & with Colour Paste. I also found the cute little quotes on either Word Cut outs or from the Word sheets from different collections.

First I sprayed my tags using the cute little Mini Mister sprays filled with a scoop or two of Shimmer Dusts {using the Craft Powder Spoon} and water. I have used Lollipop, Peacock & Passion.

While that dried, I stamped onto tissue paper a few different stamps using black ink:
Meridian
Unfortunately the Floral one is Unavailable but I suggest substituting with the Wonderful flower stamp - it would work well too.


I've played around with each tag differently. I have stencilled the Dragonfly Flight onto one using Modelling paste. I have stuck the stamped tissue paper around the edges of the tags - positioning where I thought looked "right".

I have also stencilled "Marked" and "Distance" using Snow White Colour Paste. As you can see here, it looks white, but becomes a glittery clear colour!


The Butterfly Flair is from the Time for Tea Flairs.


I have also treated each of the DIY Hearts slightly differently too. I coloured with the Mister Sprays first on the Heart below, and then once dried I have added the stamped tissue paper, applying with Gel Medium.

I have used the Adhesive Foam to stick on the quotes to give more dimension to my tag.


The Heart below I have applied the Flowers first and then once the Gel Medium has dried I have added the Lollipop Shimmer Dust.


I have made a video - you can pop on over to the Bee Arty Hive to check it out HERE!

Some of what I've used from Bee Arty {links are all here in the blog post}:


I also suggest to use the "wonderful" flowers from this stamp, as the one I used is no longer available:


PS - the Bee & Butterfly would be fabulous for the tags too!

Anyway, I hope you've been inspired to create some tags, or at least use the techniques I have! I still am finishing off a few more tags so stay tuned!


Happy Creating!
XO Charm


Monday 22 August 2022

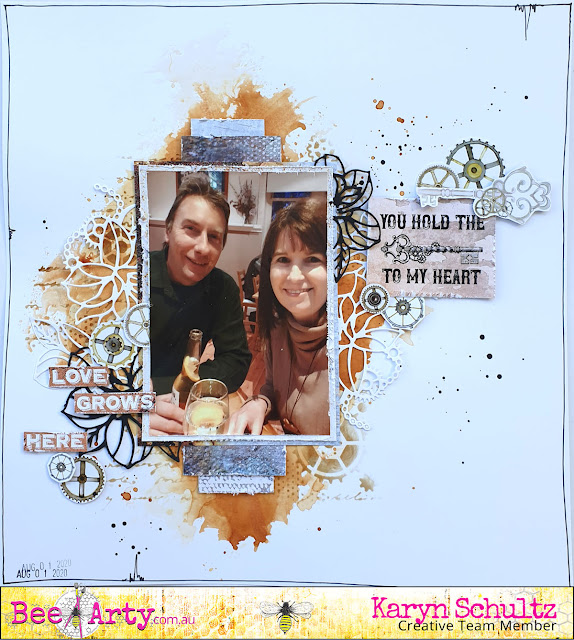
Love Grows Here - With Karyn Schultz!

  Hi Bee Arty Lovelies!

It's Karyn here and today I have 2 scrapbook pages to share with you made using lots of fabulous products from the new  Rustic Blossom Collection available at Bee Arty.  
 
 
For the first page I started with a sheet of 350gsm Heavy White Cardstock and added a watercolour base using Tan Colour Shimmer Dust (mixed with water). 
I added some stencilling using the Rustic Script A4 stencil and Tan Colour Shimmer Dust (a concentrated colour mixed with water and applied with a sponge).  
The photo was matted with papers from the Rustic Blossom Paper Collection Pack
I added diecuts using the Blossom Gear metal die and White and Black cardstock.
I then added words cut from the Storytime Paper and fussy cuts from the Owl Remember Paper.
Lastly I added splatters of Tan Colour Shimmer Dust and outlined my page using a fine black Life of Colour paint pen.
 

For the second page I started with a sheet of 350gsm Heavy White Cardstock and added a square watercolour base using Peacock Colour Shimmer Dust (mixed with water). 
I added some stencilling using the Rustic Script A4 stencil and Deep Water Colour Paste
I added some stamping using the flower stamp from the Owl Punk stamp set and black Archival ink.
The photo was matted with papers from the Rustic Blossom Paper Collection Pack
I added diecuts using the Blossom Gear metal die and White cardstock and Silver Net Mirror Board.
I also added words cut from the Storytime Paper.
Lastly I added splatters of Peacock Colour Shimmer Dust and outlined the painted blue section using a fine black Life of Colour paint pen
 
Thanks so much for stopping by

Crafty Hugs xx


Friday 19 August 2022

Fireworks Waikiki Beach by Tracey Campbell

 Aloha my creative Bee Arty crew, it is Tracey Campbell here with my latest Creative Team project to share with you. I have recently been away on two weeks holiday with my family, we had a great time in Hawaii and one of the highlights were the Friday night Fireworks on Waikiki Beach. I managed to get a few photos which I jsut knew I had to team with the Bee Arty Fireworks collection.

Fireworks on Waikiki Beach


To start off my layout I cut three of the cards from the Showtime paper from the Fireworks Collection. As I was scrapping my fireworks photos I picked the two cards with the fireworks on them and used a craft knife to cut out the image where it overlapped with the white space. 


I then slipped the photos under the cut out firework so that it sits overlapping the photo. 


Cut two strips of patterned paper. The first strip needs to be12 inches by 1 cm in length from the Magical patterned paper.  The second strip should be 12 inches by 3 cms from the Bonfire patterned paper. Run the strips along the righthand side of a 12x12 sheet of white cardstock


Using the Fireworks stencil, three coloured inks that matches the patterned papers and a dauber, ink the image. 


This is how the stencilled image looks with the three colours daubed through it.


For the second image I used a baby wipe and spread the excess ink from the first image through the stencil onto the cardstock. 


This creates a dull faded image, as you can see in the photo above.


Next use the straw from a bottle of Sunshine Colour Shimmer Spray and flick some droplets over the stencilled fireworks.


This is how the background looks after the Colour Shimmer Spray is dry.


Next fussy cut the letters of the title from the Alphabet patterned paper, the word "Fireworks" from the Colourful patterned paper and the fireworks from the Bunting patterned paper.


Arrange the photos and fussy cut elements so that it reflects the final layout.

Using the cards as mats for photos is a quick and effective way to use them in your scrapbooking layouts. Mahalo for stopping by and I hope that I have given you a bit of inspiration.

Hugs 
Tracey