Monday 31 May 2021

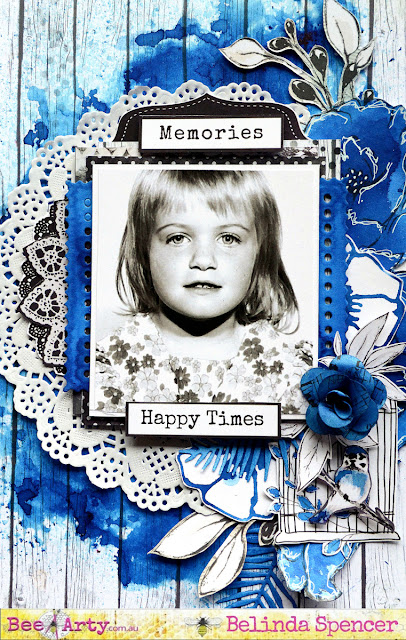
Happy Times by Belinda Spencer

 Hello Bee Arty fans!


It's Belinda here today to share with you my latest layout created for Bee Arty and featuring the stunning Grateful Heart collection.

Here I have mixed some of the Duke Colour Shimmer Dust with some water in a small bowl and have tested the colour in a spare art journal that I keep by my desk for this purpose.


I cropped a piece of the Faith patterned paper from the Grateful Heart collection and mounted it onto some of the awesome 350gsm White Cardstock. I spritzed it with a little water and dropped in the Duke Shimmer Dust. I spritzed with more water and played around with it on the page until I had a good coverage. Then I set aside the page to dry.


I added a doily to the page and then fussy cut the gorgeous floral design from another sheet of the Faith patterned paper. I painted the flowers with the Duke Shimmer Dust and water mix and let dry. I used a 1mm White Life of Colour Paint Pen to add some sketchy lines to the flowers.


I cropped some patterned papers from the range, layered together and added to the page. I also fussy cut a birdcage and bird, painted with the Duke/water mix and added to the layout. 


I used a paint brush to apply some of the Duke/water mix to a flower stamp from the Floral Delights 1 Clear Stamp Set and stamped on an extra piece of the white cardstock. Once dry, I fussy cut and slipped in and under the patterned paper stack.


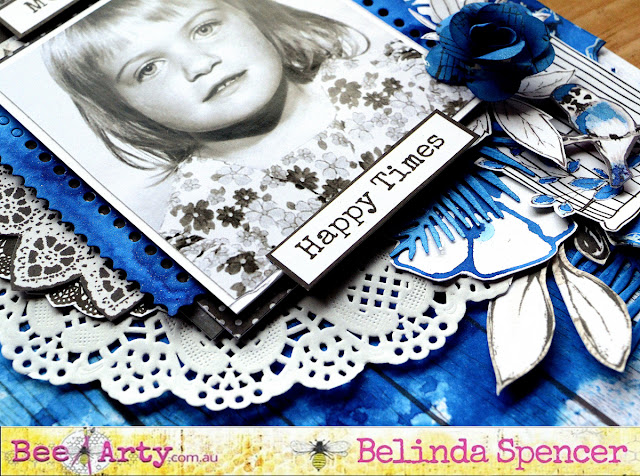
And here is the completed layout.


I die cut a Postage Stamp frame and some leaves using a die from the Leaves of Paradise die set and coloured them using the Duke/water mix and added to the page once dry. I finished with some more fussy cut leaves, a flower and some words.


Here's what I used:
- Blessed
- Collection Bonus Sheet
- Faith
- Together

Thanks so much for stopping by the blog today. I hope you find some time to get creative with some fabulous Bee Arty products too.

Cheers
Belinda

Sunday 30 May 2021

Simply beautiful by Sandi Spink

Hi hope everyone is enjoying their week. I have always had a problem of knowing when to stop and when to add more or not, so today I decided to go back to my old style of simple is best. I have always loved white space so here is my take on going back to simple and beautiful using ' Fearless, Brave and Free' paper range by Fiona Paltridge.


I used:  Papers - Frames and Phrases 'Free', Circles 'Collections' 'Within' 'Leap' and the B sides of 'Confidence' and 'Chance'

12x12 white cardstock 

Music paper coloured with a wash of 'Lagoon'

Black cardstock to back title

Colour Blast Artist Ink- 'Sunburst'

Colour Blast Colour Spray- 'Lagoon', 'Carribean', 'Road base' 

colour Blast Shimmer dust- 'Amber'

Archival ink- black

Black wire


Step 1- I sprayed a small amount of 'Lagoon' onto the right side of the paper ensuring that there was minimum spray in the area. 


Step 2- Using the 'Carribean' spray I unscrewed the top and dropped droplets of colour over the 'lagoon' colour. Moving the paper helped the ink move, make patterns and mix. I let it dry slightly before adding more droplets so that I didn't get a large puddle. By placing the corner of a wet one into the puddle can draw up excess ink. 

Step 3- Whilst the ink is drying it's a good time to cut out the phrases, frames and shapes needed to be layered together to add dimension and colour. I used the artist dye ink 'Sunburst' to add red to the hearts to the frame.

 Step 4- Picking out a title and backing it with back card stock makes the title pop so after adding this to the page I decided to add arrows to connect the title and the layers. Remembering all the time.... simple don't add to much. I felt there was too much white space so I used the 'Lagoon', 'Carribean', 'Road base' and some 'Amber' shimmer dust mixed with a small amount of water to add splats. 

Sometimes things don't go to plan so if 2 colours mix that spoil the look you can do what I did and find some of the 'chance' circles cut them out and cover the area and then of course add a few more to even out the look. Mistakes can add a dimension you didn't think of before. 


Here is some closeups for you to look at:


Thanks for joining me and I hope I inspired you to check out this and other amazing kits at beearty.com.au . You can find more inspiration and links on BeeArty's facebook page https://www.facebook.com/BeeArtyHive 


Saturday 29 May 2021

Blessed, by Amanda Hartmann

Hi Bee Arty fans!

Today I share my page, inspired by this month's mood board and using some Grateful Heart and Mixed media.

Papers used:
Black cardstock
Gathers paper: from Grateful Heart
Blessed paper: from Grateful Heart

Mixed Media:
* Colour Mica Powders in Peach Nectar and Sunshine
* Colour Paste in Snow white
*Colour Embossing Powder from the Embossing Bundles in Teal Sparkle and Sweetheart


Here is a sneak of my page, inspired by the mood board.


Here are the steps I used for some elements of this page.

1. Use Colour Paste in Snow white through the circles stencil, onto the Grateful heart paper.

2. While the paste is still wet, sprinkle with the Colour Embossing Powder in Teal sparkles. Sprinkle in some areas, but not all. Shake off excess.

3. Heat set the embossing powder to the paste.

4. Fussy cut flowers and leaves from the Gathers paper.
Mix Colour Mica Powders in Peach Nectar and Sunshine with some water and paint the fussy cut elements. Save some of the mix to splatter on the layout near the end.

Not photographed
5.  Emboss the circular chipboard shape with Colour Embossing Powder in Sweetheart.

6. Assemble your page!

And here is my final page and some close ups!


Hand painted fussy cut elements are layered with the chipboard piece and and the title - hand cut from the papers. I also finished with mica splatters.


There is still time to join this month's challenge!

Thanks for looking,
Amanda


Thursday 27 May 2021

Free Spirit - With Karyn Schultz!

  Hi Bee Arty Lovelies!

Its Karyn here and today I have a scrapbook page to share with you made using the Bohemian Bliss Collection from Bee Arty.  
 
 
The base of my page is created with the Market Days paper. This paper is so pretty I decided not to add any mixed media to the page. Diecuts have been created using the String leaves metal dies, the Calendula metal die and the Fine Feathers metal die in white cardstock as well as paper offcuts from the paper collection.
 
I've added three 7.5cm x 10cm photos mounted on Dreamcatcher paper. I've fussy cut lots of flowers from the paper collection and added words cut from the Sweet Talker paper
 
For those of you in the kit club you will recognise embellishments from the kit. I've painted a chipboard frame from the kit using white gesso, then Polar colour mica powder. I've filled the metal charm with sequins, and added a strip of trim across the bottom of the page.
 
Here is my completed page.
 
  
Here are some close ups.


Thanks so much for stopping by

Crafty Hugs xx


Wednesday 26 May 2021

SERENITY NOW!! canvas by Linda Pearson

Hey there, Bee Arters ....  

A quick post to showcase using the Buddha 2 – A4 mask and stencil from Michelle Grant's Silhouette collection.


Bee Arty Products used:  Buddha 2 – A4 mask and stencil and Life of colour pens - black

Other materials used:

30 x 40cm canvas

Large and Small  -  Flat artist brushes

Large and Small  -  Round artist brushes

Paint Palette

Acrylic Paints:  Violet, Magenta, Cool Red, Warm Red, White, Light Yellow, Black


The background requires lots of blending (large flat brush) starting with cool red across the top third of the canvas working down the canvas adding the warm red to the brush.  You may work in some white paint to the blending mixes to create lighter hues on the background.  Continue to work the magenta and violet/white mix colours blending as you go.  

Add some random blends of purple  and cool red over the canvas to create a textured look.  Dry off completely.

Moon - block in a circular moon shape, top of canvas, in white paint, dry off.  Next block in the moon shape with light yellow, dry off.   Mix white with light yellow add some texture to the moon,  swipe a touch of warm red to the light yellow mix.  With a flat brush drag  a small amount of yellow/red mix across the moon and spread past onto the sky.

Mountains - Violet mixed with a little black on small flat brush drag the brush across the middle of the canvas from left to right to create some mountain shapes.  Dry brush some light violet and magenta to create depth in mountains.  Dry off completely.


Foreground (Buddha and bamboo foliage) - Place the Buddha 2 – A4 mask and stencil onto the canvas then use the black Life of colour pen to trace the shape onto the canvas. Place the mask from the Buddha stencil, trace in the arms of the buddha.  Fill the silohouetted shape in black paint. 

Ground/bamboo - Add some rocks/ground around the bottom of the stencil and fill in with black paint also.  Use the small round brush loaded with black add bamboo stalks, add leaves to the stalks and grass strokes along the ground.  


Thanks for stopping by ...


Linda Pearson
linda@yourcreativepalette.com.au


Monday 24 May 2021

You have my Heart by Charmane Koch

 Happy Monday Everyone!

Hoping your week will be a wonderful one!

Today I wanted to share with you one of the layouts I created based on a Challenge that we had at the AMAZING Bee Arty Retreat!

Here's a closeup...


We had to use the Love & Grace Elmore paper - which is gorgeous just by itself...


Sorry I don't have any step-by-steps as I didn't take any on retreat! {silly me!}

I however started off by stencilling the gorgeous Rose Reveal stencil from the Love & Grace Range using some modelling paste to the top left & bottom right of the gorgeous designs on the page... I have then quickly dried with a heat gun.


Using Apple of my Eye & Blush Mica Powder I have added water to colour the Rose Reveal stencil, & the White Doily that I have tucked behind the photo.

Before sticking everything down, I also lightly stamped the Memories Stamp which was another requirement for the challenge!

I cut out a few dies using the 350gsm White Cardstock - Runway, String Leaves & String Wreath and then embossed them using Key Lime & Baby Pink from the Mermaid Embossing bundle! Such beautiful colours!


Here are the Dies, Stamp & Stencil I used for this layout:


To finish off my layout I have trimmed the edges and distressed and backed with the fabulous nice and thick 350gsm White Cardstock.

I really love how this page turned out using so many of the AWESOME products at Bee Arty!


Thanks for stopping by and I hope I have inspired you to play today!


XO Charm

Sunday 23 May 2021

Made With Love by Belinda Spencer

 Hello Bee Arty Fans!

It's Belinda here today to share my latest layout for Bee Arty inspired by the May Mood Board and featuring lots of gorgeous Colour Blast product.


Here's a reminder of the gorgeous inspiration for this month:


For this layout I worked with the stunning Grateful Heart collection. I cropped a sheet of the Hope patterned paper to size and mounted on the fabulous white cardstock for extra sturdiness.

I mixed up a concoction of Snow White Colour Blast Paste, Peacock Colour Shimmer Dust and Black Heavy Gesso for the darkest colour in the mood board and added to the page using the Rhythm A5 Stencil. I used a soft wet paintbrush and a water spray bottle to manipulate the product on the page letting it drip down the page and moving it around until I was happy with the coverage.


I diluted down the mix with some water and flicked it over the page too with the soft paintbrush.


Next I added some messy thread to my page and some pretty flowers that I coloured and fussy cut from the Together patterned paper. To colour the fussy cut image I used Colour Sprays in Lagoon, Saffron and Sunset. I mixed the Saffron and Sunset to achieve the pretty peach colour and diluted with a little water.


Once dry, I added the fussy cut image to the page.


Next I decided I needed a little more detail in the background so I used some of the leftover mix from the background stencilling, diluted it with water and painted it onto the Bokeh Stamp before stamping on my page. I love the messy watercolour effect this gives.


I painted a birdcage, page tabs and cute mason jars from the Family and Gathers patterned papers with the same colours as the main floral image and fussy cut those too. I sprayed an extra piece of white cardstock with the Saffron Colour Spray, let dry completely and then die cut the small die from the Grungy Filmstrip Die Set.

'Made With Love'


I added all of these pieces to my layout along with some more pieces fussy cut from the patterned papers including my title and quote. To finish I added some enamel dots from my stash.


Colour Blast products used:


- Lagoon
- Saffron
- Sunset


Thanks for stopping by the blog today! I hope you are feeling inspired to grab your Colour Blast stash and have a play.

Cheers
Belinda