Tuesday 30 March 2021

COLLAGE GIRL CANVAS by Linda Pearson

 Hi Bee Arty friends ....  We are now in lockdown again but let's make the time to create some amazing art.

Today I am sharing a canvas I did last year using lots of mixed media products.  


Bee Arty Products used in this project:

Other products used:
  • Collage papers - Assorted Gel print papers, coloured photo of myself 
  • permanent water colour pencil in dark blue
  • Fiber paste
  • texture paste
  • gel matt medium
  • pink paint
  • plastic bag
   
   
Tear the gel print and photo paper into similar width strips.


Glue torn strips of paper to cover the whole canvas.  Cover the page with a coat of white paint or Gesso to a translucent finish.


Mix the Colour paste - Licorice paste with some Shimmer dust –  Duke.  I also added some fiber paste to the mixed to make a heavily textured paste, but this can be omitted if you haven't any.  Apply the mix thickly through the Face Side Profile 2 - A4 Stencil.  


Mix a  good quantity of texture paste with black Gesso, add some black paint if the colour isn't dark enough for you.  Spoon the paste into the plastic bag, snip a corner of the bag then pipe the texture paste to form the hair line and strands of hair.
Pipe a lace trim along the bottom edge of the portrait silhouette.

Mix some pink paint with texture paint then apply paste through the Flux A6 stencil stencil around the outer edge of the canvas.  Outline around the edges with permanent water colour pencil (dark blue), then add some water to the pencil outline to blend some shading to the stencil.


Thank you for stopping by and hope you are inspired to have a go at creating a canvas for yourself .... enjoy the Easter break 
linda@yourcreativepalette.com.au 
Your Creative Palette


Monday 29 March 2021

Free Spirit Mixed Media Card

 Hello Everyone,


I'm back on the blog with a mixed media card today. I also have a process video to share with you'll.

I enjoyed making this quick and easy card with the Colour Blast and Bee Arty Products. 


Here's a look at the card


I've used the Fearless, Brave & Free Paper Collection for my base and focal elements apart from the Colour Blast Colour Paste and Mica Powders. I've also used a stencil and an acrylic stamp to add details and texture on the background. 

You can watch the process video on the Bee Arty Facebook group or on my YouTube Channel.

Here are a few close ups:


Supplies used

Fearless. Brave & Free Paper Collection

Colour Blast Colour Paste Blush

Colour Blast Mica Powder- Deep Blue

Colour Blast Shimmer Dust- Candy

Bee Arty Stencil- Humps

Colour Blast Stamp- All the Way


Hope you enjoyed this card tutorial!

Hugs,

Aditi

Monday 22 March 2021

Sweet Blessings by Charmane Koch

 Happy Monday Everyone!

Today I wanted to share a layout I created based on the Grateful Heart "Love" paper & Grateful Heart Party Lights stencil. I love that I could make the paper by own by colouring it to match my photo using Mica Powders as a watercolour.


This is what the paper looked like before I "coloured it in"...


I also added extra leaves by using the Party Lights stencil  & modelling paste. I then coloured with Apple of My Eye Mica Powder and outlined with black pen.


I added a bit of colour to a Paper Doily and Charms Creations Music Heart to tie the whole page together.


I love how this page came together so easily - and all I really had to do is add a little extra colour! I love how the Grateful Heart papers allow you to add your own colour to match.

Here is the finished page - so soft and pretty!


Thanks for popping by!


XO Charm


Sunday 21 March 2021

Be Fearless- Art Journal Page by Aditi Mahajan

 Hello,

My name is Aditi, and I live in India. This is my first post, as a creative team member of Bee Arty! I specialise in mixed media and I enjoy making video tutorials! I'm looking forward to inspiring you'll with my style of art. 


Today I decided to create a mixed media art journal page. Journaling to me is pure play and relaxation. It also gives me the freedom to try out any new product. 


Here's a look at the page


I've used a Jane Davenport Journal here. I did not prime my page because I wanted to experiment with the Colour Blast Mica Powders. So I misted my page with water and sprinkled Sunshine, Sage and Polar.
I let the water mister do the trick without using a paintbrush. I love the effect and the shimmer of the powders. 


Next, I used the Script rubber stamp and randomly stamped it with black ink. I then used the honey comb stamp and stamped it using the same colour on the background randomly.


Next, I used the Colour Blast Colour Paste Cool Mint through a stencil to add vibrance and texture onto my page.


With my background ready, I now needed some elements to create a focal point. I decided to use the die cuts and coloured them with the same mica powders. I adhered them onto my page using foam tape for dimension. I also added some sequins. To complete it, I cut out a word from the Fearless, Free & Brave Collection and adhered it to the page.


Here are a few close ups of the completed page


Supplies used:

Colour Blast Metal Dies- Bird Talk and Butterfly Effect

Hope you've enjoyed this creation!
Happy Crafting!


Treasured Memories with Belinda Spencer

 Hello Bee Arty fans!!

It's Belinda here with you today to share my latest project for Bee Arty featuring the stunning Forever My Always Collection designed by the super talented Fiona Paltridge.


I started my layout by cropping a sheet of the Heart Beat patterned paper and mounting it on a sheet of the amazing Bee Arty Heavy Weight White Cardstock.

I then mixed up a concoction of approx. 20 drops of Marine Colour Artist Ink + a dash of Indigo Colour Spray + a tiny amount of Velvet Colour Shimmer Dust + a couple of sprays of water in a Colour Blast Mini Mister.

I sprayed my 'potion' very liberally on my page and also spritzed with a bit more water to create quite a puddle of lovely colour. I used a soft wet paintbrush to pick up some of the ink on my page and flick it over the background to create interesting little droplets of colour.

In fact there was way too much colour on my page still so I dipped a die cut Postage Stamp frame in the colour as well as a Butterfly Effect butterfly. I still had too much colour so I pressed a page of an art journal I keep for just such an occasion into the ink too.


I dried the page with a heat gun and then used a palette knife to swipe some Snow White Colour Paste over the Stardust A5 Stencil. Once that was dry, I added some stamping using Jet Black Archival Ink and the Geo Grunge Stamp.


Here is my completed layout:

'Treasured Memories'


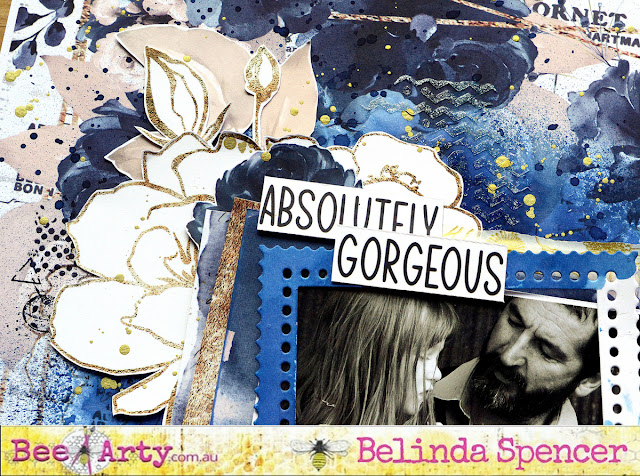
I cropped some papers from the Forever My Always collection and stacked them under my photo. I also fussy cut some flowers and leaves from the collection patterned papers and added those to the layout along with my paper stack and photo.


I added the gorgeous Diamond Die Cut under all of the flowers and the photo  as well as the words cut from the patterned papers. To finish I added a chipboard word from my stash.


Here's what I used:

Thanks so much for stopping by the blog today.

Cheers
Belinda


Saturday 20 March 2021

Don't Stop Until You're Proud - With Karyn Schultz!

  Hi Bee Arty Lovelies!

It's Karyn here and today I have a scrapbook page to share with you made using a variety of products from Bee Arty.
 
  
I created this layout recently for a live on the Colour Blast be Bee Arty facebook page (watch here) and thought I would show some close-up pics and links in a blog post.
 
I started with a sheet of Comfort Zone paper from the Fearless, Brave and Free collection. I add to this background by adding Peacock, Cobalt, and Paris Colour Shimmer Dusts using a painting with plastic technique and splatters.

When this is dry (I always dry thoroughly between layers) I add stencilling using the Organised Chaos stencil and Cobalt Colour Shimmer Dust (mixed with water then gently sponged through the stencil).

Then add more stencilling using the Directions stencil and Dusty Charcoal Colour Paste
Next add stamping using the Cool Words stamp set and a black archival ink pad. I just use parts of these word stamps to add to my background.
 
I mat the photo on Strength paper. Then embellish the page with diecuts using the Calendula metal die, the Fine Feathers metal die, and the Frame metal die. I've also added elements (circles and arrows) cut from the Leap paper and words from the Free paper. Finally I doodle around the page with a fine black Life of colour pen (I love love love these pens - the best paint pens, and an Australian company!).
 
Here is my completed page.

 
 Here are some close-ups of the page.


Thanks so much for stopping by

Crafty Hugs xx


You Amaze Me by Tracey Campbell

Hello everyone, Tracey Campbell here with with my latest 12x12 layout using awesome Colour Blast by Bee Arty products. Do you ever set yourself a challenge? If I'm in a scrapping rut or finding myself without any mojo I set myself a challenge. As I have been busy with work and with my family I have found that my mojo is lacking so it was self challenge time..... "The Three Challenge". Pick three pattern papers, three stencils and three stamps and use them on a page. I picked the following materials to start my self challenge with from the Bee Arty range:

Stamp Sets: Meridian, Cool Words and Fearless

Stencils: Organised Chaos, Keep Going and Encircled

Patterned Papers: Transform, Fearless, Brave & Free, and Strength 


So this is what I did to create my layout. Fussy cut a few squares, triangles and a circle from the Fearless, Brave and Free patterned paper.  Chose and cut out a word title, I picked You Amaze Me. 
Place the Organised Chaos Stencil over the top of the Transform patterned paper spray the image using Envy and Singin The Blues Shimmer Spray. I sprayed the centre of the stencil with the Singin The Blues colour and used Envy on the outer edges.  Tip: place scrap paper over laying the edges of the stencil so that you do not get spray over the stencil to avoid the straight edges on your patterned paper. 

I sprayed in two parts, the top of the page first, then cleaned off the stencil and did the bottom half of the paper. Tip: Flip the stencil while it is still wet with spray onto another sheet of paper of some cardstock to get a reverse image to use as a starting point for another layout.  The photo below shows the imprint left from spaying the Shimmer Sprays on to the patterned paper. 

Using Stormy Weather Embossing Powder, the Meridian stamp and an embossing ink stamp down the right side of the of the patterned paper. 

Set with a heat tool.

Now more stencilling, grab some Heavy Black Gesso, a palette knife and the Encircled stencil. Position the stencil so that it run vertically down the right hand side of the page over lapping the embossing and spray images already on the paper. Spread the Gesso through with a palette knife. 


Flip the stencil and run the lines of the stencil horizontally across the paper, but only stencil half of the image. Set aside to dry.


Use the Strength patterned paper and mat two 3x4 inch portrait photos. Use black ink and stamp the Cool Words down the page running them over the top of the mixed media work you have already done. I apologise that I did not take a photo of me doing this, but you can see the position of the Cool Words in the finished layout. 


Finish off the layout by adhering the photos in the centre of the page where the lines of the Encircled stencil work intersect. Stick with white glue the triangles, squares and the circle so that they overlap with each other (shape cluster) and tuck them under the top left, top right and bottom right corners of the photos.
Adhere the title over the top of the top right hand shape cluster.  
Use a black Sharpie pen and add a bit of journalling and a circle and line boarder around the outer edge of the layout. 


Here are a few close ups.


The finished layout, a colourful funky layout of my youngest daughter just after her Colour Run at school.


If you have scrolled back to the start of my post to see the list of the 3 stamps, the 3 stencil and the 3 papers to see if I did actually use them all..... well I can say that I came close. I didn't end up using one stamp set and one stencil!! :) I got to the stage where I was happy with the layout and felt it was complete without using them all so I just popped them to the side, after all the really challenge was to find my mojo and I think I found it. I hope that I have given you an idea on how to help yourself of a scrapping rut when mojo is low. Let me know if this works for you. 

Hug
Tracey