Hello again. It's me, Kerry.
Today I have something a little different. I thought I would share with you some of the ways I have been playing with my Colour Blast products.
Lets start with embossing powders. For the following techniques I have used the Colour Blast embossing powders, you will also need some embossing ink, I have used Versamark and a heat tool.
Lets start with a piece of metal, I have used a bronze flower trinket, Lets say you wanted to use this on a project, but the colour was not suitable, you can easily change the colour with embossing powder.
Firstly, turn the flower upside down and press it into the versamark,

Then just sprinkle the desired colour of embossing powder over the top, shake off any excess (and return it to the jar) and heat set, but be careful as the metal will be hot once you finish

If you want a thicker coat, you can just repeat the process
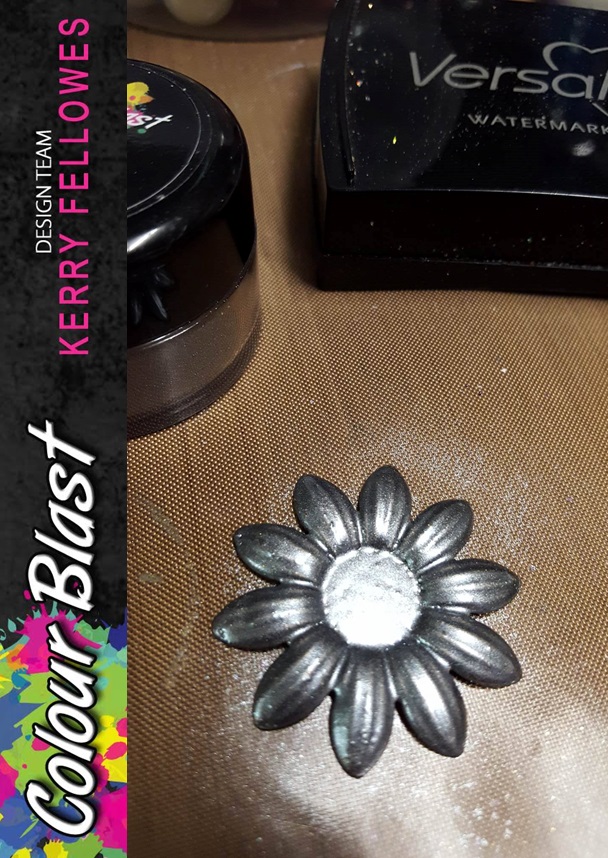
TIP: if your metal is still hot enough, you can skip the re-application of the versamark as the powder will stick to the hot metal. You can also use more than one colour for added interest.

Next pearls and beads.

The same technique can be used to colour beads and pearls, I find it is easier to use a skewer to hold the bead but you may need to remove it to add the versamark.


Next, again using the same technique, I have used embossing powder to change the texture and colour of this wooden gear.


If I apply a single coat I get this lovely texture on the smooth wood,

and if I want a smoother more enameled looking finish, I just add a second coat.

You can also use the same technique to colour a piece of lace.

You can also use the same technique to colour a piece of lace.

It will stiffen the lace slightly but it is still easily bent and quite pliable.

In the pictures below I have sprinkled the embossing powder in 2 colours on my lace, and then used my heat tool. TIP - Be careful if your lace is synthetic as the the heat may melt the lace.

And of course, chipboard, and yes, the application technique is the same.


I like to use the shimmer sprays after I have embossed my chipboard piece as it gives some awesome texture.

Just emboss the chipboard using the normal technique. Then, add a few sprays of the shimmer spray on top of the embossed piece.

Then use the heat tool to 'melt' the embossing powder again. The droplets of shimmer spray will sink into the embossing powder leaving little crater like texture on the chipboard.

And finally, while we are talking about the shimmer sprays, I love to use them to 'activate' my distress inks for some awesome shimmery backgrounds.

Apply a little distress ink to your non stick craft mat,

then instead of spritzing with water, use a couple of spritzes of shimmer spray.

You can keep pressing your paper into the ink/spray until you get the desired result

and you end up with a lovely shimmery background

I hope you have found this helpful and I would love to see what you make using these techniques. Click on the link to see the full Colour Blast range.
Until Next time,

Hi Kerry
ReplyDeleteIts always lovely when people share tips and techniques x
Much appreciated and thank you, i got a few new techniques from that post.
Great! I an glad you found it helpful :) Would love to see what you make xx
DeleteGreat tipes, thanks Kerry.
ReplyDeleteAwesome tips.... thank you 😁
ReplyDelete