Hi everyone! Sue Plumb here to share my latest Colour Blast design team project with you. Today, I have a 12x12" mixed media layout that I created using a combination of Colour Shimmer Dusts, a Colour Shimmer Cube, Colour Paste and a Colour Spray. The page features a photo of my daughter that was taken last year on the night of her school production.
As the production was set in Africa and my daughter had played a lion cub; I was looking to create a page that had a "tribal" feel to it, so I started by creating my background.
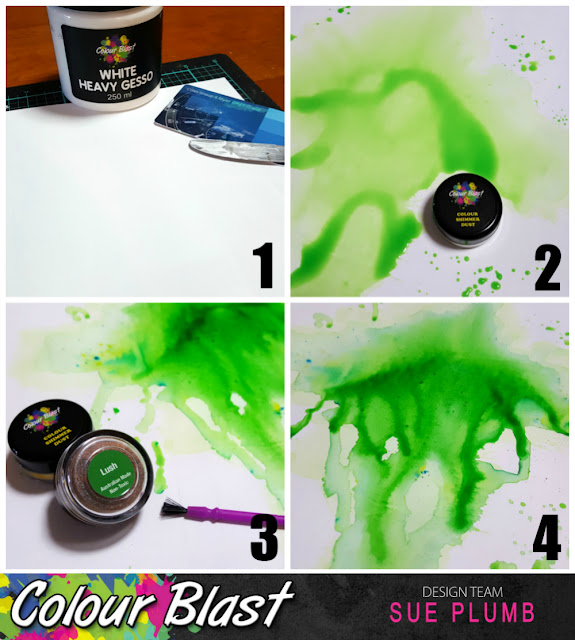
1. I applied a thin coat of White Heavy Gesso all over my cardstock, then set it aside to dry.
2. I then mixed some Paris Colour Shimmer Dust with water and applied it to the central area of my cardstock using a brush. I applied enough so the paint pooled on my page, which allowed me to tilt the page to spread the colour around. I also added some splatters using the same brush.
3. Whilst the paint was still wet, I took a small, stiff bristled dry brush and used it to flick some dry Lush Colour Shimmer Dust over the wet area on my page. This allowed the colour to spread randomly and provided a contrast to the first colour. (Whilst still being a shade that blended well.)
4. I then tilted the page slightly to allow the two colours to run and blend further in areas. I then set it aside to dry.
The next step in my process was to add some depth and contrast to my background.
5. I added some stamping using a Darkroom Door background texture stamp to my main focal area, and then used a circle stamp to provide some extra points of interest. I also used another spotty texture stamp to random areas of my page.
6. Next, I used a Sienna Colour Shimmer Cube and a water brush to add some colour highlights to the stamped circles. (I didn't make my brush very wet - just enough to pick up the colour, as I wanted to be careful not to re-activate the underlying layers too much.)
7. I coloured each of the circles on my page and left the page to air dry.
Then it was time to add another layer to my page - this time I added some texture using Colour Paste.
8. I used Bling Colour Paste, which I applied using a palette knife through a stencil.
9. I moved the stencil around to apply different sections of the pattern around my page (taking care not to squash the wet paste already there).
10. I then left the Colour Paste to air dry completely before I then started constructing my page.
First, I added some layered pieces of patterned paper and paper doilies for my photo mat in the main focal area of my layout. (You can see how I held the layers together using staples before I adhered the bundle onto the page.) I also added some small torn pieces of washi tape and some wood veneer stars.
Next, I added some frayed gauze and wood veneer circles, which I wrapped with some pip berry stems. I also added a loose piece of stem, which I twisted around a bit before stapling to my page. (Paper doilies, washi tape, wood veneer pieces and pip berry stems all from D-lish Scraps.)
I then added a Charms Creations star onto the corner of my photo, which I layered with a Flutterby Designs flair button.
The next step was to add a touch of bling, so I scattered a few gold sequins around my page. This helped give the page a bit of extra depth, and also helped tie in the gold colour further.
The final steps in my process were to add my handwritten journaling; a few stamped phrases and date; and a bit of splatter (of course!) Instead of my traditional black, I opted instead to use Coffee Colour Spray for my splatter for a slightly softer look. (I simply took the nozzle out of the bottle and flicked it around my page.)
That's all from me today, I hope I have inspired you to get your Colour Blast products out and put them to good use. Don't forget to you can share your own creations with us in the Colour Blast Creative Corner on Facebook, and you can also ask questions of any of our team members too.
I will be back again in a couple of weeks time with another project to share. Until then, happy scrapping!


what an awesome page sue! love all the layers and depth.
ReplyDelete