Showing posts with label Linda Pearson. Show all posts

Monday, 14 November 2022

Bricks and mortar by Linda Pearson

 
For today’s blog entry I was feeling in a painterly mood and wanted to try out a new technique using a stamp in a different way.  I chose the City Lights stamp and the Distressed Bricks A5 stencil to create this painting.  The substrate I used was a canvas media board from Dina Wakely but a heavy cardstock (350gsm +), journal or canvas can easily be utilised.
 
Bee Arty products used in the project:
 
City lights clear stamp set
Shimmer dust – (assorted colours)
Mica powder – (assorted colours)
Distressed bricks A5 stencil (Rustic Dreams collection)
Catalyst silicone mini blades tool
Craft Powder Spoon
Darice 6 well paint palette
 
Bee Arty has a variety of stamps that could be used alternatively with this process:
Eye spy clear stamp set
Kind heart clear stamp set
New dawn clear stamp set
Serendipity clear stamp set
Time flies clear stamp set
Zen red rubber stamp set
 
Other products used:
Moulding paste (thick texture paste)
Dina Wakley media board
Dark brown (umber) fluid paint
Dark brown archival ink and blending tool


Apply a layer of texture paste through the
Distressed bricks A5 stencil (Rustic Dreams collection) over the top section of the media board using a Catalyst silicone mini blades tool.  While still wet apply a liberal amount of textured paste over the rest of the substrate.


Press firmly the City lights clear stamp set into the wet texture paste to form a good impression in the paste.   Remove stamp and allow to dry thoroughly as watery mixes of colour will be added to the dried paste.


In the Darice 6 well paint palette add small amounts of Shimmer dust in a variety of colours to suit the stamped and stencilled images.  Using a small round brush to colour the images as desired.  Please note: some colours were mixed together and some Mica powder was added to produce colours also.   Also the water mixes may activate the textured paste if not died sufficiently before adding colour to piece.  Allow to dry thoroughly when complete.


Add detailing to the image by using a darker brown (or appropriate colour e.g. black to suit colour choices).  A fluid mix is required and a fine liner brush to add the brown colour to the shape of the indented sections of the stamped image.
Distress around the border of the substrate with dark brown archival ink and blending tool.
 
Thank you for stopping by, look forward to sharing with you again soon.
Cheers from Linda


linda@yourcreativepalette.com.au
FB:  inspired art journalling group


Monday, 15 August 2022

Pursue your passion by Linda Pearson


Rustic Blossum Collection by Queenie Y released mid-August -  Bee Arty Kit Club

This kit is due for release 15th August, 2022.


Alphabet A6 stencil

Owl Remember cut out sheet

Rustic owl small tag sheet

Story time word sheet

Gear Up cardstock

Keylock metal die

White Cardstock – Bee Arty  250gsm

Metal cogs pack

Large white No 10 Tag

Archival stamp pad acorn (darkish brown)

Rose Gold foil cardstock

Blending Tool/with foam tip

Black gel pen

Liquid glue

Twine

Paint – Paper Artsy-Caramel  Dina Wakley-Sage


Mix some sage paint into some caramel, use a dry-brush method to spread the paint over the tag.


Distress the edges blending tool with Acorn stamp pad.

Using the Alphabet A6 stencil apply acorn stamp colour though the stencil randomly over the tag.


Run the Keylock metal cog dies through the machine using rose gold foil cardstock.

Distress the cogs with acorn archival stamp ink.

Fussy cut some flower elements from the Owl Remember cut out sheet.

Outline these elements with black fine gel pen.


Cut the owl card from the Rustic Owl small tag sheet.

Distress the edges with Acorn archival stamp ink.

Add the owl tag to lower right-hand side of the tag with foam tape.

Arrange all the elements onto the card, layering the die cut shapes, flowers and metal cogs under, over and around the owl tag. Adhere with liquid glue when happy with layout.


Cut the wording from the Story Time word sheet.

Distress the words with Acorn archival stamp ink.

Add foam tape behind and adhere to the tag.

Loop twine trim through the hole.


Cut the Gear Up cardstock to A4 size or larger than the tag (I subsequently adhered the completed project into my Dina Wakley Denim journal book … I painted the background the same colour as the tag.


To prepare the cardstock, distress the edges with scissors or distressing tool.

Then wet the edges with water to further distress the paper.


Thank you for stopping by and hope you are encouraged to give this collection a go, click on this link to join the kit club Bee Arty Kit Club.


Check in again soon …. BYE for now …. from Linda

linda@yourcreativepalette.com.au

Facebook group inspired art journaling

Monday, 1 August 2022

You were meant to STAND OUT! By Linda Pearson


 Moonshadows paper collection pack

Garden blue 12x12 scrapbooking paper

Dragonfly dance 12x12 scrapbooking paper

Favourite 12x12 scrapbooking paper

Borderline A4 stencil

Eclipse 12x12 scrapbooking paper

Celebrate banner clear stamp set

Versamark Stamp pad translucent

Embossing powder – Purple sparkle

Calypso Teal shimmer paint

Silicone sponge

Purple paint pen

Foam Tape

Teal archival ink pad

Blending tool and foam tip


Cut the Favourite 12x12 scrapbooking paper to A4 size.

Pounce Teal paint through the floral section of the Borderline A4 stencil with a silicone sponge.

Outline the stenciled area with purple paint pen.


Add the star stamp from the Celebrate banner clear stamp set using Versamark Stamp pad translucent, sprinkle with Embossing powder – purple sparkle and heat set, add to top and bottom of page.


Cut circle shapes of different sizes from the Garden blue 12x12 scrapbooking paper

Dragonfly dance 12x12 scrapbooking paper

(3 large and 4 smaller circles).  Distress the edges with Teal archival ink and blending tool.

From the Eclipse 12x12 scrapbooking paper fussy cut out several flowers and butterflies.


Assemble all the circle elements to the page using liquid glue. 

Add the cut-out elements (flowers and butterflies) with foam tape. 

Glue the sentiment words to the page.

Distress the border with Teal archival ink and draw lined border with purple paint pen.


Thank you for stopping bye and look forward to sharing with you next time.


Bye for now from Linda


linda@yourcreativepalette.com.au


Monday, 20 June 2022

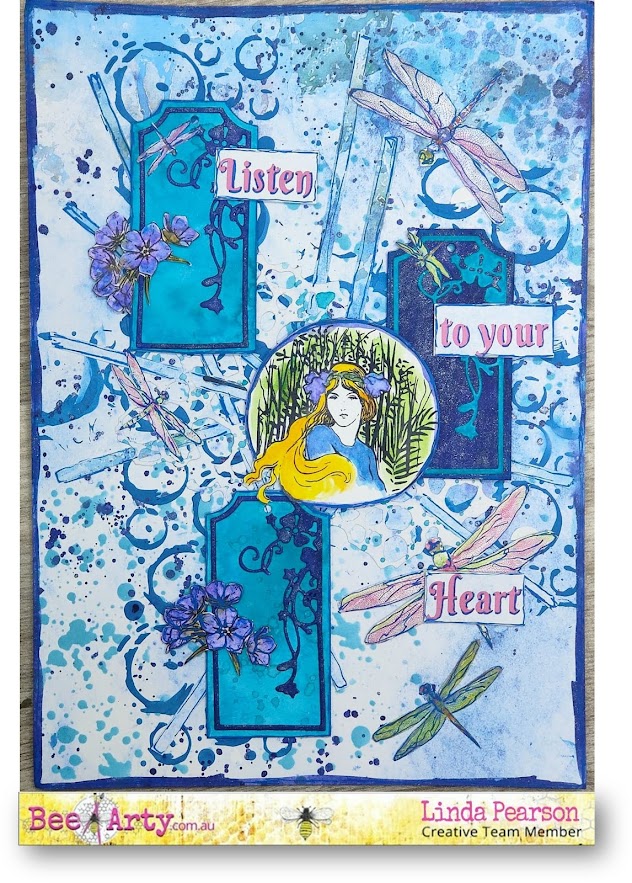
Listen to your heart by Linda Pearson

Today’s journal page has been created using the Moonshadows Collection by Sue Smyth.  This beautifully designed serene paper collection will be available later this week. 

To ensure you don’t miss your chance to work with these beautiful papers and inspiring mixed media tools, subscribe today to receive your kit … Bee Arty Kit Club


Moonshadows collection designed by Smyth

Moonshine word cardstock (side B)

Dragonfly dance cardstock

Collection cut-out sheet

Borderline A4 stencil

Moondust A5 stencil

Floral Tags metal die

Moonrock metal die

White Cardstock – Bee Arty A4

Bee Arty Shimmer dust – peacock, cobalt, passion

Bee Arty Colour Spray lagoon + drop of grass Colour artist inks

Darice 6 well paint palette

Mini archival ink pad – Garden Patina

Blending tool / foam tip

Modelling paste

Mounting tape

Water colour paints

Paint pen – royal blue

Liquid adhesive
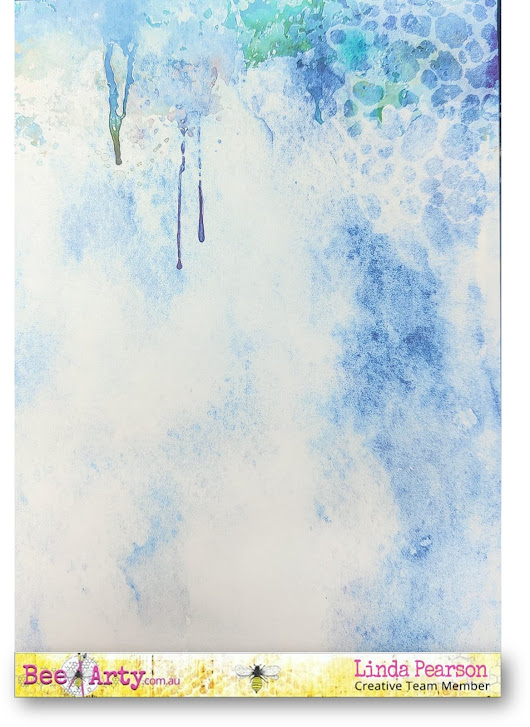
 

Cut the Moonshine word sheet (side B) down to A4 size.


Rub the Garden Patina (archival ink) through the Moondust A5 stencil using a domed blending tool diagonally across the page (top right to bottom left)


Add a few scoops of Bee Arty Shimmer dust cobalt into modelling paste, add a little white paint to match the blue of the Moonshine cardstock.
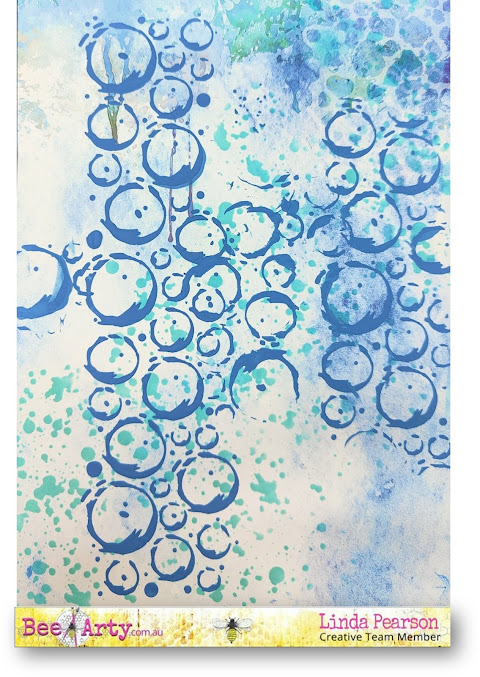


Apply the blue modelling paste through the ‘circles’ section of the Borderline A4 stencil with a palette knife in a loose cross shape.  Allow to dry.


Add a couple of scoops of Bee Arty Shimmer dust – Passion and one scoop of cobalt Shimmer dust into a Darice 6 well paint palette add some water and mix.  

Splatter this mix mostly over the textured stencil area and also paint around the border of the page.


Run the Floral Tags metal die through a diecut machine onto a sheet of A4 White Cardstock – Bee Arty to create 3 tags.

Also run the Moonrock metal die through onto a piece of A4 White Cardstock – Bee Arty. (no image).
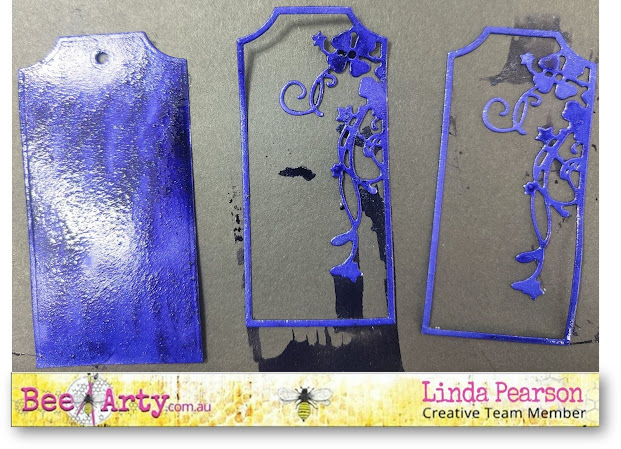


Colour one of the backing tag pieces and two of the floral diecuts with passion/cobalt Bee Arty Shimmer dust mix.
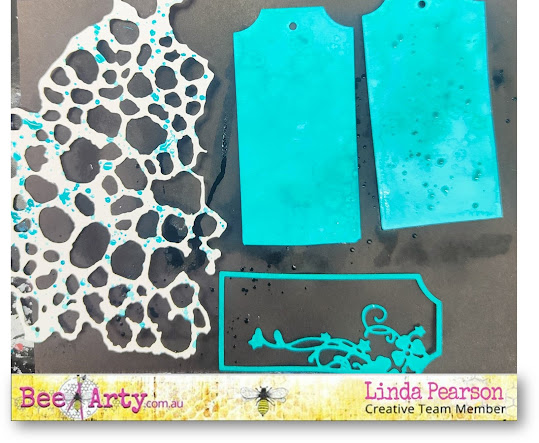


Colour the remaining pieces with a watery mix of peacock  Bee Arty Shimmer dust. 

Add some splatters in same colour over the Moonrock metal die.

Please note ... in hindsight I should have coloured the Moonrock metal die with the cobalt/passion mix so that it stands out on the page ... you may wish to do this instead.
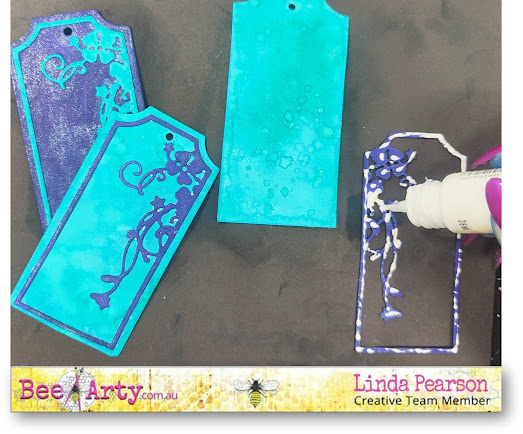


Glue the 3 floral pieces to the tag backings using opposite colours to create focal points.
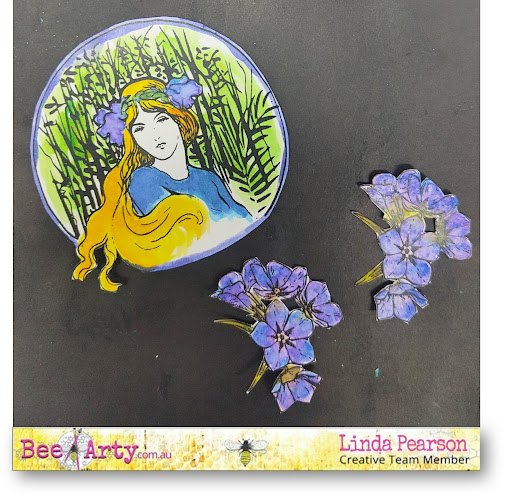


Fussy cut a few images from the Collection cut-out sheet then colour in with water colour paints.
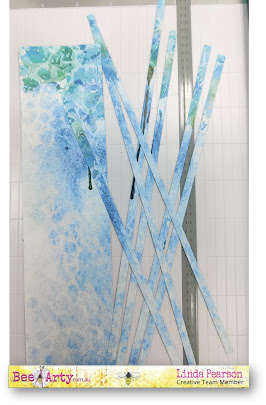


Cut some thin (7) strips from the leftover piece of the Moonshine word sheet (side B) with paper cutter.  

Then loosely weave the strips randomly through the Moonrock metal die cut out to resemble a starburst shape.  

Trim to suit the background.


With a royal blue paint pen edge along the strips of paper to visually lift them from the page a little.
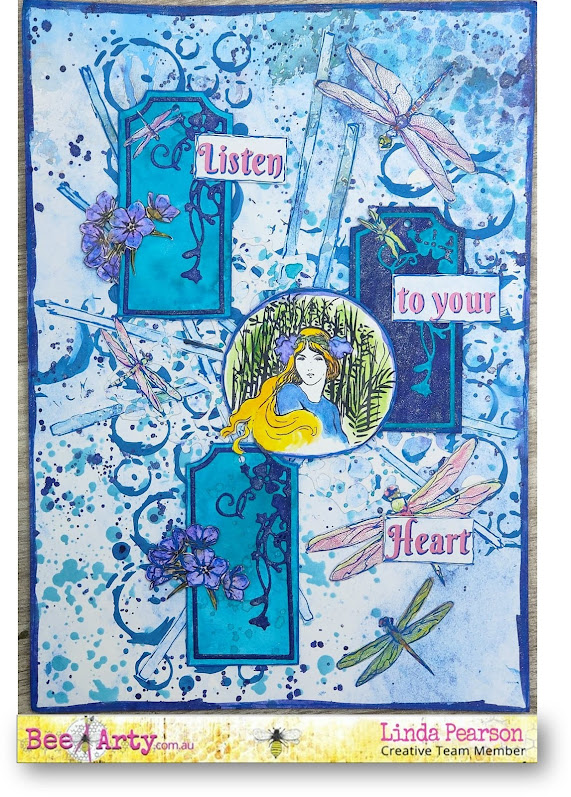


Fussy cut several dragonflies from the Dragonfly dance cardstock and some wording from the Moonshine word cardstock.  Arrange all the elements on the page then add mounting tape to the tags, goddess image and wording then adhere to the page.

Add detailing with the royal blue paint pen to all the elements (dragonflies, tags, wording) to finish.

I certainly hope you have found some inspiration with my journal page and have been enticed to order this collection for yourself.


Until next time … happy creating!!



 Cheers from Linda Pearson

YourCreativePaletteAU (Facebook)


Monday, 9 May 2022

Creative Soul by Linda Pearson


For this project I used some elements from the new and amazing Bee the Sunshine Paper Collection Pack designed by Fiona Paltridge.  

This art journal page could be altered to include a photo to the layout if desired.


Products used to create the journal page listed below ... 

Bee the Sunshine Paper Collection Pack

Find your way clear stamp set

Floral arrangement clear stamp set

Gracious 12x12 scrapbook paper (reverse side - 1 quarter)

Honey 12x12 scrapbook paper – word sheet

Sunny days 12x12 scrapbook paper

Kindness 12x12 scrapbook paper (glass jar)

Pretty fields 12x12 scrapbook paper (reverse side)

Embossing powder – stormy weather

Versamark Stamp pad translucent

Dina Wakley Sedona acrylic paint

Carnation Pink and white paint

Paper doyley or mandala stencil

Mounting Tape

Cardboard off cuts

Double sided tape

Co-ordinating coloured twine

Archival Ink – smoked hickory

Blending tool


 Using the reverse side of the Pretty fields 12x12 scrapbook paper (reverse side) add the Find your way stamp with Versamark ink pad and stormy weather Embossing powder.  Heat set the powder with heat gun.

Cut out the glass jar tag from the Sunny days 12x12 scrapbook paper. Add some ghost stamping to the edges with the Find your way clear stamp set and black archival ink.

Fold the square doyley to form a smaller strip, colour the doyley with carnation pink and white paint pounced over the doyley.


 Add splatters using DW Sedona acrylic paint to the scrapbook paper, doyley and the glass jar tag.

Distress the edges of all cut outs with smoked hickory Archival Ink.


 Using an off cut of coloured scrapbook paper stamp some elements from the Floral arrangement clear stamp set with Versamark Stamp pad translucent, coated in stormy weather Embossing powder, heat set with heat gun. Fussy cut the stamped elements.


Add cut cardboard to suit both the cut paper sections. Add double sided tape to both pieces also.

Add double sided tape to the backside of doyley.


Add all the layers to the background cardstock; doyley, the ‘bee’ image from the Gracious 12x12 scrapbook paper, then finally add the glass jar tag. 


Adhere the fussy cut floral elements to the glass jar.  Add detailing using a coordinating paint pen.

Adhere the coloured twine under the glass jar card.

Cut the bee tag and wording from the Honey 12x12 scrapbook paper word sheet, adhere to the page using mounting tape.


 Thank you for stopping by and look forward to creating for you again very soon.  

 Bye for now!  cheers from Linda 

linda@yourcreativepalette.com.au