Tuesday, 28 February 2017

There May Be Something There by Melinda Sweetman

Hello, hello!! Melinda here with you today sharing an art journal page I put together using some of the beautiful Colour Blast products!

Here is my completed page, can you guess which movie I was totally inspired by?! Haha


If you guessed Beauty and The Beast you would be spot on. It is after all my fave all time Disney princess movie and to say I am excited about the new movie coming out would be an understatement!

First up, a quick coat of Black Heavy Gesso - this stuff is gorgeous, easy to apply and when it dries it is beautifully smooth and black.


Next up a quick spray of the oh so pretty Bling Colour Shimmer Spray through a brick stencil. I then stamped off the excess back onto the page in a couple of places. (I totally got caught up in the process of playing and forgot an in progress shot but this is a close up of the stencil work after it had dried).


My whole reason behind creating this page was I had picked up this gorgeous Prima stencil and have recently received my DT order which included the Apple of My Eye Colour Paste and I just knew they were made for each other so I used both the Apple of My Eye and the Fire Engine Colour Paste through the rose part of the stencil and as that was drying I knew this was going to be my ode to Beauty and The Beast ;)


And so as not to waste any precious paste I had another art journal open, awaiting product. I flipped over the rose stencil and applied the excess to another page....


Next up, while all that beautiful texture was drying I worked on my title/quote. I decided to use some thickers but the colour didn't really work (LOVED the font) so I grabbed my Lipstick Colour Embossing Powder, my embossing ink and set to work.


At this point I added in my doodling for the jar with a white acrylic paint pen and also 3 more quotes from the movie with a gold acrylic paint pen.

I decided I wanted a little extra texture in the background so another stencil, this time with Bling Colour Paste, in 3 places. And I spread the excess off onto the other page, again, I can't bring myself to just wash this gorgeous stuff down the sink!! It was late at this stage so I left that to air dry over night.


The next morning it was all dry and I was loving how it looked. Time to finish it off!! I used my wet adhesive to stick down the thicker letters and some little clear alpha stickers for the in between words. 

I really love how this turned out, I do love to just play and see where I end up. Helps to have amazing products to play with!! 

Here are a couple of close ups and a link to my YT process video if you would like to watch my page come together.


Thanks so much for stopping by and have a fabulous day!


Melinda


Monday, 27 February 2017

Just Me by Amy Prior

Hi there Colour Blast fans!!! Amy Prior back with you all again today, this time sharing another scrapbook page step by step featuring products from 7 Dots Studio Writer's Block Collection alongside some Colour Blast goodies.


Step 1: Rip the top and bottom sections of a lighter piece of patterned paper ready to place over the top of a darker piece of patterned paper. Set the darker piece of paper to the side ready to mount the top piece later. 


Step 2: Using a paint brush, add some Stormy Weather Colour Shimmer Spray in messy looking puddles.


Step 2(continued): Create a diamond shape with the paint brush but avoid stroking. Dab the paint brush up and down to create a more organic look. 


Step 3: Once dry, layer various 7 Dots Studio Writer's Block papers, and embellishments together with some flowers underneath the photograph.


Lots of gorgeous & Dots Studio Writer's Block embellishments finished off this layout perfectly.


Instead of using a title for this page, I have added a few of the word stickers from 7 Dots Studio as little titles everywhere.


Well that is it from me today, thanks so much for stopping by and until next time, happy scrapping!

Amy Prior xx

Sunday, 26 February 2017

#goodtimes layout by Farrel Tailor

Hello CB fans!!! Farrel here to share you my recent layout using the ever so yummy Colour Blast Pastes, Colour Sprays and Embossing Powder.


I just can't seem to stay away from these colours and they matched our summer holiday photos perfectly!!! So let me show you the process in creating this fun and super quick layout.

I started off by lightly coating my white cardstock with gel medium. Once it was dry, I then cut a piece of plastic packaging I had left over from some flowers and mixed some Lush Colour Shimmer Dust and water into a mister bottle and sprayed onto the plastic.


I then placed the plastic onto my layout to create a watercolour pattern.

I gave it a quick heat dry and then used the same technique with Sapphire  Colour Spray and Saffron  Colour Spray. Making sure I dried in between colours.


I then spread some Deep Water  Colour Paste through a stencil randomly over my layout.


Next I decided to use the negatives of some chipboard and applied a light coat of White Heavy Gesso and then applied Sunshine  Colour Embossing Powder. 


Here are some close ups of the Colour Embossing Powder and Colour Paste.


Hopefully this inspired you to create with your happy colours!!!
Thanks for dropping by 

Until next time - Happy Scrappin xx


Saturday, 25 February 2017

All you need is love... Journal page by Skai Mitchell


I was so lucky to have spent a long weekend with some amazingly talented ladies at Hunter Valley Retreat recently, and had the opportunity to really get my stash of Colour Blast products out and play with them, without kids and cats interrupting.

I have to say, the Colour Shimmer Dusts are my favourite product to play with right now. They are super versatile and the effects you can get just playing with different amounts of water and its application is endless. 

Inspired by the super rad Lisa Oxley and her journal pages, I've created this journal spread dedicated to love. 


I began by applying a layer of Black Gesso to my journal with a old credit card. You can see I've done a few layers and kept it messy and textural.

Next I've used the White Gesso and applied it randomly using some bubble wrap.

Now for the fun part!

I ripped a few pages out of my journal and gathered my Colour Shimmer Dusts, dry paint brush, water and isopropyl rubbing alcohol. 

My first page was done in blues, and I've used Navy, Cobalt and Duke to create this page. Layering is essential, and added each colour on its own with a dry paint brush and sprayed with water, drying some portions in between. This take practice, so just have fun playing with the water and the way it pools. 

The isopropyl rubbing alcohol can be added in flicks while the water is still wet, and it give beautiful colour rings...

I've re-created the same technique where with Candy, Lollipop and Passion Colour Shimmer Dusts. How amazing it that shine!

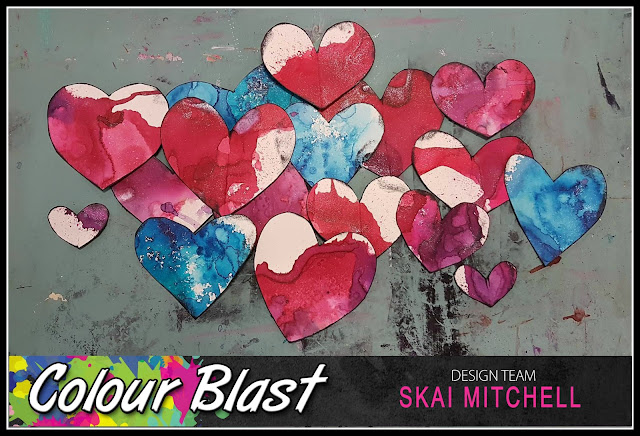
Next I've cut out a stack of hearts in random sizes and inked the edges with Black Stazon

To stamp my title with some large Heidi Swapp foam alpha stamps I've mixed up some Lollipop Colour Shimmer Dust in my pallet with some White Gesso. Use your pallet knife to mix it well.. 


Layer up your hearts onto your page, add your title and define your edges with a white pen, and you have a complete journal page. 


Thank you for popping by. Dont forget to add your art to our Colour Blast Creative Corner page on Facebook. I'd love to see what you come up with using these amazing products.


Friday, 24 February 2017

Best Boss Ever- Fiona Hughes


Hello my crafting friends, I'm back today to share this layout of my youngest child, Angus & his Boss, Adam.
They have a really fun relationship, which I really wanted to demonstrate in this layout.


Ok, so first I started with the Colour Shimmer Dust in Midnight and Navy... First wetting down my heavy white cardstock and sprinkling the Colour Shimmer Dusts over the page randomly.
I then sprayed it some more water, to activate the amazing colours.


I dried this with my heat tool.... too impatient to let it dry naturally.
Once dried you can see the beautiful shimmer.... spectacular!


Looking pretty random right now isn't it!
Now I add some splatters using Colour Shimmer Spray Snow White &  Colour Spray -Sapphire
for some more detail.


While my splatters were drying, I again used the Colour Spray in Sapphire to colour my canvas star. I also coloured some medical gauze with  Colour Shimmer Spray- Stormy Weather, & allowed them to dry.


My background is now dry so it's time to add some texture.
I grab a stencil and some Colour Paste in Steel, and worked it through the stencil horizontally across the page.. and allowed to dry.


I chose a circular shaped piece of chippie &  heat embossed it, using Colour Embossing Powder- Snow White, to give a sort of cosmic vibe.


A few extra splatters in Colour Shimmer Spray- Stormy Weather & Colour Spray- Road Base to finish the background.

Then finally putting it all together, after matting this pic on some off-cuts of patterned papers.


Quite a masculine layout.  Thanks for looking. Until next time, happy crafting.

Cheers, Fiona.