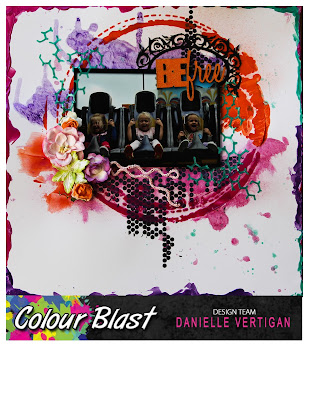
Yay its my turn!!!
Today is my first official blog post as a Design team member for Colour Blast
and I'm a complete newbie so its going to be fun!!!

I was so excited when these goodies arrived and I know you wont be disappointed when you play with them!
My challenge to myself was to see how I could use the Colour Pastes differently and they certainly are fun to play with!! The Shimmer is DIVINE!!! Not to mention the depth of colour that intensifies as it dries!
My first Step was an application through the stencil of Stormy Weather.
Its smooth, clean and fast drying. The product itself is super light and goes a long way.
Next was to mix up a pea size of Rose Petal with some water to create a water paint. I applied it with a brush and allowed the water to run around the page as directing it with movement. splatters also worked well by flicking my brush.
It also dried with the same shimmer.
Once dried I layered a second stencil over the top.
I love layers!! I created a mix with the colour using Rose Petal and Tangareen Dream blending them on the left.
Any excess on my spatula was used to create the smears.
No wastage.....
once dried I repeated the water colour process using Royalty.
I turned the project upside down tapping it on my work station to help create the reverse drips.
When almost dry I added some extra paste to my water colouring with a paint brush to help add a little more intensity and give some roughage to the surface.
Then finished off with a flick of the Shimmer Spray Stalk, Envy around the top and bottom right.
Through my stencil using Envy I applied the paste to my craft mat and waited for it to dry.
Will definitely be doing more of this.
I was able to use my stencil around my page and layer it on my photo which was foam taped for dimension with no mess! I used my skewer to help add glue (Keeps your fingers clean) and away I went.
You can see how the chicken wire is able to wrap into the photo. I couldn't pass the layout by without embossing my title and WOW! What a product!! Love, Love, Love it!!
Plenty more playing with that to be done!
A little layer of colour with the paste and the spatulas around the edges to create a frame and we are done! Even with this technique you can layer the paste without the colours blending or bleeding.
I hope you enjoyed my little journey. Don't forget to pop on over to www.colourblastaust.com.au for all these amazing products.
Thanks for stopping by and till next time


Beautiful and awesome tutorial.
ReplyDeleteThanks Anguree, I'm glad you enjoyed it! It was a lot of fun to create 😊
ReplyDelete