Showing posts with label memory maze. Show all posts

Saturday, 29 June 2019

Last post by Suzanne Franin


Hey Everyone Suzanne here

This is my last post for Colour Blast I've decided to step down for health reasons 
I will miss posting projects using these awesome Australian products as we don't have too many too choose from these days
I want to say a HUGE Thank You to Tenisha for choosing me to be on her team and to Kaye for all the hard work she does behind the scenes 
Also to the Design Team thank you you've all been great to work with xxxx

So for my final project, I created a Steampunk type creation using the Limited Edition Paper RangeSienna Colour PasteColour Shimmer Brush Markers - Silver and Gold and lots of cogs from Memory Maze as well as some metal and a clear cabochon over one of her eyeglasses 


I used the clocks and cogs piece from the Stand Out Limited Edition Range and roughed up the edges with the scissors
I then used the strip with the brads on it from the Exception paper from the same range
And from the Glorious paper, I fussy cut out the girl the globe bug and the key
I also used the scissors to rough the edges then used the Coffee Archival ink to go around the edges of everything
I used the White Heavy Gesso on all the Memory Maze Chipboard pieces
With the cogs, I wanted a metallic look so I used Silver and Gold Colour Shimmer Brush Markers
For some added texture and colour I added scrapes of  Sienna Colour Paste

Here you can see the cabachon I added to her eyeglass


Here's a closer look at the cogs and other metal pieces I added 
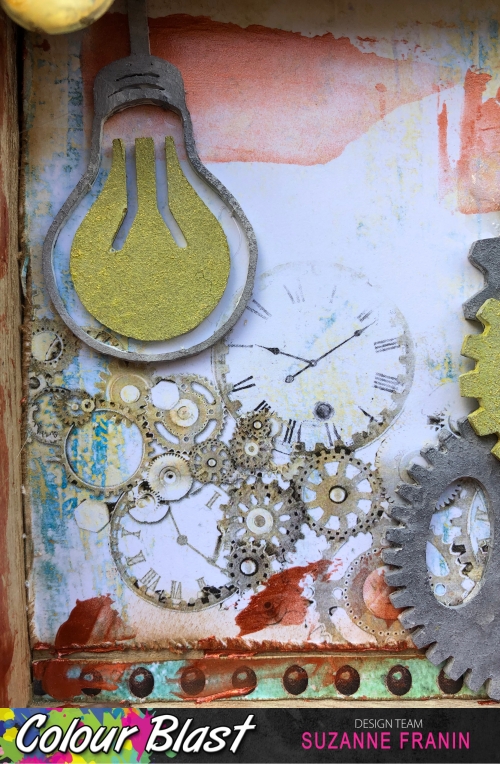
I love the cogs and clocks on the piece I cut out and the Light globe I added from Memory Maze 
I loved the Globe Bugs that are on the paper but in my stash, I had small globes so I thought I would use one over the top for added dimension
Being steampunk themed they use a lot of metal and a lot of the men have moustaches so I thought it only appropriate I add one
Here I added a large metal brad that I have had for years and I stuck the key from the papers I had fussy cut out on it 
I also added a watch because they always have pocket watches and this was the closest to a pocket watch I had 
I then added an Embellish With Flair Vintage Map Flair as it fitted so well with everything


Tuesday, 4 June 2019

You & Me by Suzanne Franin

Hey Everyone Suzanne here

This week's Colour Blast project I HAD to use the new stencil I'd gotten Colour Blast Boho Mandala Stencil from the Follow Your Dreams range it's so pretty  

Make sure you check out the Shop for the latest releases 
Also, check out our Stockists for our range of products and help out a small business

Look at these two how gorgeous are they 
Mum took them to one of those pop-up shops where they take the pictures in the shopping centres and had a whole heap of photos done and when I saw them I asked if I could do a canvas of one of the photos she said for sure not knowing what I was going to do
It was so hard to pick as there were so many of them together and apart but this was the most fun out of all of them
And lucky for me their mum loved it

 I used the Colour Blast White Heavy Gesso on all the embellishments and the canvas to prime everything so that whatever medium I was going to use on them would adhere with no problem  
I used the Colour Blast Boho Mandala  Stencil from the Follow Your Dreams range with some clear impasto
I'd have to say this is my new favourite stencil it's so pretty
 

With the background, it took a while to work out what colour to go with I was going to do it in Snow White Shimmer Cube but the Lady I made it for said the other colour she liked was purple (she hadn't seen what I was doing with the photo until I was finished)
So I used the Colour Shimmer Cube Royalty 

 I used the Colour Artist Ink Slipper and some water for the flowers as they weren't white and didn't look right 
I also used it on a few of the other embellishments

 I used a Flair from Embellish With Flair it's from the You Make Me Smile Set
I also used some Cocoa Vanilla Studio Happiness Accessory Stickers and Die Cut Ephemera set
 The Heart is from Finnabair and I filled it with some Silver Art Ingredients Glass Glitter and used a Cocoa Vanilla Studio saying sticker from the Happiness collection to put on top same as I did with the saying on the arrow
The chipboard arrow is from a Memory Maze Set Arrow love me and you

Thank you for visiting and I hope you will come back soon x


Monday, 11 February 2019

Imagine by Suzanne Franin


Hey Everyone Suzanne here

My turn on the Colour Blast Blog - make sure you check out the rest of the blog for lots of inspiration and check out the Colour Blast Kit Club - Check what kit would suit you 
It's so convenient everything you need all in one box 

I found this picture of John Lennon with the words to the song Imagine 
It's such a powerful song which we all need to read and do


I primed the canvas with the Colour Blast Heavy White Gesso


I used four different Colour Pastes - Apple of my Eye, Fire Engine, Sunshine and Tangerine Dream


 I used the four different Colour Pastes through the Memory Maze Pavement Stencil scraping each colour letting them overlap here and there
I liked the look of it as it was similar to the photo of John Lennon 


Here I'm rubbing some Dorland's Wax Medium over the paste - 1 it helps the paste from sticking to other thing and two it helps make the effect below (I'm sure there are lots more things I can use it for but we'll get to those)


Once I've heated where the wax is it bubbles all over and gives the pattern a really cool look


I sprayed a paper clay border with Colour Spray Carribean for a different pop of colour


I used Tim Holtz Idea-ology Small Talk sticker quote that I thought appropriate 


Here I used a Kaisercraft flower, a metal clock face from my stash and a Memory Maze Acrylic Deer Head


I used a Tim Holtz Transparency Globe an old Making Memories ribbon slide and a paper clay man from mum 


Thank you for visiting and I hope you come back soon x


Monday, 5 November 2018

Roses by Suzanne Franin


Hey Everyone Suzanne here

So for my creation this week for the blog I decided to try something out on a hoop I made my own gritty texture paste and I wanted it to be rusty 
Make sure you take look around the rest of the blog and if you have a product that you have and aren't sure how to use search it and projects that have used that product should come up and give you some ideas


I made a mix of decorative stones which are tiny stones, texture powder and impasto making sure it was mixed completelyI then went around the side and one edge of the outer hoop as the inside hoop would be covered by the calico


I then used Colour Artist Ink Rust and Colour Shimmer Spray Leather mixing them as I went to try and get the colour I was after but it didn't turn out how I wanted


So I made a mix of of Colour Mica Powder Espresso and some Gem Stone Glue from Helmar so the shimmer would stay instead of using clear gesso which takes the shimmer away


Then I used some of my large collection of the timber from the backs of the canvases (I collect them all they come in handy for all sorts of things) and arranged them into this pattern which isn't really anything


I then used Colour Paste Blush with a Rose stencil on the timber pieces (I wasn't sure how it would work but I like it)


I love when you use the colour pastes how the colours change when they dry


I then added a sprig of flowers that has some birds on it as well


Then I added some metal embellishments for a contrast colour and a different texture


Can't go past some Bling from Memory Maze


And these gorgeous Mermaid Balls that my mum gave me I have so many different colours in them they are so pretty


This is a side view of the hoop so you can see the texture


And another so you can see the shimmer of the Colour Mica Powder


Thank you for visiting and I hope you will come back soon x